레이블이 power9인 게시물을 표시합니다. 모든 게시물 표시

2020년 12월 8일 화요일

IBM PowerAI (Watson ML Community Edition)이 설치된 Ubuntu ppc64le 기반의 docker image 만들기


먼저 다음 링크를 참조하여 ppc64le (IBM POWER9) nvidia-docker2 환경에서 Ubuntu 기반의 docker image를 만듭니다.  


http://hwengineer.blogspot.com/2019/05/ppc64le-ibm-power9-nvidia-docker2.html


참고로 ppc64le (IBM POWER9)에서의 CUDA 설치는 NVIDIA CUDA download page의 안내와 같이 아래처럼 진행하시면 됩니다.


# wget https://developer.download.nvidia.com/compute/cuda/repos/ubuntu1804/ppc64el/cuda-repo-ubuntu1804_10.1.105-1_ppc64el.deb

# dpkg -i cuda-repo-ubuntu1804_10.1.105-1_ppc64el.deb

# apt-key adv --fetch-keys http://developer.download.nvidia.com/compute/cuda/repos/ubuntu1804/ppc64el/7fa2af80.pub

# apt-get update

# apt-get install cuda


또는 이미 만들어둔 docker image를 다음과 같이 pull 해와도 됩니다.


# docker pull bsyu/ubuntu18.04_cuda10-1_ppc64le:v0.1


이렇게 pull 받아온 docker image를 확인합니다.


root@unigpu:/files/docker# docker images

REPOSITORY                          TAG                 IMAGE ID            CREATED             SIZE

bsyu/ubuntu18.04_cuda10-1_ppc64le   v0.1                ef8dd4d654e7        2 hours ago         6.33GB

ubuntu                              18.04               ecc8dc2e4170        4 weeks ago         106MB


이 image를 다음과 같이 구동합니다.  


root@unigpu:/files/docker# docker run --runtime=nvidia -ti --rm bsyu/ubuntu18.04_cuda10-1_ppc64lel:v0.1 bash


이제 그 image 속에서 다음과 같이 IBM PowerAI (IBM Watson ML Community Edition)을 설치합니다.  이는 IBM이 마련한 conda channel을 등록하고 거기에서 conda install 명령을 수행하는 방식으로 설치됩니다.


# conda config --prepend channels https://public.dhe.ibm.com/ibmdl/export/pub/software/server/ibm-ai/conda/


# conda create --name wmlce_env python=3.6


# conda activate wmlce_env


# apt-get install openssh-server


# conda install powerai     


위와 같이 conda install powerai 명령을 내리면 tensorflow 뿐만 아니라 caffe, pytorch 등이 모두 설치됩니다.  가령 Tensorflow 1.14만 설치하고자 한다면 위 명령 대신 conda install tensorflow=1.14를 수행하시면 됩니다.


powerai 전체 package 설치는 network 사정에 따라 1~2시간이 걸리기도 합니다.  설치가 완료되면 다음과 같이 docker commit하여 docker image를 저장합니다.


# docker ps -a

CONTAINER ID        IMAGE                                   COMMAND             CREATED             STATUS              PORTS               NAMES

45fb663f025c        bsyu/ubuntu18.04_cuda10-1_ppc64le:v0.1   "bash"              42 seconds ago      Up 39 seconds                           elastic_gates


이어서 v0.2 등의 새로운 tag로 commit 하시면 됩니다.


[root@ac922 docker]# docker commit 45fb663f025c bsyu/ubuntu18.04_cuda10-1_ppc64le:v0.2


아래는 그렇게 만들어진 docker image들의 사용예입니다.   제가 만든 그런 image들은 https://hub.docker.com/u/bsyu 에 올려져 있습니다.


root@unigpu:~# docker run --runtime=nvidia -ti --rm bsyu/ubuntu18.04_cuda10-1_tf1.15_pytorch1.2_ppc64le:latest 


(wmlce_env) root@bdbf11e90094:/# python

Python 3.6.10 |Anaconda, Inc.| (default, Mar 26 2020, 00:22:27)

[GCC 7.3.0] on linux

Type "help", "copyright", "credits" or "license" for more information.


>>> import torch


>>> import tensorflow as tf

2020-05-29 04:53:09.637141: I tensorflow/stream_executor/platform/default/dso_loader.cc:44] Successfully opened dynamic library libcudart.so.10.1


>>> sess=tf.Session()

2020-05-29 04:53:20.795027: I tensorflow/stream_executor/platform/default/dso_loader.cc:44] Successfully opened dynamic library libcuda.so.1

2020-05-29 04:53:20.825918: I tensorflow/core/common_runtime/gpu/gpu_device.cc:1639] Found device 0 with properties:

name: Tesla V100-SXM2-16GB major: 7 minor: 0 memoryClockRate(GHz): 1.53

pciBusID: 0004:04:00.0

2020-05-29 04:53:20.827162: I tensorflow/core/common_runtime/gpu/gpu_device.cc:1639] Found device 1 with properties:

name: Tesla V100-SXM2-16GB major: 7 minor: 0 memoryClockRate(GHz): 1.53

pciBusID: 0004:05:00.0

2020-05-29 04:53:20.828421: I tensorflow/core/common_runtime/gpu/gpu_device.cc:1639] Found device 2 with properties:

name: Tesla V100-SXM2-16GB major: 7 minor: 0 memoryClockRate(GHz): 1.53

pciBusID: 0035:03:00.0

2020-05-29 04:53:20.829655: I tensorflow/core/common_runtime/gpu/gpu_device.cc:1639] Found device 3 with properties:

name: Tesla V100-SXM2-16GB major: 7 minor: 0 memoryClockRate(GHz): 1.53

pciBusID: 0035:04:00.0

2020년 10월 27일 화요일

tf_cnn_benchmarks를 이용한 GPU 성능 벤치마크 테스트


Deep learning용 GPU 서버의 성능 측정은 역시 deep learning에 가장 많이 사용되는 tensorflow를 이용한 benchmark test를 돌려보는 것입니다.  구체적으로 어떤 GPU에서는 몇 images/sec의 속도가 나와야 한다는 기준은 존재하지 않습니다.  테스트에 사용되는 neural network의 종류와 사소한 parameter, 그리고 어떤 dataset을 이용하느냐에 따라 그 성능은 천차만별이기 때문입니다.  또 테스트를 위해 labeling된 image dataset을 구하는 것도 쉽지 않습니다.


그런데 이런 어려운 문제를 극복하고 GPU를 이용한 tensorflow를 이용한 benchmark test를 수행하는 방법이 있습니다.  Tensorflow github에 공개된 tf_cnn_benchmarks를 이용하는 것입니다.  이 테스트는 더 이상 update되고 있지는 않지만 다음과 같은 장점이 있어서 아직도 널리 쓰이고 있습니다.


1) 사용방법이 간단

2) GPU 개수를 조절해가며 테스트 가능

3) CPU만으로도 테스트하여 CPU 대비 GPU 성능도 평가 가능

4) Test용 image dataset을 별도로 준비하지 않아도 python code에서 합성하여 사용

5) 성능 평가 수치를 images/sec로 간단명료하게 제시


이를 POWER9 processor를 장착한 IBM POWER 서버에서 수행하기 위해서는 먼저 다음과 같이 anaconda package를 download 받아 설치합니다.


[cecuser@p1226-kvm1 ~]$ wget https://repo.anaconda.com/archive/Anaconda3-2020.07-Linux-ppc64le.sh


[cecuser@p1226-kvm1 ~]$ chmod a+x Anaconda3-2020.07-Linux-ppc64le.sh


[cecuser@p1226-kvm1 ~]$ ./Anaconda3-2020.07-Linux-ppc64le.sh


Do you accept the license terms? [yes|no]

[no] >>> yes


[/home/cecuser/anaconda3] >>>


Do you wish the installer to initialize Anaconda3

by running conda init? [yes|no]

[no] >>> yes


Anaconda 설치가 끝난 뒤 profile을 수행하면 conda environment가 가동됩니다.


[cecuser@p1226-kvm1 ~]$ . ~/.bashrc


(base) [cecuser@p1226-kvm1 ~]$


이제 IBM OPEN-CE (구 명칭 IBM PowerAI 또는 Watson Machine Learning Community Edition), 즉 IBM ppc64le 환경에서 쉽게 deep leanring 관련 open source conda package를 설치할 수 있도록 해주는 conda channel을 등록합니다.


(base) [cecuser@p1226-kvm1 ~]$ conda config --prepend channels https://public.dhe.ibm.com/ibmdl/export/pub/software/server/ibm-ai/conda/


이 tf_cnn_benchmarks는 python 3.6 환경에서 수행하므로 다음과 같이 python 3.6용 conda virtual environment를 생성합니다.  여기서는 이름을 wmlce_env로 정했습니다.


(base) [cecuser@p1226-kvm1 ~]$ conda create --name wmlce_env python=3.6


방금 만든 wmlce_env 환경을 activate 합니다.  


(base) [cecuser@p1226-kvm1 ~]$ conda activate wmlce_env


이제 prompt 맨 앞부분이 (wmlce_env)로 바뀐 것을 보실 수 있습니다.  이제 OPEN-CE를 설치합니다.  구명칭인 PowerAI라는 이름의 패키지를 설치하시면 됩니다.  네트워크 환경에 따라 시간이 꽤 걸릴 수 있습니다.  (30분 ~ 몇 시간)


(wmlce_env) [cecuser@p1226-kvm1 ~]$ conda install powerai


그러고 난 뒤, 다음과 같이 tensorflow의 하위 github인 benchmarks를 clone 합니다.


(wmlce_env) [cecuser@p1226-kvm1 ~]$ git clone https://github.com/tensorflow/benchmarks


이제 그 중 tf_cnn_benchmarks로 들어갑니다.


(wmlce_env) [cecuser@p1226-kvm1 ~]$ cd benchmarks/scripts/tf_cnn_benchmarks


이 directory에 들어있는 tf_cnn_benchmarks.py를 수행하면 됩니다.  이때 다음과 같은 parameter를 주고 수행하면 됩니다.


먼저, GPU를 1개 이용한 테스트입니다.   아래 테스트는 NVIDIA P100 GPU를 이용한 것입니다만 공식적인 수치는 아니며 환경에 따라 또 다른 수치가 나올 수 있으니 참고용으로만 쓰십시요.


(wmlce_env) [cecuser@p1226-kvm1 tf_cnn_benchmarks]$ python tf_cnn_benchmarks.py --num_gpus=1 --batch_size=32 --model=resnet50 --variable_update=parameter_server --data_format=NHWC --num_batches=640


Done warm up

Step    Img/sec total_loss

1       images/sec: 224.9 +/- 0.0 (jitter = 0.0)        8.108

10      images/sec: 225.9 +/- 0.2 (jitter = 0.6)        8.122

20      images/sec: 226.0 +/- 0.2 (jitter = 0.4)        7.983

...

620     images/sec: 221.4 +/- 0.6 (jitter = 0.7)        7.772

630     images/sec: 221.4 +/- 0.6 (jitter = 0.7)        7.676

640     images/sec: 221.5 +/- 0.6 (jitter = 0.7)        7.779

----------------------------------------------------------------

total images/sec: 221.40


만약 GPU 2장을 쓰고 싶으시면 아래와 같이 --num_gpus=1 대신 --num_gpus=2를 쓰시면 됩니다.


(wmlce_env) [cecuser@p1226-kvm1 tf_cnn_benchmarks]$ python tf_cnn_benchmarks.py --num_gpus=2 --batch_size=32 --model=resnet50 --variable_update=parameter_server --data_format=NHWC --num_batches=640


GPU의 성능이 제대로 나오고 있는 것인지 보는 가장 직관적이고 좋은 방법은 이 동일한 테스트를 CPU로 돌려보는 것입니다.  아래와 같이 --device=CPU를 쓰시면 CPU로만 수행이 가능합니다.  역시 CPU 성능 및 개수와 밀접한 상관이 있으므로, 아래 수치는 참고로만 쓰십시요.


(wmlce_env) [cecuser@p1226-kvm1 tf_cnn_benchmarks]$ python tf_cnn_benchmarks.py --device=CPU --batch_size=32 --model=resnet50 --variable_update=parameter_server --data_format=NHWC --num_batches=640


Done warm up

Step    Img/sec total_loss

1       images/sec: 3.0 +/- 0.0 (jitter = 0.0)  8.108

10      images/sec: 3.0 +/- 0.0 (jitter = 0.0)  8.122

20      images/sec: 2.9 +/- 0.0 (jitter = 0.0)  7.983

...

620     images/sec: 2.9 +/- 0.0 (jitter = 0.0)  7.750

630     images/sec: 2.9 +/- 0.0 (jitter = 0.0)  7.667

640     images/sec: 2.9 +/- 0.0 (jitter = 0.0)  7.805

----------------------------------------------------------------

total images/sec: 2.91

----------------------------------------------------------------


참고로 위 GPU 테스트를 수행할 떄의 nvidia-smi tool을 보면 아래와 같이 GPU 사용률을 보여줍니다.  


Tue Oct 20 04:23:57 2020

+-----------------------------------------------------------------------------+

| NVIDIA-SMI 440.33.01    Driver Version: 440.33.01    CUDA Version: 10.2     |

|-------------------------------+----------------------+----------------------+

| GPU  Name        Persistence-M| Bus-Id        Disp.A | Volatile Uncorr. ECC |

| Fan  Temp  Perf  Pwr:Usage/Cap|         Memory-Usage | GPU-Util  Compute M. |

|===============================+======================+======================|

|   0  Tesla P100-SXM2...  On   | 00000001:00:01.0 Off |                    0 |

| N/A   51C    P0   240W / 300W |  15677MiB / 16280MiB |     96%      Default |

+-------------------------------+----------------------+----------------------+


+-----------------------------------------------------------------------------+

| Processes:                                                       GPU Memory |

|  GPU       PID   Type   Process name                             Usage      |

|=============================================================================|

|    0     16243      C   python                                     15667MiB |

+-----------------------------------------------------------------------------+


2020년 7월 6일 월요일

Ubuntu 18.04 (ppc64le, IBM POWER9)에서 잊어버린 root passwd reset 하는 방법


먼저 system booting할 때 petit-boot menu까지 나오면, 거기서 맨 아래줄의 'Exit to shell' 메뉴를 선택합니다.

여기서 'fdisk -l' 명령을 내리면 어떤 disk들이 있는지, 그리고 어느 disk partition에 OS가 들어있는지 보실 수 있습니다.  제가 겪은 경우에는 sda와 sdb의 2개 disk가 있었고, 그 중 sda에서 dm-0, dm-1, dm-2의 3개 device가 보였는데 그 size를 보면 dm-0는 PReP partition, dm-2는 SWAP partition이므로 아마 dm-1이 OS partition이라고 판단되었습니다.  그걸 /mnt에 mount 합니다.

# mount /dev/dm-1 /mnt

이제 이 /mnt 속을 보면 etc나 lib, usr, var 등과 같이 OS가 설치된 것이 보일 것입니다.  이제 chroot 명령으로 /mnt를 /로 바꿉니다.

# chroot /mnt

이제 dm-1 속의 OS image를 /로 mount 한 것입니다.  이제 passwd를 바꿔줍니다.

# passwd

그리고나서 Ctrl-D로 빠져나와 정상적으로 booting하면 됩니다.

2020년 2월 20일 목요일

POWER9 (RHEL 8.1, ppc64le)에서 MariaDB MaxScale을 source로부터 build하기


MaxScale은 MariaDB의 앞단에서 HA 및 query routing, CDC 등을 처리해주는 솔루션입니다.  MariaDB는 물론, mariadb-server-galera도 Red Hat Software Collections (RHSCL)에 포함되어 있습니다만, 현재로서는 MaxScale은 포함되어 있지 않습니다.

하지만 MaxScale은 open source이므로 source로부터 쉽게 build할 수 있습니다.

[cecuser@p606-kvm1 ~]$ cat /etc/redhat-release
Red Hat Enterprise Linux release 8.1 (Ootpa)

먼저 일반적인 개발 환경을 위해 필요한 package들을 설치합니다.

[cecuser@p606-kvm1 ~]$ sudo yum  groupinstall -y "Development Tools"

다음으로는 아래 OS package들을 설치하고, Rambbit-MQ와 Jansson 등의 open source SW를 source로부터 build합니다.  원래 이 과정들은 MaxScale source code package 중에서 포함된 install_build_deps.sh를 수행하면 자동으로 되는 것입니다만, ppc64le에서는 일부 수행 오류가 나는 것이 있어서 다음과 같이 수동으로 수행하면 됩니다.

[cecuser@p606-kvm1 ~]$ sudo yum install -y libtool openssl-devel libaio libaio-devel libedit systemtap-sdt-devel rpm-sign wget gnupg pcre-devel flex rpmdevtools git wget tcl tcl-devel openssl libuuid-devel xz-devel sqlite sqlite-devel pkgconfig lua lua-libs rpm-build createrepo yum-utils gnutls-devel libgcrypt-devel pam-devel libcurl-devel nodejs-devel


[cecuser@p606-kvm1 ~]$ git clone https://github.com/alanxz/rabbitmq-c.git

[cecuser@p606-kvm1 ~]$ cd rabbitmq-c

[cecuser@p606-kvm1 rabbitmq-c]$ git checkout v0.7.1

[cecuser@p606-kvm1 rabbitmq-c]$ sudo make install

[cecuser@p606-kvm1 rabbitmq-c]$ cd ..


[cecuser@p606-kvm1 ~]$ git clone https://github.com/akheron/jansson.git

[cecuser@p606-kvm1 ~]$ cd jansson

[cecuser@p606-kvm1 jansson]$ git checkout v2.9

[cecuser@p606-kvm1 jansson]$ mkdir build && cd build

[cecuser@p606-kvm1 build]$ cmake .. -DCMAKE_INSTALL_PREFIX=/usr -DCMAKE_C_FLAGS=-fPIC -DJANSSON_INSTALL_LIB_DIR=/usr/lib64

[cecuser@p606-kvm1 build]$ make

[cecuser@p606-kvm1 build]$ sudo make install

[cecuser@p606-kvm1 build]$ cd ../..


[cecuser@p606-kvm1 ~]$ wget -q -r -l1 -nH --cut-dirs=2 --no-parent -A.tar.gz --no-directories https://downloads.apache.org/avro/stable/c/

[cecuser@p606-kvm1 ~]$ tar -zxf avro-c-1.9.2.tar.gz

[cecuser@p606-kvm1 ~]$ cd avro-c-1.9.2

[cecuser@p606-kvm1 avro-c-1.9.2]$ mkdir build && cd build

[cecuser@p606-kvm1 build]$ cmake .. -DCMAKE_INSTALL_PREFIX=/usr -DCMAKE_C_FLAGS=-fPIC -DCMAKE_CXX_FLAGS=-fPIC

[cecuser@p606-kvm1 build]$ make && sudo make install

[cecuser@p606-kvm1 build]$ cd ../..


이제 MaxScale의 source를 download 받습니다.

[cecuser@p606-kvm1 ~]$ git clone https://github.com/mariadb-corporation/MaxScale

[cecuser@p606-kvm1 ~]$ cd MaxScale/

[cecuser@p606-kvm1 MaxScale]$ mkdir build && cd build

원래 manual에는 아래와 같이 install_build_deps.sh를 수행하라고 되어 있지만, 하지 마십시요.  위에서 이미 수동으로 다 처리했으며, 이걸 수행하면  x86용 binary를 download 받아서 멀쩡한 nodejs 관련 파일을 망쳐놓는 오작동을 합니다.

[cecuser@p606-kvm1 build]$ ../BUILD/install_build_deps.sh    --> Don't Run !


cmake를 수행합니다.

[cecuser@p606-kvm1 build]$ cmake .. -DCMAKE_INSTALL_PREFIX=/usr


그리고 다음 파일에서 ppc64만 있고 ppc64le가 없어서 발생하는 error가 있으므로, 아래와 같이 수정합니다.

[cecuser@p606-kvm1 build]$ vi ../query_classifier/qc_sqlite/sqlite-src-3110100/config.guess
...
    ppc64:Linux:*:*)
        echo powerpc64-unknown-linux-${LIBC}
        exit ;;
    ppc64le:Linux:*:*)   # 추가
        echo powerpc64le-unknown-linux-${LIBC}  # 추가
        exit ;;   # 추가
...

다음은 make를 수행하면 됩니다.

[cecuser@p606-kvm1 build]$ make && sudo make install


테스트를 해보면 모두 정상 수행되는 것을 보실 수 있습니다.

[cecuser@p606-kvm1 build]$ make test
Running tests...
Test project /home/cecuser/MaxScale/build
      Start  1: test_mxb_log
 1/62 Test  #1: test_mxb_log ........................   Passed    0.01 sec
      Start  2: test_semaphore
 2/62 Test  #2: test_semaphore ......................   Passed   12.01 sec
      Start  3: test_worker
...
61/62 Test #61: test_hintparser .....................   Passed    0.01 sec
      Start 62: test_masking_rules
62/62 Test #62: test_masking_rules ..................   Passed    0.01 sec

100% tests passed, 0 tests failed out of 62

Total Test time (real) = 108.24 sec


2020년 2월 18일 화요일

POWER9에서 sysbench를 source로부터 build하기


sysbench는 주로 DBMS의 성능 benchmark test를 할 때 사용되는 tool입니다.  IBM POWER9 즉 ppc64le 아키텍처의 Redhat에서 이를 build하는 방법은 간단합니다.

먼저 필요한 OS package들을 설치합니다.

(base) [cecuser@p663-kvm1 sysbench]$ sudo yum -y install make automake libtool pkgconfig libaio-devel

MariaDB 그리고 PostgreSQL과 연계 테스트를 위해서는 아래와 같은 OS package들도 함께 설치합니다.

(base) [cecuser@p663-kvm1 sysbench]$ sudo yum -y install mariadb-devel openssl-devel postgresql-devel

이제 source code를 download 받습니다.

(base) [cecuser@p663-kvm1 ~]$ git clone https://github.com/akopytov/sysbench.git

(base) [cecuser@p663-kvm1 ~]$ cd sysbench

여기서 travis_ppc64le branch로 checkout 합니다.  이걸 하지 않으면 "error: ‘GG_State’ {aka ‘struct GG_State’} has no member named ‘J’ "라는 error를 겪게 되는데, 이에 대해서는 https://github.com/akopytov/sysbench/pull/234 를 참조하십시요.

(base) [cecuser@p663-kvm1 sysbench]$ git checkout travis_ppc64le

다음으로 autogen,sh을 수행하여 configure script를 생성합니다.

(base) [cecuser@p663-kvm1 sysbench]$ ./autogen.sh

만약 postgresql이나 mariadb로 sysbench 테스트를 하실 거라면 아래와 같이 '--with-pgsql --with-mysql' 옵션과 함께 configure를 돌리시면 됩니다.  Default로는 mysql을 찾습니다.

(base) [cecuser@p663-kvm1 sysbench]$ ./configure --with-pgsql --with-mysql

만약 mysql이나 postgresql을 쓸 것이 아니라면 다음과 같이 하면 됩니다.

(base) [cecuser@p663-kvm1 sysbench]$ ./configure --without-mysql

그 다음으로는 make, sudo make install을 수행하면 됩니다.

(base) [cecuser@p663-kvm1 sysbench]$ make -j4

(base) [cecuser@p663-kvm1 sysbench]$ sudo make install

(base) [cecuser@p663-kvm1 sysbench]$ cd ..

sysbench는 아래 위치에 설치됩니다.

(base) [cecuser@p663-kvm1 ~]$ ls -l `which sysbench`
-rwxr-xr-x 1 root root 1384488 Feb 18 08:00 /usr/local/bin/sysbench

--without-mysql로 build된 sysbench 파일을 편의를 위해 아래의 Google drive에 올려놓았습니다.

https://drive.google.com/open?id=1tH9bbgQaipoAqxWFHAHVL3F4QPFSlcdG

혹시 몰라, 아래와 같이 위에서 "make -j4"까지 해놓은 sysbench directory 전체를 tgz로 묶어서 아래의 Google drive에 올려놓았습니다.  여기서는 --without-mysql로 build된 버전을 올렸습니다.

https://drive.google.com/open?id=1ircTWDzOKuZzglvz5cn-Wr2vEg0q0i3a

새로 build를 해야 하는 경우, 이 file을 아래와 같이 푸시고 sudo make install 만 수행하시면 됩니다. 

(base) [cecuser@p628-kvm1 ~]$ tar -zxf sysbench_ppc64le.tgz

(base) [cecuser@p628-kvm1 ~]$ cd sysbench

(base) [cecuser@p628-kvm1 sysbench]$ sudo make install

또는 postgresql 등의 옵션을 줘서 다시 build해야 한다면 맨 첫줄의 autoconf.sh부터 새로 시작하시면 됩니다.

2020년 2월 13일 목요일

IBM AC922 서버에서 CUDA-enabled HPL 수행하기


HPL (High Performance Linpack) 테스트는 수퍼컴 클러스터의 성능 측정에 널리 쓰이는 오픈소스 프로그램입니다.   GPU를 사용하여 HPL을 수행하기 위해서는 CUDA-enabled HPL이 필요한데, 그건 NVIDIA가 지적 재산권을 가진 프로그램이며 그건 오픈소스가 아닙니다.  WWW 상을 뒤져보면 CUDA-enabled HPL의 source code를 NVIDIA가 공개하기는 하는데, 그건 매우 오래된 GPU architecture인 Fermi 아키텍처의 GPU에 대한 것이라서 최신 GPU의 성능 측정에는 적절하지 않습니다.

아래에서는 NVIDIA의 협조를 받아 CUDA-enabled HPL의 executible binary file을 가지고 있다는 전제 하에 IBM AC922 서버 (POWER9 * 2, V100 SXM2 32GB GPU * 4) 1대로 CUDA-enabled HPL을 수행하는 과정만 제시합니다.

그 결과는 역시 confidential 정보라 공개하지 못하는 점 양해 부탁드립니다.

이 테스트 수행을 위해서는 서버에 먼저 CUDA 10.1이 설치되어 있어야 합니다.  또한 IBM의 XL Fortran, Spectrum MPI, ESSL 등의 library 등이 필요합니다.

[cecuser@p1235-met1 HPC]$ ls
ESSL_FOR_LINUX_ON_POWER_V6.2.0.tar.gz
hpl_cuda10.1.4gpus.tgz
IBM_SMPI_10.2_IP_GR_LINUX_PPC64LE.tgz
ibm_smpi_lic_s-10.02-p9-ppc64le.rpm
lsf10.1_lnx310-lib217-ppc64le.tar.Z
XL_FORTRAN_FOR_LINUX_V16.1.1_PRO.gz

먼저 XL Fortran을 설치합니다.

[cecuser@p1235-met1 HPC]$ mkdir xlf

[cecuser@p1235-met1 HPC]$ cd xlf

[cecuser@p1235-met1 xlf]$ tar -zxvf ../XL_FORTRAN_FOR_LINUX_V16.1.1_PRO.gz

[cecuser@p1235-met1 xlf]$ ./install
...
Press Enter to continue viewing the license agreement, or, Enter "1" to accept the agreement,
"2" to decline it or "99" to go back to the previous screen, "3" Print.
1
INFORMATIONAL: Unexpected CUDA Toolkit version detected '10.1' (9.2, 10.0 are supported), defaulting to __CUDA_API_VERSION=10000.  Re-configure with '-cudaVersion 9.2' to override.
Installation and configuration successful


이어서 Spectrum MPI를 설치합니다.  10.1이 아니라 10.2가 필요합니다.

[cecuser@p1235-met1 HPC]$ tar -zxf IBM_SMPI_10.2_IP_GR_LINUX_PPC64LE.tgz

[cecuser@p1235-met1 HPC]$ cd ibm_smpi-10.02.00.03-p9-ppc64le

[cecuser@p1235-met1 ibm_smpi-10.02.00.03-p9-ppc64le]$ sudo rpm -Uvh *.rpm ../ibm_smpi_lic_s-10.02-p9-ppc64le.rpm

[cecuser@p1235-met1 ibm_smpi-10.02.00.03-p9-ppc64le]$ su -

[root@p1235-met1 ~]# IBM_SPECTRUM_MPI_LICENSE_ACCEPT=yes /opt/ibm/spectrum_mpi/lap_se/bin/accept_spectrum_mpi_license.sh

[root@p1235-met1 ~]# exit

이어서 ESSL을 설치합니다.  이건 engineering용 library인데, GPU를 이용하도록 되어 있습니다.

[cecuser@p1235-met1 HPC]$ tar -zxvf ESSL_FOR_LINUX_ON_POWER_V6.2.0.tar.gz

[cecuser@p1235-met1 HPC]$ cd RHEL/RHEL7/

[cecuser@p1235-met1 RHEL7]$ su
Password:

[root@p1235-met1 RHEL7]# rpm -Uvh essl.license-6.2.0-0.ppc64le.rpm

[root@p1235-met1 RHEL7]# export IBM_ESSL_LICENSE_ACCEPT=yes

[root@p1235-met1 RHEL7]# /opt/ibmmath/essl/6.2/lap/accept_essl_license.sh

[root@p1235-met1 RHEL7]# rpm -Uvh essl.3264.rte-6.2.0-0.ppc64le.rpm essl.6464.rte-6.2.0-0.ppc64le.rpm essl.rte.common-6.2.0-0.ppc64le.rpm essl.man-6.2.0-0.ppc64le.rpm essl.3264.rtecuda-6.2.0-0.ppc64le.rpm essl.common-6.2.0-0.ppc64le.rpm essl.msg-6.2.0-0.ppc64le.rpm essl.rte-6.2.0-0.ppc64le.rpm


이제 CUDA-enabled HPL의 binary 및 script를 풀어냅니다.

[cecuser@p1235-met1 HPC]$ tar -zxvf hpl_cuda10.1.4gpus.tgz

[cecuser@p1235-met1 HPC]$ cd hpl

이 속에 들어있는 것은 간단합니다.  Binary 실행 파일인 xhpl과 함께, 그 수행에 필요한 HPL.dat, 기타 mpirun을 위한 script 입니다.

먼저 HPL.dat의 내용입니다.  Edit해야 하는 주요 내용은 아래 붉은 색으로 표시한 Ns (계산해야 하는 문제의 크기), NBs (한번에 어느 정도 크기로 문제를 풀 것인지 결정하는 block size), 그리고 mesh 구조를 결정하는 Ps와 Qs입니다. 

간단히 말하면 Ns는 가급적 GPU들의 메모리를 꽤 가득 채울 정도로 크게 하고, NBs는 적절한 크기를 trial & error 방식으로 찾아야 합니다.  가령 제가 해보니 아래와 같은 크기의 Ns면 32GB memory의 GPU 4장을 가득 채웁니다.  또한 256이나 768에 비해 512로 NBs를 두는 것이 가장 성능이 잘 나오는 것 같습니다.  Ps와 Qs는 서로 곱해서 GPU 갯수가 나오면 되는데, 가급적 서로 비슷하게, 그리고 가급적 Ps가 Qs보다 작게 설정하면 됩니다.

[cecuser@p1235-met1 hpl]$ cat HPL.dat
HPLinpack benchmark input file
Innovative Computing Laboratory, University of Tennessee
HPL.out      output file name (if any)
6            device out (6=stdout,7=stderr,file)
1            # of problems sizes (N)
128000       Ns
1          # of NBs
512        NBs
0            PMAP process mapping (0=Row-,1=Column-major)
1            # of process grids (P x Q)
2            Ps
2            Qs
16.0         threshold
1            # of panel fact
2            PFACTs (0=left, 1=Crout, 2=Right)
1            # of recursive stopping criterium
4            NBMINs (>= 1)
1            # of panels in recursion
2            NDIVs
1            # of recursive panel fact.
0            RFACTs (0=left, 1=Crout, 2=Right)
1            # of broadcast
3            BCASTs (0=1rg,1=1rM,2=2rg,3=2rM,4=Lng,5=LnM)
1            # of lookahead depth
0            DEPTHs (>=0)
1            SWAP (0=bin-exch,1=long,2=mix)
192          swapping threshold
1            L1 in (0=transposed,1=no-transposed) form
0            U  in (0=transposed,1=no-transposed) form
0            Equilibration (0=no,1=yes)
8            memory alignment in double (> 0)

여기서는 1대로 수행하니까 hosts 파일은 사실 필요가 없습니다만 아래와 같은 format으로 설정하면 됩니다.

[cecuser@p1235-met1 hpl]$ cat hosts
localhost  slots=4

아래는 mpirun을 수행하는 script입니다.  제가 쓴 환경처럼 infiniband가 없는 경우 "-pami_noib" 옵션을 써야 합니다.

[cecuser@p1235-met1 hpl]$ cat run_me_4_gpu_xlc_spectrum.sh
#!/bin/bash
export MPI_ROOT=/opt/ibm/spectrum_mpi
export MANPATH=$MPI_ROOT/share/man:$MANPATH
export PATH=/usr/local/cuda-10.1/bin:/opt/ibm/spectrum_mpi/bin:$PATH
export LD_LIBRARY_PATH=/opt/ibmmath/essl/6.2/lib64/:/opt/ibm/spectrum_mpi/lib:$LD_LIBRARY_PATH
sudo nvidia-smi -ac 877,1395
#echo always > /sys/kernel/mm/transparent_hugepage/enabled
TUNE="-x PAMI_IBV_DEVICE_NAME=mlx5_0:1 -x PAMI_IBV_DEVICE_NAME_1=mlx5_3:1 -x PAMI_ENABLE_STRIPING=0 -x PAMI_IBV_CQEDEPTH=4096 -x PAMI_IBV_ADAPTER_AFFINITY=1 -x PAMI_IBV_OPT_LATENCY=1 -x MLX5_SINGLE_THREADED=1 -x MLX5_CQE_SIZE=128 -x PAMI_IBV_ENABLE_DCT=1 -x PAMI_IBV_ENABLE_OOO_AR=1 -x PAMI_IBV_QP_SERVICE_LEVEL=8"
sudo ppc64_cpu --dscr=7
#mpirun -N 4 -npernode 4 --allow-run-as-root -x OMPI_MCA_common_pami_use_odp=0 -x PAMI_IBV_DEBUG_PRINT_DEVICES=1 -tag-output $TUNE --hostfile nodes -bind-to none ./run_linpack_6_gpu_xlc_spectrum_0726
mpirun -N 4 -npernode 4 --hostfile hosts -pami_noib -bind-to none ./run_linpack_4_gpu_xlc_spectrum.sh


그리고 아래가 실제 xhpl을 수행하는 script입니다.  위의 mpirun script를 수행하면 결국 아래의 script가 수행됩니다.  IBM의 Spectrum MPI에서는 내부적으로 OMPI_COMM_WORLD_LOCAL_RANK, PMIX 등의 환경 변수를 자동 생성하여 GPU를 할당하는데 사용합니다.  아래 script를 보면 case 문을 이용하여 CUDA_VISIBLE_DEVICES 환경 변수를 이용하여 GPU 1개씩마다 xhpl을 하나씩 수행합니다.


[cecuser@p1235-met1 hpl]$ cat run_linpack_4_gpu_xlc_spectrum.sh
#!/bin/bash
#location of HPL
HPL_DIR=`pwd`
# Number of CPU cores
# Total CPU cores / Total GPUs (not counting hyperthreading)
#CPU_CORES_PER_RANK=16
CPU_CORES_PER_RANK=8
export MPI_ROOT=/opt/ibm/spectrum_mpi
export OMP_NUM_THREADS=$CPU_CORES_PER_RANK
export MAX_H2D_MS=10
export MAX_D2H_MS=10
export RANKS_PER_SOCKET=2
export RANKS_PER_NODE=4
export NUM_WORK_BUF=4
export SCHUNK_SIZE=128
export GRID_STRIPE=4
export FACT_GEMM=1
export FACT_GEMM_MIN=128
export SORT_RANKS=0
export PRINT_SCALE=1.0
export TEST_SYSTEM_PARAMS=1
sudo rm -rf /dev/shm/sh_*
export LIBC_FATAL_STDERR_=1
#export PAMI_ENABLE_STRIPING=0
export CUDA_CACHE_PATH=/tmp
export OMP_NUM_THREADS=$CPU_CORES_PER_RANK
export CUDA_DEVICE_MAX_CONNECTIONS=8
export CUDA_COPY_SPLIT_THRESHOLD_MB=1
export GPU_DGEMM_SPLIT=1.0
export TRSM_CUTOFF=1000000
#export TRSM_CUTOFF=99000
export TEST_SYSTEM_PARAMS=1
export MONITOR_GPU=1
export GPU_TEMP_WARNING=70
export GPU_CLOCK_WARNING=1310
export GPU_POWER_WARNING=350
export GPU_PCIE_GEN_WARNING=3
export GPU_PCIE_WIDTH_WARNING=2
#export ICHUNK_SIZE=1536
export ICHUNK_SIZE=384
export CHUNK_SIZE=5120
APP=$HPL_DIR/xhpl
#lrank=$OMPI_COMM_WORLD_LOCAL_RANK
lrank=$(($PMIX_RANK%4))
nrank=$(($PMIX_RANK/4))
#crank=$(($nrank/89))
#neven=$(($crank%2))
neven=$(($nrank%2))
#neven=0
export CUDA_VISIBLE_DEVICES=$lrank
echo "RANK $PMIX_RANK on host $HOSTNAME PID $$ even: $neven"
if [ $neven -eq 0 ]
then
case ${lrank} in
[0])
#ldd $APP
sudo nvidia-smi -ac 877,1395 > /dev/null;
#export PAMI_IBV_DEVICE_NAME=mlx5_0:1;
#export OMPI_MCA_btl_openib_if_include=mlx5_0:1;
export CUDA_VISIBLE_DEVICES=0; numactl --physcpubind=0,4,8,12,16,20,24,28,32,36 --membind=0 $APP
  ;;
[1])
#export PAMI_IBV_DEVICE_NAME=mlx5_1:1;
#export OMPI_MCA_btl_openib_if_include=mlx5_1:1;
export CUDA_VISIBLE_DEVICES=1; numactl --physcpubind=40,44,48,52,56,60,64,68,72,76 --membind=0 $APP
  ;;
[2])
#export PAMI_IBV_DEVICE_NAME=mlx5_0:1;
#export OMPI_MCA_btl_openib_if_include=mlx5_0:1;
export CUDA_VISIBLE_DEVICES=2; numactl --physcpubind=80,84,88,92,96,100,104,108,112,116 --membind=8 $APP
  ;;
[3])
#export PAMI_IBV_DEVICE_NAME=mlx5_3:1;
#export OMPI_MCA_btl_openib_if_include=mlx5_3:1;
export CUDA_VISIBLE_DEVICES=3; numactl --physcpubind=120,124,128,132,136,140,144,148,152,156 --membind=8 $APP
  ;;
esac
exit
fi


이제 다음과 같이 run_me_4_gpu_xlc_spectrum.sh를 수행하시면 됩니다.  대략 10분 이내의 시간이 걸릴 것입니다.

[cecuser@p1235-met1 hpl]$ ./run_me_4_gpu_xlc_spectrum.sh


중간값을 빼면 결과적으로는 아래와 같은 결과물이 display 됩니다.   결과는 공개하지 못하는 점 다시 한번 양해 부탁드립니다.

...

================================================================================
T/V                N    NB     P     Q               Time                 Gflops
--------------------------------------------------------------------------------
WR03L2R4      128000   512     2     2             XXX              X.XXXe+04
--------------------------------------------------------------------------------
||Ax-b||_oo/(eps*(||A||_oo*||x||_oo+||b||_oo)*N)=        0.0005540 ...... PASSED
================================================================================


2020년 2월 4일 화요일

IBM ppc64le 환경 CUDA 10.2에서의 Active: failed (Result: start-limit) error


NVIDIA CUDA 10.2를 ppc64le 아키텍처 (IBM POWER8/9)에 설치한 경우, 다음과 같이 nvidia-persistenced가 살지 못하고 error를 내는 바람에 nvidia-smi 등 CUDA 기능을 사용하지 못하는 경우가 있습니다.

[cecuser@p615-met1 ~]$ nvidia-smi
NVIDIA-SMI has failed because it couldn't communicate with the NVIDIA driver. Ma                                                                  ke sure that the latest NVIDIA driver is installed and running.

[cecuser@p615-met1 ~]$ sudo systemctl status nvidia-persistenced
● nvidia-persistenced.service - NVIDIA Persistence Daemon
   Loaded: loaded (/usr/lib/systemd/system/nvidia-persistenced.service; enabled; vendor preset: disabled)
   Active: failed (Result: start-limit) since Mon 2020-02-03 20:33:38 EST; 36min ago
  Process: 11480 ExecStart=/usr/bin/nvidia-persistenced --verbose (code=exited, status=1/FAILURE)

Feb 03 20:33:38 p615-met1 systemd[1]: nvidia-persistenced.service: control process exited, code=exite...us=1
Feb 03 20:33:38 p615-met1 systemd[1]: Failed to start NVIDIA Persistence Daemon.
Feb 03 20:33:38 p615-met1 systemd[1]: Unit nvidia-persistenced.service entered failed state.
Feb 03 20:33:38 p615-met1 systemd[1]: nvidia-persistenced.service failed.
Feb 03 20:33:38 p615-met1 systemd[1]: nvidia-persistenced.service holdoff time over, scheduling restart.
Feb 03 20:33:38 p615-met1 systemd[1]: Stopped NVIDIA Persistence Daemon.
Feb 03 20:33:38 p615-met1 systemd[1]: start request repeated too quickly for nvidia-persistenced.service
Feb 03 20:33:38 p615-met1 systemd[1]: Failed to start NVIDIA Persistence Daemon.
Feb 03 20:33:38 p615-met1 systemd[1]: Unit nvidia-persistenced.service entered failed state.
Feb 03 20:33:38 p615-met1 systemd[1]: nvidia-persistenced.service failed.
Hint: Some lines were ellipsized, use -l to show in full.


보통 이 경우 다음과 같이 /etc/udev/rules.d/40-redhat.rules의 memory hotplug 관련 부분을 comment-out 처리하지 않아서 발생하는 것이 대부분입니다.

[cecuser@p615-met1 ~]$ sudo vi /etc/udev/rules.d/40-redhat.rules
...
#SUBSYSTEM!="memory", ACTION!="add", GOTO="memory_hotplug_end"
SUBSYSTEM=="*", GOTO="memory_hotplug_end"


그런데 이렇게 하고 나서 rebooting을 해도 여전히 같은 error가 나더군요.  한참 골머리를 앓았는데, 이제 보니 CUDA 10.2에 약간의 bug가 있어서 그런 것 같습니다.  아래와 같이 /etc/ld.so.conf.d/cuda-10-2.conf 속에 ppc64le-linux 대신 x86_64-linux의 directory가 들어가 있습니다. 

이것만 손으로 다음과 같이 수정하시고 ldconfig를 수행해 주시면 됩니다.


[cecuser@p615-met1 ~]$ sudo vi /etc/ld.so.conf.d/cuda-10-2.conf
#/usr/local/cuda-10.2/targets/x86_64-linux/lib
/usr/local/cuda-10.2/targets/ppc64le-linux/lib

[cecuser@p615-met1 ~]$ sudo ldconfig


[cecuser@p615-met1 ~]$ nvidia-smi
Mon Feb  3 23:50:00 2020
+-----------------------------------------------------------------------------+
| NVIDIA-SMI 440.33.01    Driver Version: 440.33.01    CUDA Version: 10.2     |
|-------------------------------+----------------------+----------------------+
| GPU  Name        Persistence-M| Bus-Id        Disp.A | Volatile Uncorr. ECC |
| Fan  Temp  Perf  Pwr:Usage/Cap|         Memory-Usage | GPU-Util  Compute M. |
|===============================+======================+======================|
|   0  Tesla V100-SXM2...  Off  | 00000004:04:00.0 Off |                    0 |
| N/A   31C    P0    51W / 300W |      0MiB / 32510MiB |      0%      Default |
+-------------------------------+----------------------+----------------------+
|   1  Tesla V100-SXM2...  Off  | 00000004:05:00.0 Off |                    0 |
| N/A   34C    P0    54W / 300W |      0MiB / 32510MiB |      0%      Default |
+-------------------------------+----------------------+----------------------+
|   2  Tesla V100-SXM2...  Off  | 00000035:03:00.0 Off |                    0 |
| N/A   32C    P0    54W / 300W |      0MiB / 32510MiB |      0%      Default |
+-------------------------------+----------------------+----------------------+
|   3  Tesla V100-SXM2...  Off  | 00000035:04:00.0 Off |                    0 |
| N/A   35C    P0    54W / 300W |      0MiB / 32510MiB |      3%      Default |
+-------------------------------+----------------------+----------------------+

+-----------------------------------------------------------------------------+
| Processes:                                                       GPU Memory |
|  GPU       PID   Type   Process name                             Usage      |
|=============================================================================|
|  No running processes found                                                 |
+-----------------------------------------------------------------------------+


별 것도 아닌 것으로 2시간 이상 소모했습니다...


2020년 1월 28일 화요일

CentOS 환경의 IBM POWER9 서버에 xCAT 설치하기


xCAT은 eXtreme Cluster/Cloud Administration Toolkit의 약자로서, 대형 HPC cluster의 설치와 운영에 사용되는 open source tool입니다.   설치는 IBM POWER9 (ppc64le) 환경에서도 x86 환경과 동일하게 간단합니다.  여기서는 CentOS 7.6 환경에서 수행해보겠습니다.

-bash-4.2# cat /etc/redhat-release
CentOS Linux release 7.6.1810 (AltArch)

먼저 go-xcat script를 다음과 같이 download 받습니다.

-bash-4.2# wget https://raw.githubusercontent.com/xcat2/xcat-core/master/xCAT-server/share/xcat/tools/go-xcat -O - >/tmp/go-xcat

-bash-4.2# chmod a+x /tmp/go-xcat

이제 이 script를 install이라는 argument와 함께 수행합니다.   그러면 Yes를 한번 눌러주는 것 외에는 사실상 더 해줄 것이 없습니다.

-bash-4.2# /tmp/go-xcat install
Operating system:   linux
Architecture:       ppc64le
Linux Distribution: centos
Version:            7
go-xcat Version:    1.0.45


Reading repositories ...... done

xCAT Core Packages
==================

Package Name                Installed                      In Repository
------------                ---------                      -------------
perl-xCAT                   (not installed)                2.15-snap201911041517
xCAT                        (not installed)                2.15-snap201911041517
xCAT-SoftLayer              (not installed)                2.15-snap201911041517
xCAT-buildkit               (not installed)                2.15-snap201911041517
xCAT-client                 (not installed)                2.15-snap201911041517
xCAT-confluent              (not installed)                2.15-snap201911041517
xCAT-csm                    (not installed)                2.15-snap201911041517
xCAT-genesis-scripts-ppc64  (not installed)                2.15-snap201911041517
xCAT-genesis-scripts-x86_64 (not installed)                2.15-snap201911041517
xCAT-openbmc-py             (not installed)                2.15-snap201911041518
xCAT-probe                  (not installed)                2.15-snap201911041517
xCAT-server                 (not installed)                2.15-snap201911041517
xCAT-test                   (not installed)                2.15-snap201911041517
xCAT-vlan                   (not installed)                2.15-snap201911041517
xCATsn                      (not installed)                2.15-snap201911041517

xCAT Dependency Packages
========================

Package Name                Installed                      In Repository
------------                ---------                      -------------
elilo-xcat                  (not installed)                3.14-4
fping                       (not installed)                2.4b2_to-2
goconserver                 (not installed)                0.3.2-snap201909171016
grub2-xcat                  (not installed)                2.02-0.76.el7.1.snap2019051602
ipmitool-xcat               (not installed)                1.8.18-0
lldpd                       (not installed)                0.7.15-6.1
net-snmp-perl               (not installed)                5.7.2-38.el7_6.2
perl-AppConfig              (not installed)                1.66-20.el7
perl-Crypt-CBC              (not installed)                2.33-2.el7
perl-Crypt-Rijndael         (not installed)                1.09-2.ael7a
perl-Expect                 (not installed)                1.21-1
perl-HTML-Form              (not installed)                6.03-6.el7
perl-HTTP-Async             (not installed)                0.30-2
perl-IO-Stty                (not installed)                0.03-1
perl-IO-Tty                 (not installed)                1.10-11.el7
perl-JSON                   (not installed)                2.59-2.el7
perl-Net-HTTPS-NB           (not installed)                0.14-2
perl-Net-Telnet             (not installed)                3.03-19.el7
perl-SOAP-Lite              (not installed)                0.710.08-1
perl-XML-Simple             (not installed)                2.20-5.el7
pyodbc                      (not installed)                3.0.7-1.ael7a
syslinux-xcat               (not installed)                3.86-2
systemconfigurator          (not installed)                2.2.11-1
systemimager-client         (not installed)                4.3.0-0.1
systemimager-common         (not installed)                4.3.0-0.1
systemimager-server         (not installed)                4.3.0-0.3
xCAT-genesis-base-ppc64     (not installed)                2.14.5-snap201811160710
xCAT-genesis-base-x86_64    (not installed)                2.14.5-snap201811190037
xnba-undi                   (not installed)                1.0.3-131028
yaboot-xcat                 (not installed)                1.3.17-rc1

xCAT is going to be installed.
Continue? [y/n] y

....
Install  15 Packages (+95 Dependent packages)

Total download size: 257 M
Installed size: 713 M
Downloading packages:
--------------------------------------------------------------------------------
Total                                              2.9 MB/s | 257 MB  01:29
Running transaction check
Running transaction test
Transaction test succeeded
Running transaction
  Installing : perl-Data-Dumper-2.145-3.el7.ppc64le                       1/110
  Installing : 1:perl-Compress-Raw-Zlib-2.061-4.el7.ppc64le               2/110
  Installing : perl-Sys-Syslog-0.33-3.el7.ppc64le                         3/110
  Installing : ksh-20120801-139.el7.ppc64le                               4/110
  Installing : perl-XML-NamespaceSupport-1.11-10.el7.noarch               5/110
  Installing : apr-1.4.8-3.el7_4.1.ppc64le                                6/110
  Installing : perl-XML-Parser-2.41-10.el7.ppc64le                        7/110
  Installing : apr-util-1.5.2-6.el7.ppc64le                               8/110
  Installing : 12:dhcp-libs-4.2.5-68.el7.centos.1.ppc64le                 9/110
...
  tftp.ppc64le 0:5.2-22.el7
  tftp-server.ppc64le 0:5.2-22.el7
  trousers.ppc64le 0:0.3.14-2.el7
  unzip.ppc64le 0:6.0-19.el7
  xCAT-probe.noarch 4:2.15-snap201911041517
  yajl.ppc64le 0:2.0.4-4.el7

Complete!

xCAT has been installed!
========================

If this is the very first time xCAT has been installed, run one of the
following commands to set the environment variables.

For sh:
    source /etc/profile.d/xcat.sh

For csh:
    source /etc/profile.d/xcat.csh


이렇게 설치가 쉬운 이유는 go-xcat이라는 script에서 자동으로 xcat 관련 YUM repository를 만들었기 때문입니다.

-bash-4.2#  yum repolist
Loaded plugins: fastestmirror
Loading mirror speeds from cached hostfile
repo id                                  repo name                                          status
base                                     CentOS-7 - Base                                    7,477
extras                                   CentOS-7 - Extras                                    403
updates                                  CentOS-7 - Updates                                 1,873
xcat-core                                xcat-core                                             21
xcat-dep                                 xcat-dep                                              30
repolist: 9,804


설치 뒤에는 자동으로 xCAT daemon이 수행되는데, 제대로 떠있는지 다음과 같이 확인합니다.

-bash-4.2#  systemctl status xcatd
● xcatd.service - xCAT management service
   Loaded: loaded (/usr/lib/systemd/system/xcatd.service; enabled; vendor preset: disabled)
   Active: active (running) since Tue 2020-01-28 02:48:59 EST; 7min ago
 Main PID: 14973 (xcatd: SSL list)
   CGroup: /system.slice/xcatd.service
           ├─14972 /usr/sbin/in.tftpd -v -l -s /tftpboot -m /etc/tftpmapfile4xcat.conf
           ├─14973 xcatd: SSL listener
           ├─14974 xcatd: DB Access
           ├─14975 xcatd: UDP listener
           ├─14976 xcatd: Discovery worker
           ├─14977 xcatd: install monitor
           └─14978 xcatd: Command log writer

Jan 28 02:48:28 p636-kvm1 xcat[14943]: xcatd is going to start...
Jan 28 02:48:58 p636-kvm1 xcat[14975]: xcatd: UDP listener process 14975 start
Jan 28 02:48:58 p636-kvm1 xcat[14977]: xcatd: install monitor process 14977 start
Jan 28 02:48:58 p636-kvm1 xcat[14978]: xcatd: Command log writer process 14978 start
Jan 28 02:48:58 p636-kvm1 xcat[14976]: xcatd: Discovery worker process 14976 start
Jan 28 02:48:59 p636-kvm1 xcatd[14939]: Starting xcatd [  OK  ]
Jan 28 02:48:59 p636-kvm1 systemd[1]: Started xCAT management service.
Jan 28 02:49:02 p636-kvm1 xcat[15071]: xCAT: Allowing mknb ppc64 for root from localhost
Jan 28 02:49:47 p636-kvm1 xcat[15089]: xCAT: Allowing mknb x86_64 for root from localhost
Jan 28 02:52:45 p636-kvm1 xcat[15209]: xCAT: Allowing lsdef for root from localhost


xCAT daemon의 버전은 다음과 같이 확인할 수 있습니다.

-bash-4.2# source /etc/profile.d/xcat.sh

-bash-4.2# lsxcatd -a
Version 2.15 (git commit 218c6d3acc8bdbd7f72115e48cda2b1a3613d18a, built Mon Nov  4 15:17:59 EST 2019)
This is a Management Node
dbengine=SQLite


이제 간단한 xCAT 명령을 사용해보겠습니다.  xCAT에서 network을 등록하고 관리하는 방법입니다.  아래와 같이 먼저 makenetworks 명령을 통해 이미 구성되어 있는 NIC을 발견하여 network object를 만들어야 하는데, 실은 xCAT이 설치되고 구성될 때 이미 만들어져 있습니다.

-bash-4.2# makenetworks
Warning: [p636-kvm1]: The network entry '129_40_XXX_48-255_255_255_240' already exists in xCAT networks table. Cannot create a definition for '129_40_XXX_48-255_255_255_240'

이 network은 다음과 같이 볼 수 있습니다.

-bash-4.2# lsdef -t network
129_40_XXX_48-255_255_255_240  (network)

이것의 이름을 좀더 쉬운 이름으로 바꾸어 보겠습니다.

-bash-4.2# chdef -t network 129_40_XXX_48-255_255_255_240 -n primary_network
Changed the object name from 129_40_XXX_48-255_255_255_240 to primary_network.

-bash-4.2# lsdef -t network
primary_network  (network)

자세히 보기 위해서는 다음과 같이 할 수 있습니다.

-bash-4.2# lsdef -t network primary_network
Object name: primary_network
    gateway=129.40.XXX.62
    mask=255.255.255.240
    mgtifname=eth0
    mtu=9000
    net=129.40.XXX.48
    tftpserver=<xcatmaster>


2019년 4월 25일 목요일

RAPIDS.ai on IBM POWER9 : ppc64le 환경에서 cuDF를 source로부터 build하기


RAPIDS.ai는 NVIDIA가 요즘 공을 들이고 있는 GPU를 이용한 data science platform입니다.  그 핵심 모듈이 cuDF와 cuML입니다.  이 모듈들은 최근 발표된 IBM PowerAI toolkit에도 포함되어 있습니다.  ( https://www.ibm.com/support/knowledgecenter/en/SS5SF7_1.6.0/navigation/pai_getstarted_rapids.html 참조)

다만 IBM PowerAI는 CUDA 10.1만을 지원하는 등 제약 사항이 일부 있기 때문에 모든 환경에서 유연하게 사용하시기가 곤란한 부분이 있을 수 있습니다.  그래도 어차피 RAPIDS는 open source니까, ppc64le 아키텍처 위에서 그냥 source로부터 build하시면 됩니다.  이번 posting에서는 cuDF를 Ubuntu 18.04 ppc64le에서 build하는 방법을 보시겠습니다.

일단 아래와 같이 cuda 10.0을 설치합니다.

~/files$ wget https://developer.download.nvidia.com/compute/cuda/repos/ubuntu1804/ppc64el/cuda-repo-ubuntu1804_10.0.130-1_ppc64el.deb

~/files$ sudo apt-key adv --fetch-keys https://developer.download.nvidia.com/compute/cuda/repos/ubuntu1804/ppc64el/7fa2af80.pub

~/files$ sudo apt-get update

~/files$ sudo apt-get install cuda

~/files$ sudo tar -xvf ./cudnn-10.0-linux-ppc64le-v7.5.0.56.solitairetheme8 -C /usr/local

~/files$ sudo tar -xvf ./nccl_2.4.2-1+cuda10.0_ppc64le.txz -C /usr/local

Python은 Anaconda3를 설치하여 Python 3.6.8을 사용했습니다. 

~/files$  which python
/home/u0017649/anaconda3/bin/python

먼저 conda install 명령으로 아래 package들을 설치합니다.

~/files$ conda install numpy six setuptools cython pandas pytest cmake flatbuffers rapidjson boost boost-cpp thrift snappy zlib gflags brotli lz4-c zstd arrow -c conda-forge

먼저 유의하실 것은 Ubuntu 18.10의 기본 gcc 버전인 gcc-8은 CUDA 10.0을 지원하지 않습니다.  그런데 또 현재 cudf v0.7.0은 아직 CUDA 10.1을 지원하지 않습니다.  그래서 해결책은 Ubuntu에 gcc-7과 g++-7을 설치해야 합니다.

~/files$ sudo apt-get install -y gcc-7 gcc-7-base gcc-7-powerpc-linux-gnu libgcc-7-dev g++-7

~/files$ sudo rm /usr/bin/gcc /usr/bin/g++

~/files$ sudo ln -s /usr/bin/gcc-7 /usr/bin/gcc

~/files$ sudo ln -s /usr/bin/g++-7 /usr/bin/g++

먼저, RMM을 설치합니다.

~/files$ git clone --recursive  https://github.com/rapidsai/rmm.git

~/files$ cd rmm

~/files/rmm$ rm -rf build

~/files/rmm$ mkdir build && cd build

~/files/rmm/build$ cmake ..

~/files/rmm/build$ make -j2

~/files/rmm/build$ sudo make install

~/files/rmm/build$ cd ../python

~/files/rmm/python$ python setup.py install


다음으로는 custrings를 설치합니다.

~/files$ git clone --recursive https://github.com/rapidsai/custrings.git

~/files$ cd custrings/cpp

~/files/custrings/cpp$ mkdir build && cd build

~/files/custrings/cpp/build$ cmake ..

~/files/custrings/cpp$ make -j2

~/files/custrings/cpp$ sudo make install

다음으로는 thrift를 설치합니다. 

~/files$ git clone --recursive https://github.com/apache/thrift

~/files$ cd thrift/

~/files/thrift$ sudo apt-get install libssl-dev

~/files/thrift$ ./bootstrap.sh

~/files/thrift$ ./configure

~/files/thrift$ cd build

~/files/thrift/build$ cmake ..

~/files/thrift/build$ make -j2

~/files/thrift/build$ sudo make install

다음으로는 Arrow를 설치합니다. 

~/files$ sudo apt-get install libdouble-conversion1 libghc-double-conversion-dev libdouble-conversion-dev libgoogle-glog-dev libgoogle-glog0v5 thrift-compiler libthrift-java

~/files$ git clone https://github.com/apache/arrow.git

~/files$ cd arrow/cpp

~/files/arrow/cpp$ mkdir build && cd build

여기서 특정 header 파일을 아래와 같이 일부 수정해야 합니다.  이 error는 꼭 ppc64le 환경에서만 나는 것은 아니고, 나중에 patch가 될 예정입니다.   ( error: there are no arguments to ‘DCHECK’ that depend on a template parameter, so a declaration of ‘DCHECK’ must be available 이라는 error 방지용.  https://github.com/apache/arrow/issues/4014 참조)

~/files/arrow/cpp/build$ vi ~/files/arrow/cpp/src/arrow/util/sse-util.h
...
#include "logging.h"   # 이 include 문을 삽입해야 함


~/files/arrow/cpp/build$ cmake -DCMAKE_BUILD_TYPE=release -DARROW_PYTHON=on -DARROW_PLASMA=on -DARROW_BUILD_TESTS=OFF  -DARROW_PARQUET=ON ..

~/files/arrow/cpp/build$ make -j2

~/files/arrow/cpp/build$ sudo make install

~/files/arrow/cpp/build$ cd ../../python

~/files/arrow/python$ export ARROW_HOME=/usr/local

기본으로 설치되는 Cython 버전이 맞지 않으므로, 반드시 0.29 버전으로 새로 설치해야 하더라고요.

~/files/arrow/python$ pip install Cython==0.29

~/files/arrow/python$ MAKEFLAGS=-j2 python setup.py build_ext --build-type=release --with-parquet --inplace

~/files/arrow/python$ MAKEFLAGS=-j2 python setup.py build_ext --build-type=release --with-parquet --bundle-arrow-cpp bdist_wheel

위에서 생성되는 wheel file을 아래와 같이 설치하시면 됩니다.

~/files/arrow/python$ pip install dist/pyarrow-0.13.1.dev40+g6907d972.d20190408-cp37-cp37m-linux_ppc64le.whl


이제 비로소 cudf를 설치할 수 있게 되었습니다.

~/files$ git clone --recursive https://github.com/rapidsai/cudf.git

~/files$ cd cudf

~/files/cudf$ git submodule update --init --remote --recursive

여기서 역시 아래의 file 하나를 수정해야 합니다.  이 역시 ppc64le에 국한된 문제는 아니고, 아래 link에서 해결된 것인데, 나중에 patch로 반영될 예정입니다.  ( https://github.com/rapidsai/cudf/issues/1384 참조)

~/files/cudf$ vi cpp/tests/hashing/hash_partition_test.cu
...
  // The indices of the columns that will be hashed to determine the partitions
  constexpr static const std::array<int, sizeof...(cols)> cols_to_hash{{cols...}};
};
 template< typename tuple_of_vectors       # 이하 4줄의 line을 추가하시면 됩니다.
           gdf_hash_func hash,
           int... cols>
 constexpr const std::array<int, sizeof...(cols)> TestParameters<tuple_of_vectors, hash, cols...>::cols_to_hash;


그 다음은 아래와 같이 build하시면 됩니다.

~/files/cudf$ cd cpp

~/files/cudf/cpp$ mkdir build && cd build

~/files/cudf/cpp/build$ cmake .. -DCMAKE_INSTALL_PREFIX=~/anaconda3

~/files/cudf/cpp/build$ make -j2

~/files/cudf/cpp/build$ sudo make install

root@8f2f82cf3e22:/mnt/cudf# cd python

root@8f2f82cf3e22:/mnt/cudf/python# python setup.py build_ext --inplace

root@8f2f82cf3e22:/mnt/cudf/python# python setup.py install
...
Best match: numpy 1.16.2
Adding numpy 1.16.2 to easy-install.pth file
Installing f2py script to /opt/anaconda3/bin
Installing f2py3 script to /opt/anaconda3/bin
Installing f2py3.6 script to /opt/anaconda3/bin

Using /opt/anaconda3/lib/python3.6/site-packages
Finished processing dependencies for cudf==0.7.0.dev0+679.g97833593.dirty

2019년 1월 30일 수요일

IBM POWER8/9 (ppc64le) 환경에서의 Darknet 설치 및 test


Darknet은 C로 구현된 open source neural network famework입니다.  IBM POWER8 또는 POWER9, 즉 ppc64le 환경에서도 당연히 잘 설치됩니다.  여기서는 CentOS 7 on POWER8에서 구현했습니다.

설치는 source를 받아서 다음과 같이 compile 하기만 하면 됩니다.  Source를 수정할 필요 전혀 없습니다.

[bsyu@centos01 files]$ git clone https://github.com/pjreddie/darknet.git

[bsyu@centos01 files]$ cd darknet

[bsyu@centos01 darknet]$ make -j8

[bsyu@centos01 darknet]$ ./darknet
usage: ./darknet <function>

다만 혹시 GPU를 사용하고자 할 때는 아래와 같이 CUDA로 build되도록 Makefile을 살짝 수정해주시면 됩니다.  이 또한 ppc64le 환경에서도 build는 잘 됩니다만, 제가 가난하여 GPU가 없기 때문에 테스트는 이것으로 못했습니다.

[bsyu@centos01 darknet]$ vi Makefile
GPU=1   # default 0
CUDNN=1   # default 0
...

[bsyu@centos01 darknet]$ make -j8

[bsyu@centos01 darknet]$ ./darknet
usage: ./darknet <function>


CUDA 없이, 처음에 build한 CPU-only 버전으로도 darknet을 통해 YOLO를 테스트해볼 수 있습니다.   이 darknet 속에는 이미 YOLO를 위한 cfg 파일과 샘플용 멍멍이 사진이 들어있거든요.

[bsyu@centos01 darknet]$  ls -l cfg/yolov3.cfg data/dog.jpg
-rw-r--r-- 1 bsyu bsyu   8342 Jan 30 15:19 cfg/yolov3.cfg
-rw-r--r-- 1 bsyu bsyu 163759 Jan 30 15:19 data/dog.jpg

이 dog.jpg를 download 받아보면 아래와 같습니다.


이제 테스트를 위해, 미리 멍멍이를 감지하도록 YOLO v3로 pre-train된 weight file을 download 합니다.

[bsyu@centos01 darknet]$ wget https://pjreddie.com/media/files/yolov3.weights

이것으로 data/dog.jpg 사진 속의 object를 'detect' 하는 명령을 내려보겠습니다.

[bsyu@centos01 darknet]$ ./darknet detect cfg/yolov3.cfg yolov3.weights data/dog.jpg
layer     filters    size              input                output
    0 conv     32  3 x 3 / 1   608 x 608 x   3   ->   608 x 608 x  32  0.639 BFLOPs
    1 conv     64  3 x 3 / 2   608 x 608 x  32   ->   304 x 304 x  64  3.407 BFLOPs
    2 conv     32  1 x 1 / 1   304 x 304 x  64   ->   304 x 304 x  32  0.379 BFLOPs
    3 conv     64  3 x 3 / 1   304 x 304 x  32   ->   304 x 304 x  64  3.407 BFLOPs
    4 res    1                 304 x 304 x  64   ->   304 x 304 x  64
    5 conv    128  3 x 3 / 2   304 x 304 x  64   ->   152 x 152 x 128  3.407 BFLOPs
    6 conv     64  1 x 1 / 1   152 x 152 x 128   ->   152 x 152 x  64  0.379 BFLOPs
...
  104 conv    256  3 x 3 / 1    76 x  76 x 128   ->    76 x  76 x 256  3.407 BFLOPs
  105 conv    255  1 x 1 / 1    76 x  76 x 256   ->    76 x  76 x 255  0.754 BFLOPs
  106 yolo
Loading weights from yolov3.weights...Done!
data/dog.jpg: Predicted in 27.192135 seconds.
dog: 100%
truck: 92%
bicycle: 99%

우리가 OpenCV로 darknet을 build하지 않았기 때문에 직접 사진이 나오지는 않지만 darknet은 predictions.jpg로 그 결과를 저장합니다.

[bsyu@centos01 darknet]$ ls -ltr | tail -n 3
-rwxr-xr-x 1 bsyu bsyu    719872 Jan 30 15:29 libdarknet.so
-rwxr-xr-x 1 bsyu bsyu    841976 Jan 30 15:29 darknet
-rw-r--r-- 1 bsyu bsyu    119208 Jan 30 15:41 predictions.jpg

이 predictions.jpg을 PC로 download 받아보면 그 결과는 아래와 같습니다.


2019년 1월 9일 수요일

ppc64le Redhat 서버에서 x86 hadoop cluster에 대해 hive로 query 수행하기

POWER9 CPU와 V100 GPU를 장착한 AC922 서버를 deep learning 용도로 사용하는 환경에서, training에 필요한 dataset은 x86 Cloudera hadoop cluster로부터 가져와야 할 필요가 있을 수 있습니다.

그런 경우, 방법은 크게 2가지가 있습니다.  하나는 그냥 hadoop 본연의 기능을 이용하는 것이고, 나머지 하나는 PyHive를 이용하는 것입니다.  이 포스팅에서는 hadoop 본연의 기능을 이용하는 방법을 먼저 다루겠습니다.  Pyhive를 이용하는 방법은 다음 posting에서 정리하겠습니다.

Hadoop 본연의 기능을 이용하려면 (당연히) ppc64le에 hadoop과 hive를 설치해야 합니다.  여기서는 접근해야 하는 x86 hadoop cluster에 Cloudera 5.14가 설치되어 있다고 가정하겠습니다.  CDH 5.14에는 hadoop 2.6.0과 hive 1.10이 들어있습니다.

먼저, ppc64le용 hadoop과 hive를 source로부터 build 합니다.  이 포스팅에 올려놓은 것처럼 source에서 직접 build하셔도 되고, 제가 미리 build해놓은 것을 download 받아 적절한 directory에 풀어놓기만 해도 됩니다.  제가 build 해놓은 것은 아래 ink의 Google drive에 올려놓았습니다.

hadoop-2.6.5.tar.gz : https://drive.google.com/open?id=12B1e6mBLBOOUW6oajwDMYTUap6iUIHEG

apache-hive-1.1.1-bin.tar.gz : https://drive.google.com/open?id=1Qg-fxWXFoqzwcXEjvXpL2sb9Tk9lssg-

위에서 내려받은 tar.gz을 아래와 같이 적절한 directory에 풀어주면 설치는 끝납니다.

여기서는 /home/hadoop-2.6.5 가 HADOOP_HOME이, 그리고 /home/apache-hive-1.1.1-bin 이 HIVE_HOME 이 됩니다.

[redhat74] root:/root> sudo tar -zxf /home/bsyu/files/hadoop-2.6.5-src/hadoop-dist/target/hadoop-2.6.5.tar.gz -C /home

[redhat74] root:/root> sudo tar -zxf /home/bsyu/files/hive-release-1.1.1/packaging/target/apache-hive-1.1.1-bin.tar.gz -C /home

그리고 다음과 같이 JAVA_HOME과 PATH를 환경에 맞게 설정해줘야 합니다.

[redhat74] root:/root> export JAVA_HOME=/usr/lib/jvm/java-1.8.0-openjdk-1.8.0.191.b12-1.el7_6.ppc64le

[redhat74] root:/root> export PATH=/home/apache-hive-1.1.1-bin/bin:/home/hadoop-2.6.5/bin:$PATH

그 다음으로 할 일은 접근해야 하는 x86 Cloudera cluster의 namenode로부터 주요 xml 구성 파일들을 그대로 copy해오는 것입니다.  특히 아래 2개를 해오셔야 합니다.  그 내용은 전혀 바꾸지 않아도 됩니다.  이러면 이 ppc64le 서버는 x86 Cloudera cluster의 slave도 아니면서 그 HDFS 및 Hive에 접근할 수 있는 것입니다.   물론 이 서버들 간에는 해당 user가 password를 답하지 않고서도 ssh를 할 수 있도록 ~/.ssh/authorized_keys 등을 미리 구성해놓아야 합니다.

(아래에서 10.10.14.71이 x86 Cloudera cluster의 namenode이자 hive 서버입니다.) 

[redhat74] root:/root> scp 10.10.14.71:/etc/hadoop/conf.cloudera.yarn/*.xml   /home/hadoop-2.6.5/etc/hadoop

[redhat74] root:/root> scp 10.10.14.71:/etc/hive/conf/*.xml   /home/apache-hive-1.1.1-bin/conf

이제 ppc64le 서버에서 hadoop 명령을 내려보면 x86 Cloudera cluster의 HDFS의 file에 접근이 가능합니다.

[redhat74] root:/root> hadoop fs -df
Filesystem                      Size       Used     Available  Use%
hdfs://powervc131:8020  871687405568  620453786  778279674022    0%

[redhat74] root:/root> hadoop fs -ls /user/hive/warehouse
Found 1 items
drwxrwxrwt   - anonymous hive          0 2019-01-09 14:48 /user/hive/warehouse/pokes

이제 hive로 x86 Cloudera cluster를 향해 query를 날려보겠습니다.  먼저 다음과 같이 환경변수를 설정합니다.  이걸 해주지 않으면 이 stackoverflow에서 언급된 "Found class jline.Terminal, but interface was expected" error를 만나게 됩니다.  ( https://stackoverflow.com/questions/28997441/hive-startup-error-terminal-initialization-failed-falling-back-to-unsupporte )

[redhat74] root:/root> export HADOOP_USER_CLASSPATH_FIRST=true

그 다음에 hive를 구동하여, 마치 AC922 서버가 x86 Cloudera cluster의 일원인 것처럼 자연스럽게 원하는 query를 날리시면 됩니다.   아래와 같이, x86 Cloudera 속에 들어있던 pokes라는 table의 data가 그대로 잘 나오는 것을 보실 수 있습니다.

[redhat74] root:/root> hive
...
hive> select * from pokes;
OK
1       "i love donut"
2       you love pretzel
3       "she loves bagel"
1       "i love donut"
2       you love pretzel
3       "she loves bagel"
1       "i love donut"
2       you love pretzel
3       "she loves bagel"
Time taken: 2.19 seconds, Fetched: 9 row(s)


(좋아, 자연스러웠어 !)


다른 방법을 쓸 수도 있습니다.  이는 HiveServer2를 이용하는 방법인데, CDH 5.14에서는 HiveServer2가 default로 구동되니까 x86 Cloudera cluster에서 별도로 구성을 해주실 것은 없을 겁니다.  위에서 설치한 hive에 포함된 beeline을 이용하여 HiveServer2에 접속할 수 있습니다.  다만 이때는 접속하는 서버를 아래와 같이 -u 옵션으로 지정하셔야 합니다.

[redhat74] root:/root> beeline -u jdbc:hive2://10.10.14.71:10000
scan complete in 2ms
...
Beeline version 1.1.1 by Apache Hive

0: jdbc:hive2://10.10.14.71:10000> select * from pokes;
...
INFO  : OK
+------------+--------------------+--+
| pokes.foo  |     pokes.bar      |
+------------+--------------------+--+
| 1          | "i love donut"     |
| 2          | you love pretzel   |
| 3          | "she loves bagel"  |
| 1          | "i love donut"     |
| 2          | you love pretzel   |
| 3          | "she loves bagel"  |
| 1          | "i love donut"     |
| 2          | you love pretzel   |
| 3          | "she loves bagel"  |
+------------+--------------------+--+
9 rows selected (0.565 seconds)

Redhat ppc64le 상에서의 hadoop 및 hive 설치

HortonWorks (HDP)를 사용하는 것이 정식이겠습니다만, 여기서는 source로부터 build하는 방법을 다루겠습니다.

먼저 다음과 같이 maven 등 필요 OS package들을 yum으로 설치합니다.

[bsyu@centos01 files]$ sudo yum install maven protobuf-compiler zlib-devel snappy-devel pkgconfig autoconf automake libtool

이어서 JAVA_HOME 등 환경변수를 설정합니다.

[bsyu@centos01 files]$ export JAVA_HOME=/usr/lib/jvm/java-1.8.0-openjdk-1.8.0.191.b12-1.el7_6.ppc64le

[bsyu@centos01 files]$ export MAVEN_OPTS="-Xmx2048m"

# hadoop build

여기서는 hadoop 2.6.5를 build 하겠습니다.  그 source를 가져오고 압축을 해제합니다.

[bsyu@centos01 files]$ wget https://archive.apache.org/dist/hadoop/common/hadoop-2.6.5/hadoop-2.6.5-src.tar.gz

[bsyu@centos01 files]$ tar -zxf hadoop-2.6.5-src.tar.gz

[bsyu@centos01 files]$ cd hadoop-2.6.5-src/

Maven으로 build하는 명령은 아래와 같이 매우 간단합니다.

[bsyu@centos01 hadoop-2.6.0-src]$ mvn package -Pdist -DskipTests -Dtar -Dmaven.javadoc.skip=true

(원래 hadoop 2.6은 java 버전 7에서 지원되던 것입니다.  그래서 java 8 환경에서는 -Dmaven.javadoc.skip=true를 붙이지 않으면 javadoc 관련하여 error가 나는 부분이 있으니 꼭 붙이시기 바랍니다.)

이렇게 생성된 hadoop-2.6.5.tar.gz을 적당한 directory에 풀어놓으면 설치는 끝납니다.  여기서는 /home/hadoop-2.6.5 가 HADOOP_HOME 이 됩니다.

[bsyu@centos01 ~]$ sudo tar -zxf /home/bsyu/files/hadoop-2.6.5-src/hadoop-dist/target/hadoop-2.6.5.tar.gz -C /home


# hive build

여기서는 hive 1.1,1을 build 하겠습니다.  그 source를 가져오고 압축을 해제합니다.

[bsyu@centos01 files]$ wget https://github.com/apache/hive/archive/release-1.1.1.tar.gz

[bsyu@centos01 files]$ tar -zxf release-1.1.1.tar.gz

[bsyu@centos01 files]$ cd hive-release-1.1.1

다음과 같이 hadoop class를 지정해주고, 특히 hadoop v2 환경에서 사용할 것임을 지정하는 -Phadoop-2를 붙여서 maven으로 build 해주면 됩니다.  

[bsyu@centos01 hive-release-1.1.1]$ mvn package -Pdist -Phadoop-2 -DskipTests -Dtar -Dmaven.javadoc.skip=true
...
[INFO] Building tar: /home/bsyu/files/hive-release-1.1.1/packaging/target/apache-hive-1.1.1-bin.tar.gz
...
[INFO] BUILD SUCCESS
[INFO] ------------------------------------------------------------------------
[INFO] Total time: 10:10.367s
[INFO] Finished at: Wed Jan 09 11:27:01 KST 2019
[INFO] Final Memory: 179M/897M
[INFO] ------------------------------------------------------------------------


이렇게 생성된 apache-hive-1.1.1-bin.tar.gz을 적당한 directory에 풀어놓으면 설치는 끝납니다.  여기서는 /home/apache-hive-1.1.1-bin 이 HIVE_HOME 이 됩니다.

[bsyu@centos01 ~]$ sudo tar -zxf /home/bsyu/files/hive-release-1.1.1/packaging/target/apache-hive-1.1.1-bin.tar.gz -C /home

위에서 build한 hadoop-2.6.5.tar.gz 과 apache-hive-1.1.1-bin.tar.gz 를 Google drive에 올려놓았습니다.


2018년 12월 19일 수요일

Tensorflow보다 46배 빠른 deep learning framework ?? - Snap ML 소개

IBM에서는 GPU 서버 등 HW만 만드는 것이 아니라 tensorflow나 caffe와 같은 deep learning용 framework SW도 개발합니다.  Snap ML이라고 하는 것이 바로 그것입니다.   이름이 왜 Snap ML이냐하면 손가락을 딱 튕기는(snap) 순식간에 training이 이루어질 정도로 빠르다고 해서 그렇습니다.


(finger snap 하면 타노스인데 말입니다.)


이 Snap ML의 성능과 효용성에 대해서는 아래 IBM 공식 blog에 잘 나와 있습니다.

https://www.ibm.com/blogs/research/2018/03/machine-learning-benchmark/

위 블로그 내용을 요약하면 구글이 Google Cloud Platform (worker machine 60대 + parameter machine 34대)에서 tensorflow를 60분 동안 걸려 training한 결과 얻은 log loss를 IBM Snap ML은 IBM POWER9과 NVIDIA GPU를 장착한 AC922 4대에서 Snap ML로 불과 91.5초의 training 만으로 얻었다는 것입니다.  여기에 사용된 dataset은 Criteo Labs에서 제공하는 실제 internet 광고 click 건수 data로서, 총 40억 row에 달하는 광대한 data입니다. 

이런 고성능이 가능했던 것은 물론 CPU와 GPU 간을 PCI 버스가 아닌 NVLink로 연결하는 AC922 서버의 우수한 아키텍처 영향도 있습니다만, 이 Snap ML이라는 framework SW 자체의 우수성도 있습니다. 

이 posting에서는 PowerAI 5.4 버전에 포함된 Snap ML을 설치하고 거기에 포함된 example 몇 개를 돌려보겠습니다. 

먼저, Anaconda2 5.2를 설치하여 conda/python 환경을 구성합니다.

[root@localhost home]# wget https://repo.continuum.io/archive/Anaconda2-5.2.0-Linux-ppc64le.sh

[root@localhost home]# chmod a+x Anaconda2-5.2.0-Linux-ppc64le.sh

[root@localhost home]# ./Anaconda2-5.2.0-Linux-ppc64le.sh

[root@localhost home]# . /root/.bashrc

[root@localhost home]# which python
/opt/anaconda2/bin/python


그 다음에 PowerAI의 장점을 살려 아주 간단하게 Snap ML을 설치합니다. 

[root@localhost home]# yum install snap-ml-local.ppc64le
==============================================================================================
 Package              Arch         Version                 Repository                    Size
==============================================================================================
Installing:
 snap-ml-local        ppc64le      1.1.0-241.1887dec       mldl-repo-local               29 M
Installing for dependencies:
 powerai-license      ppc64le      5.4.0-124.150cee0       mldl-repo-local              4.3 M
 python-devel         ppc64le      2.7.5-76.el7            rhel-7-for-power-9-rpms      398 k


이렇게 설치된 snap-ml-local 속에는 아래와 같은 fileset들이 들어 있습니다.   보시다시피 저 위의 IBM 공식 블로그에 소개했던 Criteo Teraclick training의 미니 버전이라고 할 수 있는 criteo Kaggle example도 들어있습니다.

[root@localhost home]# rpm -ql snap-ml-local-1.1.0-241.1887dec.ppc64le
/opt/DL
/opt/DL/snap-ml-local
/opt/DL/snap-ml-local/bin
/opt/DL/snap-ml-local/bin/check_dependencies
/opt/DL/snap-ml-local/bin/install_dependencies
/opt/DL/snap-ml-local/bin/snap-ml-local-activate
/opt/DL/snap-ml-local/conda-pkgs
/opt/DL/snap-ml-local/conda-pkgs/channeldata.json
/opt/DL/snap-ml-local/conda-pkgs/icons
...
/opt/DL/snap-ml-local/examples/creditcard
/opt/DL/snap-ml-local/examples/creditcard/README.md
/opt/DL/snap-ml-local/examples/creditcard/example-creditcard.py
/opt/DL/snap-ml-local/examples/creditcard/preprocess-creditcard.py
/opt/DL/snap-ml-local/examples/criteo
/opt/DL/snap-ml-local/examples/criteo/README.md
/opt/DL/snap-ml-local/examples/criteo/example-criteo-kaggle-privacy.py
/opt/DL/snap-ml-local/examples/criteo/example-criteo-kaggle.py
/opt/DL/snap-ml-local/examples/criteo/preprocess-criteo-kaggle-privacy.py
/opt/DL/snap-ml-local/examples/criteo/preprocess-criteo-kaggle.py
...

Snap ML의 사용을 위해서는 먼저 install_dependencies를 수행하여 관련 conda package들을 설치합니다.

[root@localhost home]# /opt/DL/snap-ml-local/bin/install_dependencies
...
    package                    |            build
    ---------------------------|-----------------
    powerai-snap-ml-local-prereqs-1.1.0_241.1887dec|           py27_0           4 KB  file:///opt/DL/snap-ml-local/conda-pkgs
    conda-4.5.11               |           py27_0         1.0 MB
    openssl-1.0.2p             |       h14c3975_0         3.3 MB
    openblas-devel-0.2.20      |                7         101 KB
    blas-1.1                   |         openblas           4 KB  file:///opt/DL/snap-ml-local/conda-pkgs
    certifi-2018.11.29         |           py27_0         146 KB
    pai4sk-0.20rc1_241.1887dec |           py27_0        14.0 MB  file:///opt/DL/snap-ml-local/conda-pkgs
    ------------------------------------------------------------
                                           Total:        18.5 MB
...

그리고 PowerAI license에 동의하는 script를 수행하고 이어서 snap-ml-local-activate를 수행하여 PATH 등의 환경 변수를 설정합니다.

[root@localhost home]# /opt/DL/license/bin/accept-powerai-license.sh

[root@localhost home]# source /opt/DL/snap-ml-local/bin/snap-ml-local-activate

이제 Amazone cloud에서 Criteo의 test dataset 미니 버전을 download 합니다.  4.5GB 정도 됩니다.

[root@localhost home]# mkdir data && cd data

[root@localhost data]# wget https://s3-us-west-2.amazonaws.com/criteo-public-svm-data/criteo.kaggle2014.svm.tar.gz
Length: 4849417655 (4.5G) [application/x-tar]
Saving to: ‘criteo.kaggle2014.svm.tar.gz’
100%[======================================>] 4,849,417,655 22.5MB/s   in 4m 29s
2018-12-14 12:28:34 (17.2 MB/s) - ‘criteo.kaggle2014.svm.tar.gz’ saved [4849417655/4849417655]

이 tar 압축을 풀고 data preprocessing을 위한 python code를 수행합니다.  약 1시간 정도 걸립니다.

[root@localhost data]# tar xzf criteo.kaggle2014.svm.tar.gz 

[root@localhost data]# time python /opt/DL/snap-ml-local/examples/criteo/preprocess-criteo-kaggle.py --data_path=/home
real    67m57.038s
user    67m20.277s
sys     0m27.750s


이제 다음과 같이 criteo kaggle2014 dataset의 포맷이 완료되었습니다. 

[root@localhost data]# ls -ltr crit*
-r--r--r-- 1 1007 1007  3523847664 Sep 27  2017 criteo.kaggle2014.test.svm
-r--r--r-- 1 1007 1007 26737621696 Sep 27  2017 criteo.kaggle2014.train.svm
-rw-r--r-- 1 root root  4849417655 Sep 27  2017 criteo.kaggle2014.svm.tar.gz
-rw-r--r-- 1 root root 16227489113 Dec 14 13:46 criteo.kaggle2014.X_train.npz
-rw-r--r-- 1 root root  5409163153 Dec 14 13:47 criteo.kaggle2014.X_test.npz
-rw-r--r-- 1 root root   275043776 Dec 14 13:47 criteo.kaggle2014.y_train.npy
-rw-r--r-- 1 root root    91681320 Dec 14 13:47 criteo.kaggle2014.y_test.npy


이걸 GPU 1번 1개를 이용하여 training하기 위해 다음과 같이 example-criteo-kaggle.py를 수행해 줍니다.

[root@localhost data]# time python /opt/DL/snap-ml-local/examples/criteo/example-criteo-kaggle.py --data_path=/home --use_gpu --device_ids 1
Data load time (s): 28.92
[Info] Tolerance 0.001 attained after 49 epochs.
/opt/anaconda2/lib/python2.7/site-packages/pai4sk/sml_solvers/logistic.py:406: UserWarning: PowerAI: Default solver is set to 'snapml'. Specify a solver to silence this warning.
  UserWarning)
[pai4sk] Training time (s):  25.89
[pai4sk] Logarithmic loss:   0.4558
[Info] Tolerance 0.001 attained after 49 epochs.
/opt/anaconda2/lib/python2.7/site-packages/pai4sk/linear_model/logistic.py:432: FutureWarning: Default solver will be changed to 'lbfgs' in 0.22. Specify a solver to silence this warning.
  FutureWarning)
[pai4sk.lmodel] Training time (s):  32.28
[pai4sk.lmodel] Logarithmic loss:   0.4558
[sklearn] Training time (s):  624.55
[sklearn] Logarithmic loss:   0.4558

real    12m14.974s
user    11m57.544s
sys     0m34.245s


위의 example 결과는 크게 3가지입니다. 

[pai4sk] Training time (s):  25.89 :  Snap ML을 이용한 training 결과
[pai4sk.lmodel] Training time (s):  32.28 :  Snap ML Linear Regression을 이용한 training 결과
[sklearn] Training time (s):  624.55 :  일반 sklearn을 이용한 training 결과

즉, Snap ML을 이용하면 일반 sklearn을 이용하는 것보다 거의 25배 더 빨리 training을 마칠 수 있으며, 그럼에도 불구하고 log loss는 비슷한 수준이라는 것을 아실 수 있습니다.

더 자세한 내용은 아래 URL들을 참조하시기 바랍니다.

https://ibmsoe.github.io/snap-ml-doc/index.html
https://ibmsoe.github.io/snap-ml-doc/tutorials.html
https://ibmsoe.github.io/snap-ml-doc/notebookcreditlocal.html#notebook-credit-local
https://ibmsoe.github.io/snap-ml-doc/pai4skapidocumentation.html#pai4sk-api-documentation

H2O Driverless AI를 이용한 Kaggle 도전 : Creditcard fraud detection

이번 posting에서는 H2O Driverless AI의 정확도가 과연 어느 정도인지 좀더 현실적으로 보여주는 테스트를 돌려보겠습니다.

Kaggle이라는 것은 일종의 data science 경쟁 대회라고 보시면 됩니다.  국가기관이나 기업 등에서 자신들이 해석하기 어려운 (주로 비인식처리된) 실제 data를 올려놓고 전세계 scientist들에게 그 분석 방법에 대해 경쟁을 벌이도록 하는 것입니다.  저는 data scientist와는 100만 광년 정도의 거리에 있는 일개 시스템 엔지니어입니다만, H2O Driverless AI의 힘을 빌어 아래의 신용카드 사기 예측 모델 생성에 도전해보겠습니다.

https://www.kaggle.com/mlg-ulb/creditcardfraud/home

여기서 제공되는 data는 https://www.kaggle.com/mlg-ulb/creditcardfraud/downloads/creditcardfraud.zip 에 올려져 있습니다.  Facebook이나 Google 등으로 로그인해야 download가 가능합니다.

압축을 풀면 다음과 같이 28만이 넘는 row를 가진 csv 파일을 얻을 수 있습니다.  이 중 마지막 3천 row를 뚝 잘라 creditcard_test1.csv로 만들고, 나머지 것을 creditcard_train.csv으로 쓰겠습니다.

[bsyu@redhat74 data]$ wc -l creditcard.csv
284808 creditcard.csv

[bsyu@redhat74 data]$ ls -l creditcard*.csv
-rw-rw-r-- 1 bsyu bsyu 150828752 Mar 23  2018 creditcard.csv

[bsyu@redhat74 data]$ head -n 1 creditcard.csv > creditcard_test.csv

[bsyu@redhat74 data]$ tail -n 3000 creditcard.csv >> creditcard_test1.csv

[bsyu@redhat74 data]$ head -n 283808 creditcard.csv > creditcard_train.csv

각 row는 아래와 같이 비식별화처리를 거친 모종의 값으로 되어 있습니다.  여기서 비식별화처리가 되지 않은 column은 맨마지막 2개, 즉 Amount와 Class입니다.  Amount는 카드 사용금액이고, Class가 0이면 정상거래, 1이면 사기거래입니다.

[bsyu@redhat74 data]$ head -n 2 creditcard_train.csv
"Time","V1","V2","V3","V4","V5","V6","V7","V8","V9","V10","V11","V12","V13","V14","V15","V16","V17","V18","V19","V20","V21","V22","V23","V24","V25","V26","V27","V28","Amount","Class"
0,-1.3598071336738,-0.0727811733098497,2.53634673796914,1.37815522427443,-0.338320769942518,0.462387777762292,0.239598554061257,0.0986979012610507,0.363786969611213,0.0907941719789316,-0.551599533260813,-0.617800855762348,-0.991389847235408,-0.311169353699879,1.46817697209427,-0.470400525259478,0.207971241929242,0.0257905801985591,0.403992960255733,0.251412098239705,-0.018306777944153,0.277837575558899,-0.110473910188767,0.0669280749146731,0.128539358273528,-0.189114843888824,0.133558376740387,-0.0210530534538215,149.62,"0"

이 dataset은 Class 측면에서 보면 굉장히 빈도가 낮은 것입니다.  즉, 전체 28만건이 넘는 거래들 중, 사기거래, 즉 Class가 1인 거래는 고작 492건에 불과합니다.  Percentage로 따지면 고작 0.173%에 불과합니다.   보통 machine learning에서 만든 모델의 정확도가 90%를 넘어가면 꽤 성공적이라고들 하는데, 이런 경우에는 어떤 거래를 판정하라는 요청을 받았을 때 그냥 무조건 정상거래라고 판정하면 99.8% 이상의 정확도를 나타냈다고(?) 주장할 수도 있습니다.  과연 이런 극악한 조건에서 H2O Driverless AI는 제대로 된 모델을 만들 수 있을까요 ?

[bsyu@redhat74 data]$ cut -d"," -f31 creditcard.csv | grep 1 | wc -l
492

우리의 목표는 이 data를 이용해서 어떤 거래가 사기인지 정상인지 판별하는 model을 만드는 것입니다.  그 성공 여부 판별을 위해 잘라낸 test dataset 3천 row 중에 실제 사기 건수는 얼마나 될까요 ?  고작 4건입니다.  588번째, 871번째, 874번째, 그리고 921번째 row입니다.

[bsyu@redhat74 data]$ cut -d"," -f31 creditcard_test1.csv | grep 1
"1"
"1"
"1"
"1"

[bsyu@redhat74 data]$ cut -d"," -f31 creditcard_test1.csv | head -n 589 | tail -n 5
"0"
"0"
"0"
"1"
"0"

[bsyu@redhat74 data]$ cut -d"," -f31 creditcard_test1.csv | head -n 875 | tail -n 7
"0"
"0"
"1"
"0"
"0"
"1"
"0"

[bsyu@redhat74 data]$ cut -d"," -f31 creditcard_test1.csv | head -n 923 | tail -n 5
"0"
"0"
"1"
"0"
"0"

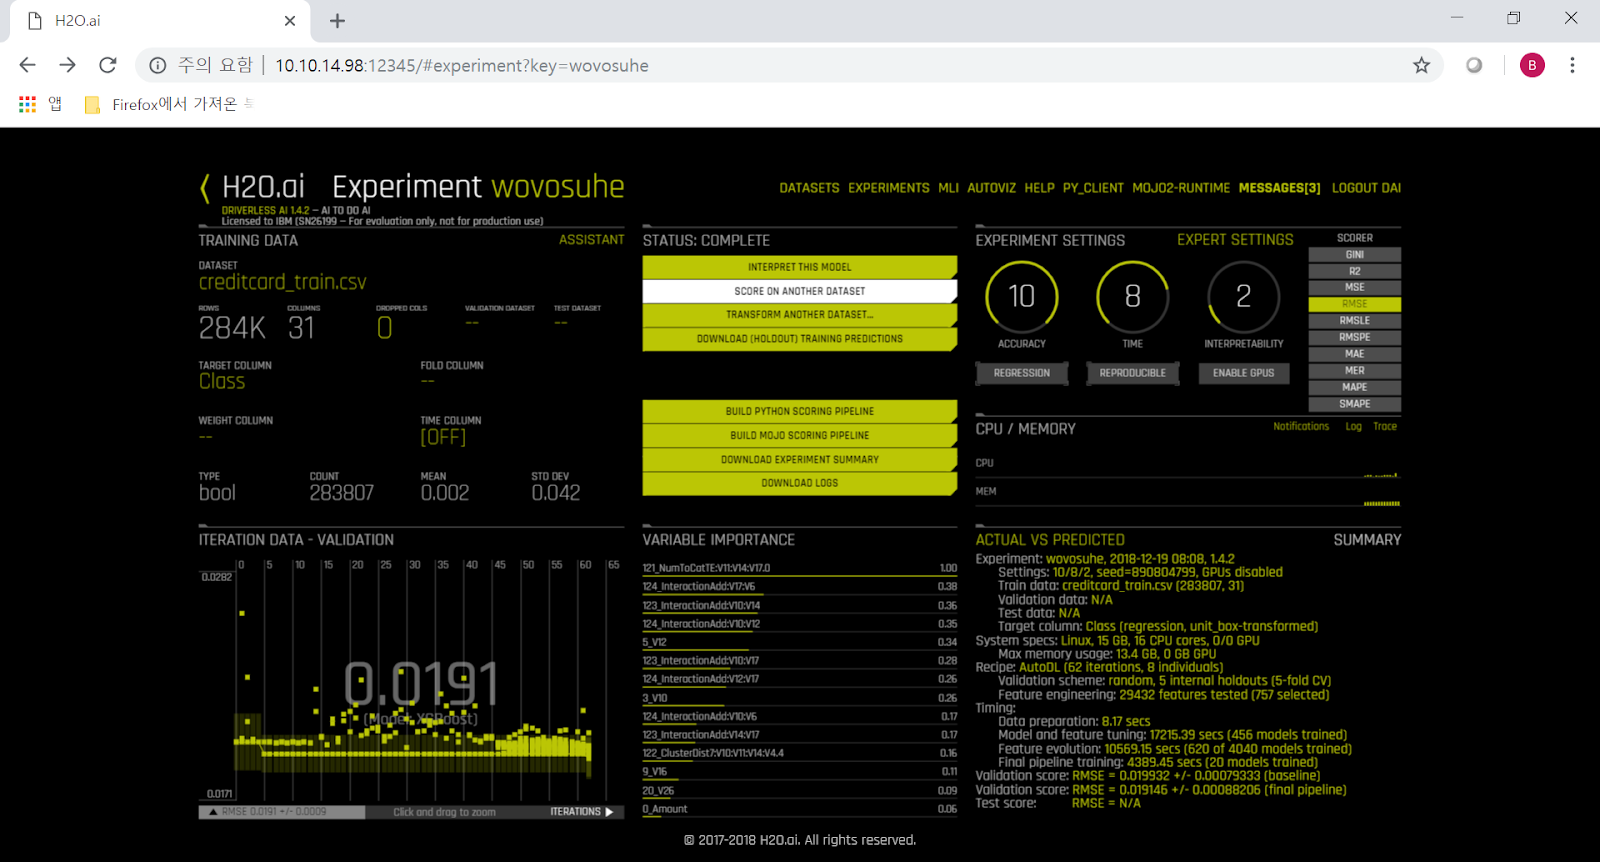
다음과 같이 H2O Driverless AI에 creditcard_train.csv를 add 하고 target column은 'Class'로 지정한 뒤, control knob은 Accuracy 10, Time 8, Interpretability 2로 맞추고 training (H2O 용어로는 experiment)를 시작했습니다.   Accuracy 항목에서 Regression으로 수행하고 있기 때문에, 결과 예측값은 0이나 1의 숫자가 아닌, 그 중간의 소수로 나올 것입니다.  그 값이 1에 가까울 수록 사기일 확률이 높고, 0에 가까울 수록 정상거래일 것입니다. 


참고로 이번에는 GPU를 갖춘 시스템을 구하지 못해서, POWER8 가상 머신에서 CPU core 2개를 이용해서 수행했습니다.   SMT=8으로 되어 있기 때문에, OS에게는 이것이 2개의 core가 아닌 16개의 logical CPU로 인식됩니다.  덕분에 CPU 사용률이 매우 높고, 또 시간도 엄청나게 오래 걸리는 것을 보실 수 있습니다.


최종적으로 만들어진 model은 크기가 무려 7GB나 되고, 만드는데 거의 9시간이 걸렸습니다.


이제 이 model을 열어 test dataset으로 판별을 해보겠습니다.  맨 처음에 training을 시작할 때 RMSE (root mean square error)가 0.0194로 시작했었는데, 최종적으로는 0.0191로 약간 줄어있는 것을 보실 수 있습니다.


Score on Anonther Dataset을 클릭하면 dataset을 선택하게 되어 있는데, 미리 서버에 올려둔 creditcard_test1.csv을 선택하면 약 1분 정도 prediction이 수행된 뒤에 그 결과로 (input인  creditcard_test1.csv가 3천 row이므로)  Class column에 대한 3천 row의 예측값을 담은 csv 파일을 download 할 수 있게 해줍니다.   그 결과는 아래와 같습니다.


최소한 정상거래를 사기거래라고 판정한 것은 하나도 없습니다.   대부분의 row는 사기 확률이 0%로 나오고, 실제로는 사기였던 4개 row에 대해서는 위와 같이 나옵니다.  즉 2개는 98%, 99%로서 사기가 확실하고, 나머지 2개는 사기 확률이 36%와 49%로 나오는 것이지요.  이 정도면 상당히 높은 수준의 결과라고 판단됩니다.   정말 멋지지 않습니까 ?

---------------------------

추가로, training dataset을 좀더 작게, 대신 test dataset을 좀더 크게 하여 model을 생성하고 테스트해보겠습니다.   아래와 같이, 전체 28만4천건 중에 26만건을 training dataset으로, 그리고 나머지 2만4천건을 test dataset으로 잘라냈습니다.

[bsyu@redhat74 data]$ wc -l credi*
   284808 creditcard.csv

[bsyu@redhat74 data]$ head -n 260001 creditcard.csv > credit_train.csv

[bsyu@redhat74 data]$ head -n 1 creditcard.csv > credit_test.csv

[bsyu@redhat74 data]$ tail -n 24807 creditcard.csv >> credit_test.csv

[bsyu@redhat74 data]$ wc -l creditcard.csv credit_train.csv credit_test.csv
   284808 creditcard.csv
   260001 credit_train.csv
    24808 credit_test.csv

이것을 다음과 같이 Accuracy 10, Time 7, Interpretability 2로 맞추고 training 했습니다.


그 결과로 (역시 GPU 없이 POWER8 CPU core 2개만 이용해서) training 하는데 총 13시간 정도가 걸렸습니다.


이 자동생성된 model을 이용하여 위에서 준비한 2만4천건의 test dataset인 credit_test.csv에 대한 prediction을 수행했고, 그 결과로 gerewika_preds_799411be.csv 파일을 얻었습니다.


[bsyu@redhat74 data]$ head /tmp/gerewika_preds_799411be.csv
Class
4.00790426897506e-5
2.7836374905953808e-5
4.3067764191826185e-5
6.776587835599978e-5
0.0007914757505702477
0.00026333562696054583
0.0003490925939070681
0.00012611508177717525
3.6875439932445686e-5


위에서 준비했던 credit_test.csv 속에는 과연 사기 건수가 몇건이었을까요 ?  그 column 중 31번째 column인 Class의 값이 1인 것이 몇건인지를 세어보겠습니다.  

[bsyu@redhat74 data]$ cut -f31 -d',' ./credit_test.csv | grep 1 | wc -l
21

위와 같이 총 21건입니다.

과연 우리가 얻은 gerewika_preds_799411be.csv 파일 속에서 사기일 가능성이 높은 칼럼은 몇 개일까요 ?  그것을 세기 위해 다음과 같은 script를 만들었습니다.

[bsyu@redhat74 data]$ cat count.sh
if [[ $# -ne 2 ]]
then
echo "Usage ./count.sh digit filename"
fi
j=1
for i in `cat $2 `
do
m=$(printf "%f" "$i")
if (( $(echo "$m >= $1" | bc -l) ))
then
echo "Row_num is $j and the vlaue is $m"
fi
(( j=j+1 ))
done


여기서 몇 %일 때 이를 사기로 볼 것인지는 여러분이 직접 정하셔야 합니다.   일단 70%, 즉 0.70 이상이면 사기로 간주하는 것으로 해서 세어보겠습니다.

[bsyu@redhat74 data]$ ./count.sh 0.7 /tmp/gerewika_preds_799411be.csv
./count.sh: line 9: printf: Class: invalid number
Row_num is 1058 and the vlaue is 0.740187
Row_num is 1475 and the vlaue is 0.897596
Row_num is 1927 and the vlaue is 0.975030
Row_num is 2562 and the vlaue is 0.996552
Row_num is 2828 and the vlaue is 0.968835
Row_num is 3276 and the vlaue is 0.979910
Row_num is 3326 and the vlaue is 0.939915
Row_num is 3879 and the vlaue is 0.896258
Row_num is 16866 and the vlaue is 0.995111
Row_num is 19865 and the vlaue is 0.958619
Row_num is 20145 and the vlaue is 0.905748
Row_num is 20151 and the vlaue is 0.911095
Row_num is 21146 and the vlaue is 0.964987


70%를 기준으로 하니 13건이 사기로 판명되었습니다.   실제값인 21건을 정확하게 맞추지는 못했습니다.   Training dataset이 28만 row에서 23만 row로 줄어드니 확실히 정확도가 떨어지는 것을 보실 수 있습니다.   그런 상황에서도 적어도 정상 transaction을 사기 transaction으로 평가하는 일은 없군요.   참고로 test dataset 속의 실제 사기 transaction의 row #는 다음과 같습니다.

Row_num is 1058 and the vlaue is 1.000000
Row_num is 1475 and the vlaue is 1.000000
Row_num is 1927 and the vlaue is 1.000000
Row_num is 2562 and the vlaue is 1.000000
Row_num is 2828 and the vlaue is 1.000000
Row_num is 3082 and the vlaue is 1.000000
Row_num is 3276 and the vlaue is 1.000000
Row_num is 3326 and the vlaue is 1.000000
Row_num is 3879 and the vlaue is 1.000000
Row_num is 8377 and the vlaue is 1.000000
Row_num is 12523 and the vlaue is 1.000000
Row_num is 14384 and the vlaue is 1.000000
Row_num is 14477 and the vlaue is 1.000000
Row_num is 15994 and the vlaue is 1.000000
Row_num is 16073 and the vlaue is 1.000000
Row_num is 16866 and the vlaue is 1.000000
Row_num is 19865 and the vlaue is 1.000000
Row_num is 20145 and the vlaue is 1.000000
Row_num is 20151 and the vlaue is 1.000000
Row_num is 21146 and the vlaue is 1.000000
Row_num is 21676 and the vlaue is 1.000000


-----------------------------------------------


이하는 상기 model을 training한 뒤 얻은 MLI (machine learning interpretation) 항목의 결과입니다.

가장 알아보기 쉬운 KLIME의 설명을 보면 다음과 같습니다.  아래 그림에도 있습니다만, Class 항목이 1 증가할 때 V11은 0.0058 증가, V4는 0.0036 증가... 등의 상관관계를 Driverless AI가 분석해냈습니다.

Top Positive Global Attributions
V11   increase of  0.0058
V4    increase of  0.0036
V2    increase of  0.0024


------------------------------------

추가 테스트를 해봤습니다.  다음과 같이 약 250000번째 줄부터 4000 줄을 빼내어 credit_test.csv라는 test용 dataset을 만들고, 그 4000 줄을 뺀 나머지 부분으로 credit_train.csv이라는 training용 dataset을 만들었습니다.

ibmtest@digits:~/files/csv$ head -n 250001 creditcard.csv > credit_train.csv
ibmtest@digits:~/files/csv$ tail -n 30808 creditcard.csv >> credit_train.csv
ibmtest@digits:~/files/csv$ head -n 1 creditcard.csv > credit_test.csv
ibmtest@digits:~/files/csv$ head -n 254809 creditcard.csv | tail -n 4000 >> credit_test.csv
ibmtest@digits:~/files/csv$ wc -l credit_train.csv credit_test.csv
   280809 credit_train.csv
     4001 credit_test.csv
   284810 total

Training용 dataset에는 class가 1, 즉 사기 transaction이 총 484개 들어있고, test용 dataset에는 9개 들어있습니다.

ibmtest@digits:~/files/csv$ cut -f31 -d',' ./credit_train.csv | grep 1 | wc -l
484

ibmtest@digits:~/files/csv$ cut -f31 -d',' ./credit_test.csv | grep 1 | wc -l
9

이제 test용 dataset 중 몇번째 row가 사기 transaction인지 row #를 찾아보겠습니다.

ibmtest@digits:~/files/csv$ j=1

ibmtest@digits:~/files/csv$ for i in `cut -f31 -d',' ./credit_test.csv`
> do
> if [ "$i" == "\"1\"" ]
> then
> echo "Row_num is " $j
> fi
> ((j=j+1))
> done


Row_num is  671
Row_num is  1060
Row_num is  1075
Row_num is  1085
Row_num is  1098
Row_num is  1318
Row_num is  1968
Row_num is  3538
Row_num is  3589

이제 H2O DAI로 training을 한 뒤, 이 test dataset을 넣어서 예측을 해보았습니다.  그 결과는 다음과 같습니다.

30% (0.3)을 기준으로 하면 아래와 같이 9건 중 6건을 찾아냅니다.

ibmtest@digits:~/files/csv$ ./count.sh  0.3 miwatuvi_preds_c5262e68.csv
./count.sh: line 8: printf: Class: invalid number
Row_num is 671 and the vlaue is 1.000000
Row_num is 1060 and the vlaue is 0.950008
Row_num is 1098 and the vlaue is 0.904203
Row_num is 1318 and the vlaue is 1.000000
Row_num is 1968 and the vlaue is 1.000000
Row_num is 3538 and the vlaue is 0.303216

20% (0.2)을 기준으로 하면 아래와 같이 9건 중 7건을 찾아냅니다. 

ibmtest@digits:~/files/csv$ ./count.sh  0.2 miwatuvi_preds_c5262e68.csv
./count.sh: line 8: printf: Class: invalid number
Row_num is 671 and the vlaue is 1.000000
Row_num is 1060 and the vlaue is 0.950008
Row_num is 1098 and the vlaue is 0.904203
Row_num is 1318 and the vlaue is 1.000000
Row_num is 1968 and the vlaue is 1.000000
Row_num is 3538 and the vlaue is 0.303216
Row_num is 3589 and the vlaue is 0.296002