2019년 4월 8일 월요일
ppc64le Redhat 7 환경에서의 nvidia-docker2 대신 nvidia-container-runtime 사용
nvidia-docker는 현재 버전 2가 나와 있습니다만, 아직 Redhat 7 ppc64le에서는 버전 1만 지원이 되고 있습니다. 그렇다고 nvidia-docker2를 Redhat 7 ppc64le에서는 완전히 못 쓰는 것은 아닙니다. 수동으로 nvidia-container-runtime을 설치해주면 되기 때문입니다. 여기에 정리된 것은 아래 site에 나온 수동 등록 방법을 직접 ppc64le 아키텍처의 GPU 서버인 IBM AC922에서 수행해본 결과입니다.
https://github.com/nvidia/nvidia-container-runtime#docker-engine-setup
먼저 docker-ce를 설치하기 위해 docker.repo를 등록합니다.
[root@ac922 home]# vi /etc/yum.repos.d/docker.repo
[docker]
name=Docker
baseurl=http://ftp.unicamp.br/pub/ppc64el/rhel/7/docker-ppc64el/
enabled=1
gpgcheck=0
아래와 같이 nvidia-container-runtime.repo를 등록합니다.
[root@ac922 home]# distribution=$(. /etc/os-release;echo $ID$VERSION_ID)
[root@ac922 home]# echo $distribution
rhel7.5
[root@ac922 home]# curl -s -L https://nvidia.github.io/nvidia-container-runtime/$distribution/nvidia-container-runtime.repo | sudo tee /etc/yum.repos.d/nvidia-container-runtime.repo
[libnvidia-container]
name=libnvidia-container
baseurl=https://nvidia.github.io/libnvidia-container/centos7/$basearch
repo_gpgcheck=1
gpgcheck=0
enabled=1
gpgkey=https://nvidia.github.io/libnvidia-container/gpgkey
sslverify=1
sslcacert=/etc/pki/tls/certs/ca-bundle.crt
[nvidia-container-runtime]
name=nvidia-container-runtime
baseurl=https://nvidia.github.io/nvidia-container-runtime/centos7/$basearch
repo_gpgcheck=1
gpgcheck=0
enabled=1
gpgkey=https://nvidia.github.io/nvidia-container-runtime/gpgkey
sslverify=1
sslcacert=/etc/pki/tls/certs/ca-bundle.crt
이제 gpg 관련해서 key를 지울텐데, 여기서는 기존에 f796ecb0 key가 설치된 적이 없었기 때문에 error가 납니다. 에러는 무시하셔도 됩니다.
[root@ac922 home]# gpg --homedir /var/lib/yum/repos/ppc64le/7Server/nvidia-container-runtime/gpgdir --delete-key f796ecb0
gpg (GnuPG) 2.0.22; Copyright (C) 2013 Free Software Foundation, Inc.
This is free software: you are free to change and redistribute it.
There is NO WARRANTY, to the extent permitted by law.
gpg: keyblock resource `/var/lib/yum/repos/ppc64le/7Server/nvidia-container-runtime/gpgdir/secring.gpg': No such file or directory
gpg: keyblock resource `/var/lib/yum/repos/ppc64le/7Server/nvidia-container-runtime/gpgdir/pubring.gpg': No such file or directory
gpg: key "f796ecb0" not found: Unknown system error
gpg: f796ecb0: delete key failed: Unknown system error
다만 다음과 같은 error가 나는 경우가 있는데, 이는 어떻게든 고치셔야 합니다.
Repository cuda is listed more than once in the configuration
https://nvidia.github.io/libnvidia-container/centos7/ppc64le/repodata/repomd.xml: [Errno -1] repomd.xml signature could not be verified for libnvidia-container
Trying other mirror
가장 쉬운 방법은 아래와 같이 repo_gpgcheck=1을 0으로 바꿔서 repo에 대한 gpg check을 안 하도록 하는 것입니다.
[root@ac922 home]# vi /etc/yum.repos.d/nvidia-container-runtime.repo
...
#repo_gpgcheck=1
repo_gpgcheck=0
그 다음으로 yum makecache를 수행합니다. 일부 존재하지 않는 mirror site에 대해서 error가 날텐데, 무시하셔도 됩니다.
[root@ac922 home]# yum makecache
...
failure: repodata/6f7751fe9609cd7adda0ef3002368400ba63b01793d8a0fe0fea8ae56c3265c65015c9b5d274fbfab7b6c4aa8738a3df7e53c8de1987a410c91624412330825c-filelists.xml.xz from nvidia-container-runtime: [Errno 256] No more mirrors to try.
https://nvidia.github.io/nvidia-container-runtime/centos7/ppc64le/repodata/6f7751fe9609cd7adda0ef3002368400ba63b01793d8a0fe0fea8ae56c3265c65015c9b5d274fbfab7b6c4aa8738a3df7e53c8de1987a410c91624412330825c-filelists.xml.xz: [Errno 14] HTTPS Error 404 - Not Found
중요한 것은 아래와 같이 그 다음에 수행하는 yum list에서 nvidia-container가 보이기만 하면 된다는 것입니다.
[root@ac922 home]# yum list | grep nvidia | grep container
libnvidia-container-devel.ppc64le 1.0.0-1 libnvidia-container
libnvidia-container-static.ppc64le 1.0.0-1 libnvidia-container
libnvidia-container-tools.ppc64le 1.0.0-1 libnvidia-container
libnvidia-container1.ppc64le 1.0.0-1 libnvidia-container
libnvidia-container1-debuginfo.ppc64le 1.0.0-1 libnvidia-container
nvidia-container-runtime.ppc64le 2.0.0-1.docker18.03.1 nvidia-container-runtime
nvidia-container-runtime-hook.ppc64le 1.4.0-2 nvidia-container-runtime
이제 docker-ce를 설치합니다.
[root@ac922 home]# yum install -y docker-ce
이어서 nvidia-container-runtime를 설치합니다.
[root@ac922 home]# yum install -y libnvidia-container-devel nvidia-container-runtime
그리고나서 nvidia-runtime을 docker에 등록하기 위해 daemon configuration file을 아래와 같이 등록합니다. 이 방법 말고 위 site에서는 systemd drop-in file이라는 것을 써도 된다고 되어 있는데, 제가 해보니 그 방법은 뭐가 잘못 되었는지 error가 나더군요. 그러니 아래 방법을 쓰십시요.
[root@ac922 home]# vi /etc/docker/daemon.json
{
"runtimes": {
"nvidia": {
"path": "/usr/bin/nvidia-container-runtime",
"runtimeArgs": []
}
}
}
이제 위 config file에 따라 아래와 같이 docker를 시작합니다.
[root@ac922 home]# systemctl daemon-reload
[root@ac922 home]# systemctl start docker
이제 docker를 run 시켜 봅니다. 기존 nvidia-docker version 1과의 차이점은 이제 nvidia-docker라는 명령을 쓰는 것이 아니라 --runtime=nvidia라고 쓰면 된다는 것입니다. 이제 테스트를 위해 기존에 만들어 두었던 tensorflow 1.3을 담은 docker image를 구동시켜 보겠습니다.
[root@ac922 home]# docker run --runtime=nvidia --rm -ti bsyu/tf1.3-ppc64le:v0.1
...
root@d72b1ea6b739:/# python
Python 3.6.1 |Anaconda custom (64-bit)| (default, May 11 2017, 15:31:35)
[GCC 4.8.4] on linux
Type "help", "copyright", "credits" or "license" for more information.
>>> import tensorflow as tf
아래와 같이 GPU를 제대로 잡아오는지 보겠습니다. 잘 됩니다.
>>> sess=tf.Session()
2019-04-08 08:26:15.424143: I tensorflow/core/common_runtime/gpu/gpu_device.cc:955] Found device 0 with properties:
name: Tesla V100-SXM2-32GB
...
2019-04-08 08:26:15.730328: I tensorflow/core/common_runtime/gpu/gpu_device.cc:976] DMA: 0 1 2 3
2019-04-08 08:26:15.730347: I tensorflow/core/common_runtime/gpu/gpu_device.cc:986] 0: Y Y Y Y
2019-04-08 08:26:15.730365: I tensorflow/core/common_runtime/gpu/gpu_device.cc:986] 1: Y Y Y Y
2019-04-08 08:26:15.730382: I tensorflow/core/common_runtime/gpu/gpu_device.cc:986] 2: Y Y Y Y
2019-04-08 08:26:15.730397: I tensorflow/core/common_runtime/gpu/gpu_device.cc:986] 3: Y Y Y Y
2019-04-08 08:26:15.730428: I tensorflow/core/common_runtime/gpu/gpu_device.cc:1045] Creating TensorFlow device (/gpu:0) -> (device: 0, name: Tesla V100-SXM2-32GB, pci bus id: 0004:04:00.0)
2019-04-08 08:26:15.730450: I tensorflow/core/common_runtime/gpu/gpu_device.cc:1045] Creating TensorFlow device (/gpu:1) -> (device: 1, name: Tesla V100-SXM2-32GB, pci bus id: 0004:05:00.0)
2019-04-08 08:26:15.730468: I tensorflow/core/common_runtime/gpu/gpu_device.cc:1045] Creating TensorFlow device (/gpu:2) -> (device: 2, name: Tesla V100-SXM2-32GB, pci bus id: 0035:03:00.0)
2019-04-08 08:26:15.730488: I tensorflow/core/common_runtime/gpu/gpu_device.cc:1045] Creating TensorFlow device (/gpu:3) -> (device: 3, name: Tesla V100-SXM2-32GB, pci bus id: 0035:04:00.0)
Parent OS에서 본 nvidia-smi에서도 python이 GPU를 점거하는 모습을 보실 수 있습니다.
+-----------------------------------------------------------------------------+
| NVIDIA-SMI 418.40.04 Driver Version: 418.40.04 CUDA Version: 10.1 |
|-------------------------------+----------------------+----------------------+
| GPU Name Persistence-M| Bus-Id Disp.A | Volatile Uncorr. ECC |
| Fan Temp Perf Pwr:Usage/Cap| Memory-Usage | GPU-Util Compute M. |
|===============================+======================+======================|
| 0 Tesla V100-SXM2... On | 00000004:04:00.0 Off | 0 |
| N/A 40C P0 65W / 300W | 30175MiB / 32480MiB | 0% Default |
+-------------------------------+----------------------+----------------------+
| 1 Tesla V100-SXM2... On | 00000004:05:00.0 Off | 0 |
| N/A 41C P0 70W / 300W | 30173MiB / 32480MiB | 0% Default |
+-------------------------------+----------------------+----------------------+
| 2 Tesla V100-SXM2... On | 00000035:03:00.0 Off | 0 |
| N/A 41C P0 65W / 300W | 30173MiB / 32480MiB | 0% Default |
+-------------------------------+----------------------+----------------------+
| 3 Tesla V100-SXM2... On | 00000035:04:00.0 Off | 0 |
| N/A 42C P0 66W / 300W | 30173MiB / 32480MiB | 0% Default |
+-------------------------------+----------------------+----------------------+
+-----------------------------------------------------------------------------+
| Processes: GPU Memory |
| GPU PID Type Process name Usage |
|=============================================================================|
| 0 14371 C python 30165MiB |
| 1 14371 C python 30163MiB |
| 2 14371 C python 30163MiB |
| 3 14371 C python 30163MiB |
+-----------------------------------------------------------------------------+
PS. 아예 --runtime=nvidia 옵션 없이 그냥 docker 명령만 써서 nvidia-container-runtime을 구동하고 싶다면 다음과 같이 "default-runtime": "nvidia" 을 /etc/docker/daemon.json에 추가해주시면 됩니다.
[root@ac922 home]# vi /etc/docker/daemon.json
{
"default-runtime": "nvidia",
"runtimes": {
"nvidia": {
"path": "/usr/bin/nvidia-container-runtime",
"runtimeArgs": []
}
}
}

2019년 3월 19일 화요일
ppc64le 환경에서의 OFED libary와 FIO 설치 및 기본 테스트
Disk의 성능 측정을 위해 FIO를 쓰는 경우가 많습니다. FIO는 rpm으로도 제공되며, 아래에서 download 받으시면 됩니다.
[u0017649@sys-97540 files]$ wget http://mirror.premi.st/epel/7/ppc64le/Packages/f/fio-3.1-1.el7.ppc64le.rpm
다만 이 FIO는 OFED library와 libaio를 prerequisite으로 필요로 하므로, 미리 이것들을 설치해야 합니다. libaio야 OS에 포함된 것을 그대로 쓰면 됩니다.
[u0017649@sys-97540 files]$ sudo yum install -y libaio
OFED library는 다음의 Mellanox 홈페이지에서 ppc64le용 패키지를 download 받으실 수 있습니다.
http://www.mellanox.com/page/products_dyn?product_family=26

먼저 OFED library가 요구하는 OS prerequisite을 설치해야 합니다.
[u0017649@sys-97540 files]$ sudo yum install -y pciutils lsof tcl gcc-gfortran libgfortran tcsh tk
[u0017649@sys-97540 files]$ ls -l *.tgz
-rw-rw-r--. 1 u0017649 u0017649 236217006 Mar 18 21:14 MLNX_OFED_LINUX-4.5-1.0.1.0-rhel7.5alternate-ppc64le.tgz
[u0017649@sys-97540 files]$ tar -zxf MLNX_OFED_LINUX-4.5-1.0.1.0-rhel7.5alternate-ppc64le.tgz
압축 해제된 directory 속에 들어가보면 script들이 몇개 보입니다.
[u0017649@sys-97540 files]$ cd MLNX_OFED_LINUX-4.5-1.0.1.0-rhel7.5alternate-ppc64le
[u0017649@sys-97540 MLNX_OFED_LINUX-4.5-1.0.1.0-rhel7.5alternate-ppc64le]$ ls
common_installers.pl docs mlnxofedinstall src
common.pl is_kmp_compat.sh RPM-GPG-KEY-Mellanox uninstall.sh
create_mlnx_ofed_installers.pl LICENSE RPMS
distro mlnx_add_kernel_support.sh RPMS_UPSTREAM_LIBS
이제 mlnxofedinstall script를 수행하면 OFED libary가 설치됩니다.
[u0017649@sys-97540 MLNX_OFED_LINUX-4.5-1.0.1.0-rhel7.5alternate-ppc64le]$ sudo ./mlnxofedinstall
(저는 실제로는 RHEL7.5ALT ppc64le 환경을 구할 수 없어서 그냥 RHEL7.4 ppc64le에서 MLNX_OFED_LINUX-4.5-1.0.1.0-rhel7.4-ppc64le.tgz를 받아서 수행했습니다. 실제로는 해당 OS 버전에 정확히 맞는 버전을 download 받아서 수행하셔야 error가 나지 않습니다.)
Detected rhel7u4 ppc64le. Disabling installing 32bit rpms...
Logs dir: /tmp/MLNX_OFED_LINUX.7174.logs
General log file: /tmp/MLNX_OFED_LINUX.7174.logs/general.log
Verifying KMP rpms compatibility with target kernel...
This program will install the MLNX_OFED_LINUX package on your machine.
Note that all other Mellanox, OEM, OFED, RDMA or Distribution IB packages will be removed.
Those packages are removed due to conflicts with MLNX_OFED_LINUX, do not reinstall them.
Do you want to continue?[y/N]:y
Starting MLNX_OFED_LINUX-4.5-1.0.1.0 installation ...
Installing mlnx-ofa_kernel RPM
Preparing... ########################################
Updating / installing...
mlnx-ofa_kernel-4.5-OFED.4.5.1.0.1.1.g########################################
Configured /etc/security/limits.conf
Installing kmod-mlnx-ofa_kernel 4.5 RPM
Preparing... ########################################
kmod-mlnx-ofa_kernel-4.5-OFED.4.5.1.0.########################################
Installing mlnx-ofa_kernel-devel RPM
...
mlnxofed-docs-4.5-1.0.1.0 ########################################
Preparing... ########################################
mpitests_openmpi-3.2.20-e1a0676.45101 ########################################
Installation finished successfully.
Preparing... ################################# [100%]
Updating / installing...
1:mlnx-fw-updater-4.5-1.0.1.0 ################################# [100%]
Added 'RUN_FW_UPDATER_ONBOOT=no to /etc/infiniband/openib.conf
Attempting to perform Firmware update...
No devices found!
To load the new driver, run:
/etc/init.d/openibd restart
저는 이 시스템에 infiniband adapter가 없기 때문에 위와 같이 'No devices found!'라는 메시지가 나옵니다만, 여기서는 신경 안쓰셔도 됩니다. 다만 맨 마지막 메시지처럼, 새로 설치된 driver를 load하려면 리부팅까지는 필요없고 아래와 같은 명령을 내리시면 됩니다.
먼저 아래와 같이 lsmod 명령으로 IB 관련 모듈이 load된 것이 있는지 살펴 봅니다. 보시다시피 없습니다.
[u0017649@sys-97540 files]$ sudo lsmod | grep ib
libcrc32c 1614 1 xfs
ibmvscsi 34850 5
scsi_transport_srp 18042 1 ibmvscsi
ibmveth 32369 0
이제 아래 명령으로 driver를 load합니다.
[u0017649@sys-97540 files]$ sudo /etc/init.d/openibd restart
Unloading HCA driver: [ OK ]
Loading HCA driver and Access Layer: [ OK ]
다시 lsmod 명령으로 IB 관련 모듈이 load된 것이 있는지 살펴 봅니다. 아까와는 달리 뭔가가 많이 올라온 것을 보실 수 있습니다.
[u0017649@sys-97540 files]$ sudo lsmod | grep ib
ib_ucm 17919 0
ib_ipoib 196794 0
ib_cm 57708 3 rdma_cm,ib_ucm,ib_ipoib
ib_umad 19974 0
mlx5_ib 380860 0
ib_uverbs 135906 3 mlx5_ib,ib_ucm,rdma_ucm
mlx5_core 1040727 2 mlx5_ib,mlx5_fpga_tools
mlx4_ib 242651 0
ib_core 341508 10 rdma_cm,ib_cm,iw_cm,mlx4_ib,mlx5_ib,ib_ucm,ib_umad,ib_uverbs,rdma_ucm,ib_ipoib
mlx4_core 413829 2 mlx4_en,mlx4_ib
mlx_compat 28099 15 rdma_cm,ib_cm,iw_cm,mlx4_en,mlx4_ib,mlx5_ib,mlx5_fpga_tools,ib_ucm,ib_core,ib_umad,ib_uverbs,mlx4_core,mlx5_core,rdma_ucm,ib_ipoib
devlink 35827 4 mlx4_en,mlx4_ib,mlx4_core,mlx5_core
libcrc32c 1614 1 xfs
ibmvscsi 34850 5
scsi_transport_srp 18042 1 ibmvscsi
ibmveth 32369 0
이제 download 받은 FIO를 설치합니다. 설치 자체는 간단합니다.
[u0017649@sys-97540 files]$ sudo rpm -Uvh fio-3.1-1.el7.ppc64le.rpm warning: fio-3.1-1.el7.ppc64le.rpm: Header V3 RSA/SHA256 Signature, key ID 352c64e5: NOKEY
Preparing... ################################# [100%]
Updating / installing...
1:fio-3.1-1.el7 ################################# [100%]
이제 fio 명령이 생겼습니다.
[u0017649@sys-97540 files]$ which fio
/usr/bin/fio
제가 테스트하는 서버는 SATA 디스크를 가상으로 쪼개어 받은 매우 형편없는 spec의 포팅용 가상머신입니다. 따라서 제대로 된 성능 테스트는 아니라는 점을 미리 인지하시기 바랍니다.
기본적인 write 테스트를 해봅니다. numjobs=1로 돌리는데, CPU 사용량은 거의 없습니다.
[u0017649@sys-97540 files]$ time fio --randrepeat=1 --ioengine=libaio --direct=1 --gtod_reduce=1 --name=test --filename=/tmp/test1 --bs=64k --iodepth=64 --size=500M --numjobs=1 --readwrite=randwrite --rwmixwrite=100
test: (g=0): rw=randwrite, bs=(R) 64.0KiB-64.0KiB, (W) 64.0KiB-64.0KiB, (T) 64.0KiB-64.0KiB, ioengine=libaio, iodepth=64
fio-3.1
Starting 1 process
test: Laying out IO file (1 file / 500MiB)
Jobs: 1 (f=1): [w(1)][99.3%][r=0KiB/s,w=0KiB/s][r=0,w=0 IOPS][eta 00m:02s]
...
Run status group 0 (all jobs):
WRITE: bw=1924KiB/s (1970kB/s), 1924KiB/s-1924KiB/s (1970kB/s-1970kB/s), io=500MiB (524MB), run=266076-266076msec
Disk stats (read/write):
sda: ios=0/7363, merge=0/667, ticks=0/15785000, in_queue=15789550, util=100.00%
real 4m26.400s
user 0m0.328s
sys 0m0.457s
이번에는 numjobs를 2로 다시 해보았습니다. (OS memory cache 효과를 없애기 위해 filename에 다른 file 이름을 써야 합니다.) 처음의 numjobs=1보다는 빠르지만 물론 2배 빠른 것은 아닙니다.
[u0017649@sys-97540 files]$ time fio --randrepeat=1 --ioengine=libaio --direct=1 --gtod_reduce=1 --name=test --filename=/tmp/test2 --bs=64k --iodepth=64 --size=500M --numjobs=2 --readwrite=randwrite --rwmixwrite=100
test: (g=0): rw=randwrite, bs=(R) 64.0KiB-64.0KiB, (W) 64.0KiB-64.0KiB, (T) 64.0KiB-64.0KiB, ioengine=libaio, iodepth=64
...
fio-3.1
Starting 2 processes
test: Laying out IO file (1 file / 500MiB)
Jobs: 2 (f=2): [w(2)][99.3%][r=0KiB/s,w=0KiB/s][r=0,w=0 IOPS][eta 00m:03s]
...
Run status group 0 (all jobs):
WRITE: bw=2455KiB/s (2514kB/s), 1227KiB/s-1228KiB/s (1257kB/s-1257kB/s), io=1000MiB (1049MB), run=417045-417161msec
Disk stats (read/write):
sda: ios=0/14383, merge=0/1643, ticks=0/48880230, in_queue=48926190, util=100.00%
real 6m57.439s
user 0m0.737s
sys 0m0.848s
이번에는 디스크가 아닌 공유 메모리 상에 써보겠습니다. 아래와 같이 /dev/shm에 1.8G 여유 공간이 있습니다.
[u0017649@sys-97540 files]$ df -h
Filesystem Size Used Avail Use% Mounted on
/dev/sda5 31G 7.3G 24G 24% /
devtmpfs 1.7G 0 1.7G 0% /dev
tmpfs 1.8G 23M 1.8G 2% /dev/shm
tmpfs 1.8G 23M 1.8G 2% /run
tmpfs 1.8G 0 1.8G 0% /sys/fs/cgroup
/dev/sda2 1014M 166M 849M 17% /boot
tmpfs 357M 0 357M 0% /run/user/1001
다만 이건 임시 메모리 파일시스템인 tmpfs이므로 버퍼를 쓰지 않는 --direct=1 옵션을 쓸 수 없습니다. 따라서 그냥 --direct=0 옵션을 택해야 합니다. 당연히 4GB/s의 우수한 속도가 나옵니다.
[u0017649@sys-97540 files]$ sudo fio --randrepeat=1 --ioengine=libaio --direct=0 --gtod_reduce=1 --name=test --filename=/dev/shm/test2 --bs=64k --iodepth=64 --size=500M --numjobs=2 --readwrite=randwrite --rwmixwrite=100
test: (g=0): rw=randwrite, bs=(R) 64.0KiB-64.0KiB, (W) 64.0KiB-64.0KiB, (T) 64.0KiB-64.0KiB, ioengine=libaio, iodepth=64
...
Run status group 0 (all jobs):
WRITE: bw=3906MiB/s (4096MB/s), 1953MiB/s-2024MiB/s (2048MB/s-2123MB/s), io=1000MiB (1049MB), run=247-256msec
Read 테스트는 다음과 같이 합니다.
[u0017649@sys-97540 files]$ fio --randrepeat=1 --ioengine=libaio --direct=1 --gtod_reduce=1 --name=test --filename=/tmp/test1 --bs=64k --iodepth=64 --size=1G --numjobs=2 --readwrite=randread --rwmixread=100 test: (g=0): rw=randread, bs=(R) 64.0KiB-64.0KiB, (W) 64.0KiB-64.0KiB, (T) 64.0KiB-64.0KiB, ioengine=libaio, iodepth=64
...
Run status group 0 (all jobs):
READ: bw=13.2MiB/s (13.9MB/s), 6778KiB/s-6793KiB/s (6941kB/s-6956kB/s), io=2048MiB (2147MB), run=154363-154703msec
2019년 3월 18일 월요일
H2O Driverless AI를 통한 인물별 의료비 예측
H2O Driverless AI (이하 H2O DAI)의 또다른 유력한 use case인 보험 업무에 대해 살펴보겠습니다. 보험사에게 있어 의료비가 많이 들 것 같은 사람을 골라내는 것은 보험사의 수익과 직결되는 무척 중요한 일입니다. 아래 Kaggle site에서 얻은 환자 기본 정보 및 각 환자에게 든 의료비에 대한 dataset을 이용하여 H2O DAI가 예상 의료비를 얼마나 정확히 측정하는지 테스트 해보겠습니다.
https://www.kaggle.com/mirichoi0218/insurance
이 dataset에는 다음과 같은 칼럼들이 있습니다.
age 나이
sex 성별
bmi 비만도
children 자녀수
smoker 흡연여부
region 사는 지역
charges 의료비
보험사에서 예측하고 싶은 것은 물론 맨 마지막 칼럼인 charges 부분일 것입니다. 이제 H2O DAI를 이용하여 어떻게 이 dataset으로부터 특정 조건을 가진 인물의 예상 의료비를 뽑아낼 수 있는지 step by step으로 알아보시도록 하겠습니다.
1) 웹 브라우저를 통해 H2O DAI에 접속합니다. 맨 처음 menu는 'DATASET'이며, 여러가지 입력 방법 중에서 저는 제 laptop으로부터 upload하는 menu를 택하겠습니다.

2) 저는 위의 Kaggle dataset (insurance.csv)에서 미리 일부 row들을 떼어내어 insurance_test.xlsx를 만들었고, 그 나머지를 insurance_training.xlsx로 저장해놓았습니다. 이것들을 선택하여 H2O DAI에 dataset으로 등록합니다.

3) insurance_training.xlsx와 insurance_test.xlsx가 dataset으로 등록되었습니다. 우측의 'Click for Actions' 부분을 눌러 나오는 sub-menu 중 'DETAILS' 부분을 클릭해 봅니다.

4) 이 DETAILS' 메뉴에서는 이 dataset이 어떤 정보를 담고 있는지 보실 수 있습니다. 각 칼럼별 평균/최대/최소/편차 등의 기본 정보와 최초 20개 row의 값 등을 보실 수 있습니다.

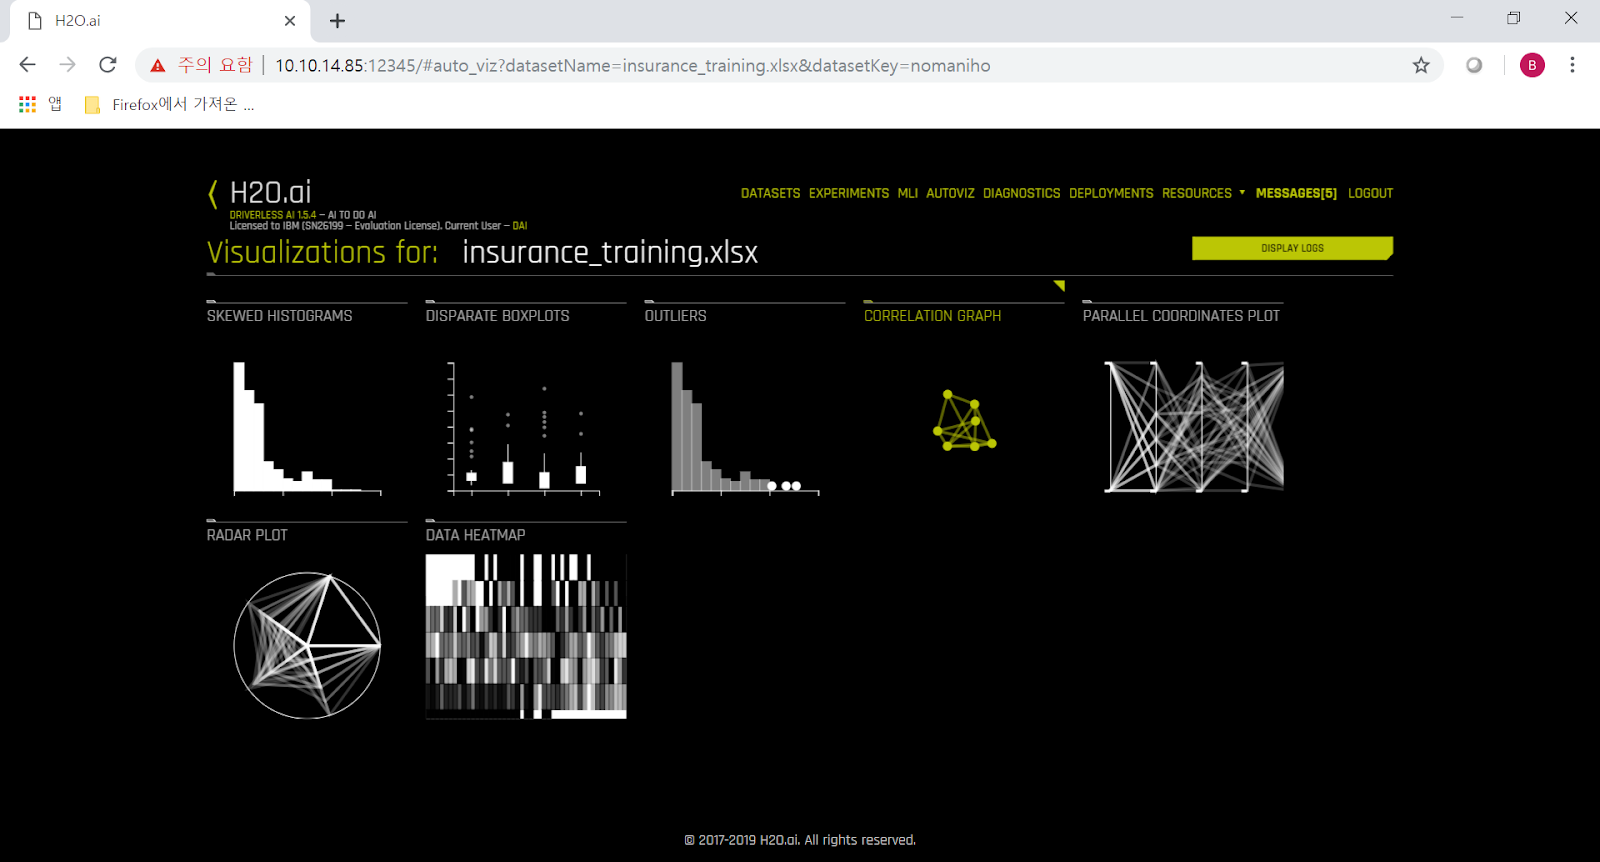
5) Dataset 우측의 'Click for Actions' 부분을 눌러 나오는 sub-menu 중 'VISUALIZATION'을 클릭하면 여러가지 다양한 graph가 자동으로 생성됩니다. 가령 'OUTLIERS PLOT'을 보면 전체 data 중 일부가 표준편차에서 크게 벗어난 것을 보실 수 있습니다. 그런 부분은 표에서 보는 것보다는 이렇게 그래프로 시각화해서 보면 직관적으로 이해하기가 쉽지요. 그렇게 크게 벗어난 오렌지색 점을 클릭해보면 해당 row의 상세 정보를 보실 수도 있습니다.



6) H2O DAI에서 가장 중요한 것은 역시 'PREDICT' 메뉴입니다. 이 메뉴를 통해서 예측 모델을 자동 생성하게 됩니다.

7) 'PREDICT' 메뉴에 들어가면 꼭 하셔야 할 일은 단 하나 밖에 없습니다. 어느 칼럼에 대한 예측 모델을 만드느냐에 대한 선택입니다. 여기서는 당연히 charges 칼럼을 택합니다.


8) 추가로 선택하실 수 있는 메뉴는 중앙 하단의 3개의 라디오 다이얼입니다. 각각의 의미와 강약 조절은 아래와 같습니다. 여기서는 default로 제시된 8-3-8을 그대로 적용하겠습니다.

Accuracy : 어떤 알고리즘들을 몇 개나 적용할지 정합니다. 물론 다이얼 숫자가 높을 수록 더 많은 알고리즘을 적용합니다.
Time : 머신러닝에서 반복 훈련, 즉 iteration을 몇 회나 수행할지 정합니다. 물론 다이얼 숫자가 높을 수록 더 많은 회수가 적용됩니다.
Interpretability : 머신러닝으로 만들어진 모델에 대한 해석의 강도 조절 부분입니다. 다이얼 숫자가 높을 수록 더 단순화해서 해석해줍니다.
9) Launch를 누르면 자동 모델 생성이 시작되고 모델이 training 되는 과정을 보시게 됩니다. 중앙 상단을 보면 그 단계에서 하고 있는 작업과 적용되는 알고리즘 등이 실시간으로 업데이트 되면서 보여집니다. 중앙 하단에는 그 시점까지의 분석 단계에서 판단할 때 가장 중요한 변수/feature, 즉 입력된 dataset의 칼럼 중 어느 칼럼이 가장 중요한 역할을 하더라는 것이 실시간으로 분석되어 보여집니다. 가령 3% 경과된 시점에서는 LIGHTGBM 알고리즘을 처리 중이고, 흡연여부-비만지수-나이 순으로 병원비에 중요한 영향을 끼친다고 나옵니다.


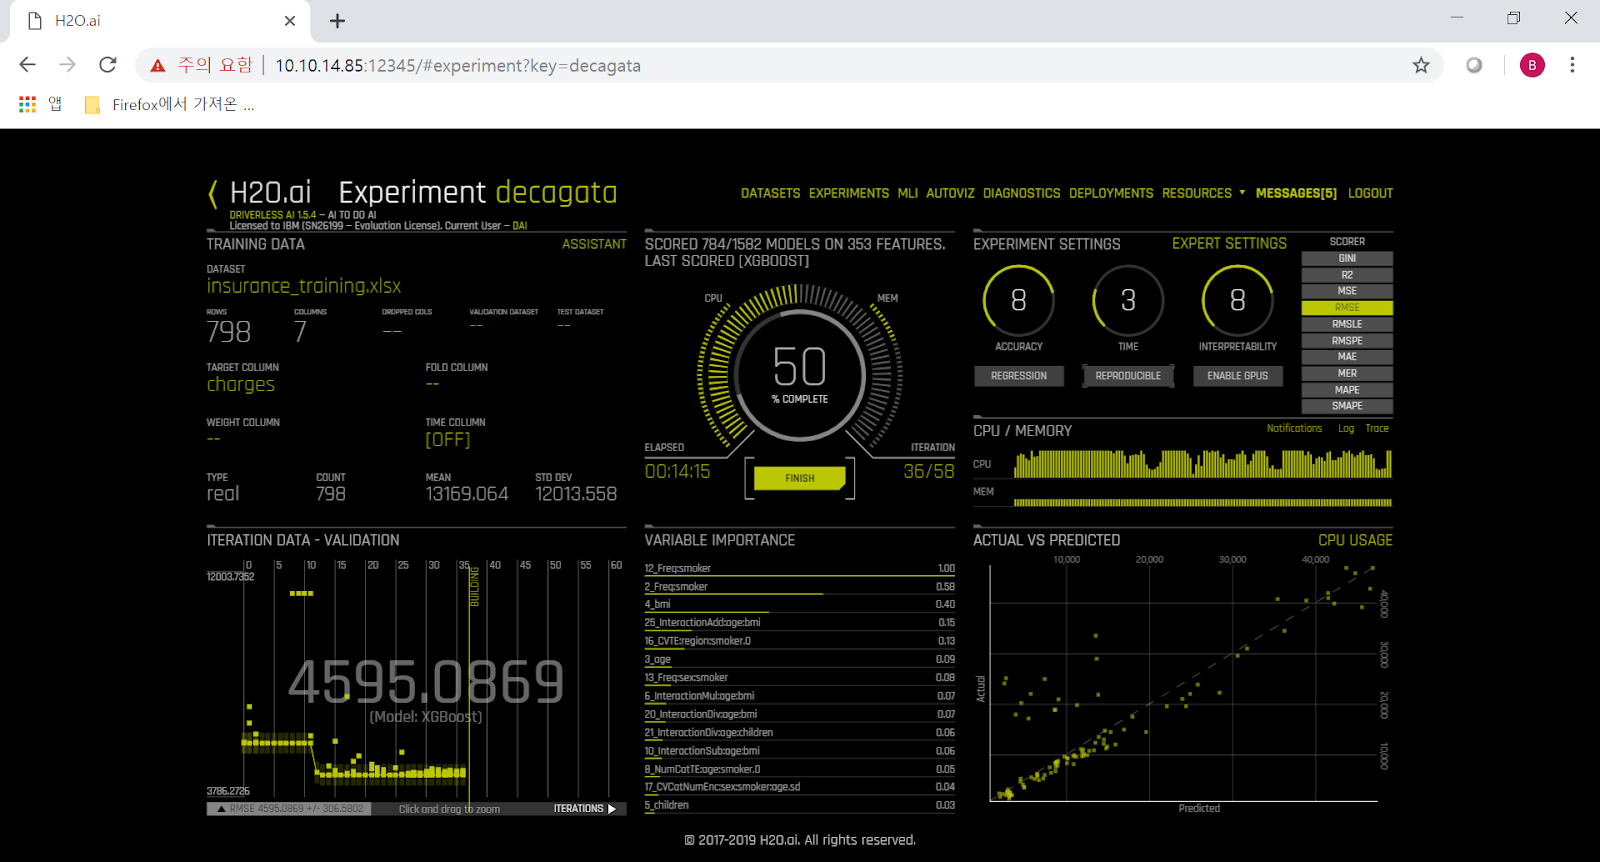
10) 그러나 auto feature engineering이 본격적으로 시작되면서 경과%가 진행되면서 그 값들은 계속 변화합니다. 가령 79% 경과 진행 중일 때는 무려 497개의 feature에 대해 1582개의 model에 대해서 평가 중이라고 나오지요. 원래 dataset의 칼럼 수, 즉 feature 수가 7개 밖에 없었다는 점을 생각하면 H2O DAI가 정말 다양한 조합의 feature engineering을 자동으로 수행하고 있다는 점을 아실 수 있습니다. 그 결과로 나오는 중앙 하단의 'Variable Importance', 즉 어떤 변수/feature가 병원비 지출액에 가장 중요한 영향을 끼치더라는 점도 비만도와 성별, 그리고 흡연여부가 결합되어 새로 생성된 변수를 가장 중요시하는 것을 보실 수 있습니다. 그 항목들을 자세히 보시면, 정말 모든 경우에 흡연여부가 가장 중요한 영향을 끼친다는 것을 보실 수 있습니다. 흡연인 여러분, 아무래도 담배는 끊으셔야 할 것 같습니다.

11) 모델 생성이 완료되면 우측 하단에 요약 설명이 나옵니다. 그러나 가장 중요한 것은 중앙 상단 메뉴의 3번쨰 항목, 즉 'SCORE ON ANOTHER DATASET' 입니다. 여기에 우리가 원하는 charges 값을 뺀 다른 값들 (연령, 사는 곳, 성별, 흡연 여부 등)이 들어있는 표를 입력하면, 해당 사람들이 얼마나 병원비를 쓸지 예측한 값을 출력해주거든요. 여기서는 미리 입력해둔 insurance_test.xlsx를 test dataset으로 선택하겠습니다. 그러면 곧장 해당 사람들의 병원비(charges) 값을 예측하여 그 결과를 csv 파일로 download 시켜줍니다.


12) 그렇게 해서 얻은 해당 환자들의 예상 병원비와 실제 병원비의 결과는 아래 그래프와 같습니다. 파란 곡선이 실제값이고, 오렌지색 곡선이 H2O DAI가 예측한 값입니다. 놀랍도록 잘 맞춘 것을 보실 수 있습니다. 다만 중간 정도에 H2O DAI는 7천4백불 정도를 예상했는데 실제로는 2만8천불을 사용하여 H2O DAI의 예상이 크게 틀린 환자가 있습니다. 이 환자의 상태를 보면, BMI 지수가 높은 비흡연자입니다. 아마도 H2O DAI가 만든 모델에서는 BMI 지수는 그다지 중요하지 않고 흡연 여부가 가장 중요했는데, 이 환자의 경우는 그 예측이 빗나간 것 같습니다.

13) 위에서 BMI 지수니 흡연여부니 하는 것은 어디까지나 저 개인의 짐작에 불과할 뿐 수학적인 모델로 계산한 결과는 아닙니다. 왜 이 머신러닝 모델이 이런 예측값을 내놓았는지 해석하는 것이 바로 MLI (Machine Learning Interpretation)입니다. H2O는 K-LIME과 Decision Tree, Random Forest 등 다양한 MLI 기능을 제공합니다. 그런 MLI는 모델 생성 완료시의 메뉴 맨 상단의 'Interpret This Model'을 클릭함으로써 생성할 수 있습니다.

14) 이런 MLI 해석 결과도 어느 정도 data science에 대한 소양이 있어야 볼 수 있는 것이 사실입니다. 가령 LIME이 무엇인지 알아야 이해를 할 수 있으니까요. (참고로 LIME은 Locally Interpretable Model-agnostic Explainations을 뜻하는 말로서, 어떤 모델을 생성할 때 사용된 변수 값을 하나씩 바꿔보고 그 모델의 결과에 얼마나 변화가 생기는지 봄으로써 어느 변수가 가장 중요한 역할을 하는지 해석하는 기법입니다.) 하지만 H2O DAI는 일반인들도 이해하기 쉬운 설명도 제시합니다.


15) 가령 Summary 부분의 맨 아래는 원래 dataset의 칼럼 중에서 어느 칼럼이 가장 중요한 역할을 하는지 보여줍니다.

16) KLIME에서는 각각의 예측값에 대해, 어떤 변수가 어느 정도의 영향을 끼쳤는지를 수식화해서 보여줍니다.

17) 가장 쉬운 설명은 KLIME 메뉴 중 중앙상단의 'Explanations' 버튼을 클릭하면 볼 수 있습니다. 여기서는 흡연여부, BMI 지수 등의 변수의 증감에 따라 우리가 알고자 하는 target (여기서는 병원비)의 증감이 어떻게 변화하는지 최대한 단순화하여 제시합니다. 여기에 제시된 설명에 따르면 흡연여부가 가장 중요하고, 자녀가 있는지 여부가 그 다음이며, 사는 곳이 어디인지도 꽤 큰 영향을 미치는 것 같습니다. 아마 부유한 동네인지 또는 그 지방의 식습관 등이 영향을 주는 것일까요 ? 왜 그런지 모르겠습니다만 이 예측 모델에서는 의외로 BMI 지수, 즉 비만 여부는 상대적으로 그다지 큰 영향을 주지는 않는다고 판단하고 있습니다.

이 포스팅의 결론은 다음과 같습니다.
1. H2O DAI는 무척 정확한 예측 모델을 정말 쉽게 만들어낼 수 있을 뿐만 아니라, 왜 그런 예측을 했는지도 매우 쉽게 풀어서 설명해줍니다.
2. 흡연자 여러분, 금연 합시다.
2019년 2월 22일 금요일
ppc64le 환경에서 tensorflow 1.12를 source로부터 build 하기
Tensorflow v1.12는 IBM PowerAI toolkit v1.5.4에 포함되어 있습니다. 그러나 그건 CUDA 10.0 환경을 위해 만들어진 것이라서, CUDA 9.2 환경을 그대로 쓰고자 하는 고객분들께서는 사용하실 수 없습니다. 하지만 github의 source code로부터 직접 build하시면 간단합니다.
제가 build한 환경은 Anaconda3 5.2 (python 3.6.8) + CUDA 9.2 + NCCL 2.2 + CUDNN 7.4.1 + Redhat 7.4 ppc64le 입니다.
먼저 아래와 같이 기초적으로 필요한 OS package들을 yum으로 설치하십시요.
[bsyu@redhat74 files]$ which python
~/anaconda3/bin/python
[bsyu@redhat74 files]$ python
Python 3.6.5 |Anaconda, Inc.| (default, Apr 29 2018, 16:38:54)
[GCC 7.2.0] on linux
[bsyu@redhat74 files]$ sudo yum install java-1.8.0-openjdk-devel.ppc64le zip unzip automake autoconf make gcc patch
[bsyu@redhat74 files]$ conda install protobuf wheel numpy six
Tensorflow v1.12 build를 위해서는 bazel v0.15 이상이 필요합니다. Bazel v0.15를 bootstrap 방식으로 먼저 build합니다. 예전에는 ppc64le 환경에서 bazel을 build하는 것이 매우 힘들었는데, 이젠 x86_64 환경에서와 똑같이 그냥 build하시면 됩니다.
[bsyu@redhat74 files]$ wget https://github.com/bazelbuild/bazel/releases/download/0.15.0/bazel-0.15.0-dist.zip
[bsyu@redhat74 files]$ mkdir bazel-0.15 && cd bazel-0.15
[bsyu@redhat74 bazel-0.15]$ unzip ../bazel-0.15.0-dist.zip
[bsyu@redhat74 bazel-0.15]$ export EXTRA_BAZEL_ARGS="--host_javabase=@local_jdk//:jdk"
[bsyu@redhat74 bazel-0.15]$ export PROTOC=~/anaconda3/bin/protoc
[bsyu@redhat74 bazel-0.15]$ ./compile.sh
....
INFO: Build completed successfully, 2371 total actions
WARNING: --batch mode is deprecated. Please instead explicitly shut down your Bazel server using the command "bazel shutdown".
Build successful! Binary is here: /home/bsyu/files/bazel-0.15/output/bazel
이제 bazel build가 완료되었습니다. 이렇게 만든 bazel 실행파일을 아래와 같이 /usr/local/bin에 옮겨놓고 쓰시면 됩니다.
[bsyu@redhat74 bazel-0.15]$ sudo cp output/bazel /usr/local/bin
그리고 tensorflow build에 들어가기 전에, 아래와 같이 cudnn.h의 soft link를 /usr/include 밑에 만들어 줍니다. 이것이 없으면 자꾸 cudnn.h를 못 찾는다는 error("Cannot find cudnn.h under /usr/local/cuda-9.2/targets/ppc64le-linux/lib")가 나니까, 그걸 막기 위한 것입니다.
[bsyu@redhat74 files]$ sudo ln -s /usr/local/cuda/include/cudnn.h /usr/include/cudnn.h
이제 tensorflow source code를 받습니다.
[bsyu@redhat74 files]$ git clone https://github.com/tensorflow/tensorflow.git
[bsyu@redhat74 files]$ cd tensorflow/
우리가 원하는 버전인 v1.12.0으로 checkout 합니다.
[bsyu@redhat74 tensorflow]$ git checkout tags/v1.12.0
./configure를 수행하되, 다음 몇 줄 이외에는 모두 default 값을 쓰면 됩니다.
[bsyu@redhat74 tensorflow]$ ./configure
Do you wish to build TensorFlow with CUDA support? [y/N]: y
Please specify the CUDA SDK version you want to use. [Leave empty to default to CUDA 9.0]: 9.2
Please specify the location where cuDNN 7 library is installed. Refer to README.md for more details. [Default is /usr/local/cuda]: /usr/local/cuda/lib64
Please note that each additional compute capability significantly increases your build time and binary size. [Default is: 3.5,7.0]: 6.0,7.0
그리고 temp file을 쓸 directory를 별도로 지정해두기 위해 다음과 같이 환경변수 TMP를 넉넉한 disk 공간이 있는 directory로 지정해두는 것이 좋습니다.
[bsyu@redhat74 tensorflow]$ export TMP=/data/tmp
이제 bazel을 이용하여 tensorflow build에 들어갑니다. 이 과정은 시간이 오래 걸리니까 nohup & 을 쓰시는 것이 좋습니다. 그리고 의외로 system memory를 많이 잡아먹습니다. 저는 16GB memory가 있는 POWER8 가상머신에서 했는데, active memory를 거의 9GB 쓰는 것 같습니다. 4GB memory만 있는 가상머신에서 build하려니 killed 되던데, 아마 메모리 부족으로 죽는 것 같았어요.
[bsyu@redhat74 tensorflow]$ bazel build --config=opt --config=cuda //tensorflow/tools/pip_package:build_pip_package
...
INFO: Build completed successfully, 1180 total actions
성공적으로 완료되었습니다. 이제 wheel file을 생성합니다.
[bsyu@redhat74 tensorflow]$ ./bazel-bin/tensorflow/tools/pip_package/build_pip_package /tmp/tensorflow_pkg
...
Fri Feb 22 22:05:17 KST 2019 : === Output wheel file is in: /tmp/tensorflow_pkg
이제 wheel file이 /tmp/tensorflow_pkg 밑에 생성되었습니다. 다음과 같이 확인합니다.
[bsyu@redhat74 tensorflow]$ ls -l /tmp/tensorflow_pkg
-rw-rw-r-- 1 bsyu bsyu 171252634 Feb 22 22:05 tensorflow-1.12.0-cp36-cp36m-linux_ppc64le.whl
이제 이 wheel file을 pip 명령으로 설치하면 됩니다. 이 과정 중에서 tensorflow에 필요한 grpcio 등의 python package들을 추가로 internet에서 download 하여 설치하므로, 만약 internet이 없는 환경이라면 intranet에 있는 PYPI repository에서 그런 package들을 download 할 수 있도록 설정이 필요합니다.
[bsyu@redhat74 tensorflow]$ pip install /tmp/tensorflow_pkg/tensorflow-1.12.0-cp36-cp36m-linux_ppc64le.whl
Processing /tmp/tensorflow_pkg/tensorflow-1.12.0-cp36-cp36m-linux_ppc64le.whl
Requirement already satisfied: numpy>=1.13.3 in /home/bsyu/anaconda3/lib/python3.6/site-packages (from tensorflow==1.12.0) (1.15.4)
Requirement already satisfied: keras-applications>=1.0.6 in /home/bsyu/anaconda3/lib/python3.6/site-packages (from tensorflow==1.12.0) (1.0.7)
Requirement already satisfied: keras-preprocessing>=1.0.5 in /home/bsyu/anaconda3/lib/python3.6/site-packages (from tensorflow==1.12.0) (1.0.9)
Requirement already satisfied: six>=1.10.0 in /home/bsyu/anaconda3/lib/python3.6/site-packages (from tensorflow==1.12.0) (1.12.0)
Requirement already satisfied: protobuf>=3.6.1 in /home/bsyu/anaconda3/lib/python3.6/site-packages (from tensorflow==1.12.0) (3.6.1)
Collecting termcolor>=1.1.0 (from tensorflow==1.12.0)
Downloading https://files.pythonhosted.org/packages/8a/48/a76be51647d0eb9f10e2a4511bf3ffb8cc1e6b14e9e4fab46173aa79f981/termcolor-1.1.0.tar.gz
Collecting astor>=0.6.0 (from tensorflow==1.12.0)
Downloading https://files.pythonhosted.org/packages/35/6b/11530768cac581a12952a2aad00e1526b89d242d0b9f59534ef6e6a1752f/astor-0.7.1-py2.py3-none-any.whl
Collecting grpcio>=1.8.6 (from tensorflow==1.12.0)
Downloading https://files.pythonhosted.org/packages/90/2e/f432e69f86961393c22a6c4490aafdbb94533deba33f5ea2d5651770aa21/grpcio-1.18.0.tar.gz (14.6MB)
100% |████████████████████████████████| 14.6MB 3.4MB/s
Collecting absl-py>=0.1.6 (from tensorflow==1.12.0)
Downloading https://files.pythonhosted.org/packages/31/bc/ab68120d1d89ae23b694a55fe2aece2f91194313b71f9b05a80b32d3c24b/absl-py-0.7.0.tar.gz (96kB)
100% |████████████████████████████████| 102kB 11.7MB/s
Collecting tensorboard<1.13.0,>=1.12.0 (from tensorflow==1.12.0)
Downloading https://files.pythonhosted.org/packages/07/53/8d32ce9471c18f8d99028b7cef2e5b39ea8765bd7ef250ca05b490880971/tensorboard-1.12.2-py3-none-any.whl (3.0MB)
100% |████████████████████████████████| 3.1MB 8.6MB/s
Collecting gast>=0.2.0 (from tensorflow==1.12.0)
Downloading https://files.pythonhosted.org/packages/4e/35/11749bf99b2d4e3cceb4d55ca22590b0d7c2c62b9de38ac4a4a7f4687421/gast-0.2.2.tar.gz
Requirement already satisfied: wheel>=0.26 in /home/bsyu/anaconda3/lib/python3.6/site-packages (from tensorflow==1.12.0) (0.32.3)
Requirement already satisfied: h5py in /home/bsyu/anaconda3/lib/python3.6/site-packages (from keras-applications>=1.0.6->tensorflow==1.12.0) (2.7.1)
Requirement already satisfied: setuptools in /home/bsyu/anaconda3/lib/python3.6/site-packages (from protobuf>=3.6.1->tensorflow==1.12.0) (39.1.0)
Requirement already satisfied: werkzeug>=0.11.10 in /home/bsyu/anaconda3/lib/python3.6/site-packages (from tensorboard<1.13.0,>=1.12.0->tensorflow==1.12.0) (0.12.2)
Collecting markdown>=2.6.8 (from tensorboard<1.13.0,>=1.12.0->tensorflow==1.12.0)
Downloading https://files.pythonhosted.org/packages/7a/6b/5600647404ba15545ec37d2f7f58844d690baf2f81f3a60b862e48f29287/Markdown-3.0.1-py2.py3-none-any.whl (89kB)
100% |████████████████████████████████| 92kB 14.6MB/s
Building wheels for collected packages: termcolor, grpcio, absl-py, gast
Running setup.py bdist_wheel for termcolor ... done
Stored in directory: /home/bsyu/.cache/pip/wheels/7c/06/54/bc84598ba1daf8f970247f550b175aaaee85f68b4b0c5ab2c6
Running setup.py bdist_wheel for grpcio ... done
Stored in directory: /home/bsyu/.cache/pip/wheels/e5/22/5a/fa5c03beb66ecc2658e73673175e748ac37385614d52430877
Running setup.py bdist_wheel for absl-py ... done
Stored in directory: /home/bsyu/.cache/pip/wheels/90/db/f8/2c3101f72ef1ad434e4662853174126ce30201a3e163dcbeca
Running setup.py bdist_wheel for gast ... done
Stored in directory: /home/bsyu/.cache/pip/wheels/5c/2e/7e/a1d4d4fcebe6c381f378ce7743a3ced3699feb89bcfbdadadd
Successfully built termcolor grpcio absl-py gast
jupyter 1.0.0 requires qtconsole, which is not installed.
distributed 1.21.8 requires msgpack, which is not installed.
gevent 1.3.0 has requirement greenlet>=0.4.13, but you'll have greenlet 0.4.12 which is incompatible.
Installing collected packages: termcolor, astor, grpcio, absl-py, markdown, tensorboard, gast, tensorflow
Successfully installed absl-py-0.7.0 astor-0.7.1 gast-0.2.2 grpcio-1.18.0 markdown-3.0.1 tensorboard-1.12.2 tensorflow-1.12.0 termcolor-1.1.0
이제 보시는 바와 같이 tensorflow가 설치되었습니다.
[bsyu@redhat74 tensorflow]$ pip list | grep tensor
tensorboard 1.12.2
tensorflow 1.12.0
이걸 GPU가 있는 서버에서 테스트하는 방법은 다음과 같습니다.
[bsyu@redhat74 tensorflow]$ cd ..
[bsyu@redhat74 files]$ python
Python 3.6.8 |Anaconda, Inc.| (default, Dec 30 2018, 01:34:02)
[GCC 7.3.0] on linux
>>> import tensorflow as tf
/home/bsyu/anaconda3/lib/python3.6/site-packages/h5py/__init__.py:36: FutureWarning: Conversion of the second argument of issubdtype from `float` to `np.floating` is deprecated. In future, it will be treated as `np.float64 == np.dtype(float).type`.
from ._conv import register_converters as _register_converters
>>> sess=tf.Session()
2019-02-22 22:14:15.250972: E tensorflow/stream_executor/cuda/cuda_driver.cc:300] failed call to cuInit: CUDA_ERROR_UNKNOWN: unknown error
2019-02-22 22:14:15.251021: I tensorflow/stream_executor/cuda/cuda_diagnostics.cc:150] kernel driver does not appear to be running on this host (redhat74): /proc/driver/nvidia/version does not exist
제가 GPU가 없는 서버에서 이걸 수행했기 때문에 위에서는 error가 났습니다만, GPU가 장착된 서버에서는 error가 없어야 하고 nvidia-smi로 보았을 때 python이 GPU를 점거하는 것으로 보일 것입니다.
여기서 build된 tensorflow wheel 파일과 site-packages directory 전체를 tar로 말아서 아래의 google drive에 올려두겠습니다.
tensorflow wheel 파일 : https://drive.google.com/open?id=1plqSuw9WnWuOPJCPEiVYSp3uK3IilQMy
CUDA 9.2의 AC922 서버에 tensorflow 1.12.0 설치하기
IBM POWER9 processor 기반의 GPU서버인 AC922을 2018년에 도입하셨던 고객분들은 대개 CUDA 9.2를 사용하고 계실 것입니다. 이 상황에서 아래와 같이 tensorflow를 포함한 기존 python package들의 버전을 올려야 하는 필요성이 있을 수 있습니다.
변경전 후
pandas 0.23.4 --> 0.24.0
tensorflow 1.8.0 --> 1.12.0
keras 2.2.2 --> 2.2.4
numpy 1.15.2 --> 1.16.1
scikit-learn 0.20.0 --> 0.20.2
scipy 1.0.0 --> 1.2.0
이게 가능할까요 ? 예 물론 가능합니다. AC922 서버가 인터넷에 연결되어 있거나, 또는 사내 intranet에 PYPI (python repository) mirror본이 구성되어 있다면 쉽습니다. (Tensorflow를 제외한 나머지 package들은) 아래와 같이 pip install --upgrade 명령을 통해 간단히 수행됩니다.
$ pip install --upgrade pandas==0.24.0
$ pip install --upgrade keras==2.2.4
$ pip install --upgrade numpy==1.16.1
$ pip install --upgrade scikit-learn==0.20.2
$ pip install --upgrade scipy==1.2.0
예를 들어 numpy는 아래와 같이 upgrade 됩니다. 설치 과정 때 nmon으로 시스템 모니터링을 해보면 cc1 (compiler)가 CPU를 열심히 쓰고 있는 것을 보실 수 있습니다.
[u0017649@sys-97058 files]$ pip install --upgrade numpy==1.16.1
Collecting numpy==1.16.1
Downloading https://files.pythonhosted.org/packages/2b/26/07472b0de91851b6656cbc86e2f0d5d3a3128e7580f23295ef58b6862d6c/numpy-1.16.1.zip (5.1MB)
100% |????????????????????????????????| 5.1MB 3.7MB/s
Building wheels for collected packages: numpy
Running setup.py bdist_wheel for numpy ... done
Stored in directory: /home/u0017649/.cache/pip/wheels/04/64/e1/283a3672c2865608968594c02a6923311f44d033bcece2683b
Successfully built numpy
jupyter 1.0.0 requires qtconsole, which is not installed.
distributed 1.21.8 requires msgpack, which is not installed.
gevent 1.3.0 has requirement greenlet>=0.4.13, but you'll have greenlet 0.4.12 which is incompatible.
Installing collected packages: numpy
Found existing installation: numpy 1.13.3
Uninstalling numpy-1.13.3:
Successfully uninstalled numpy-1.13.3
Successfully installed numpy-1.16.1
You are using pip version 10.0.1, however version 19.0.2 is available.
You should consider upgrading via the 'pip install --upgrade pip' command.
문제는 tensorflow입니다. Tensorflow는 불행히도 아직 1.12 버전이 ppc64le 아키텍처 상에서는 PYPI로부터는 pip로 설치가 안 됩니다. 하지만 이것도 큰 문제는 아닙니다. Tensorflow는 open source니까, 그냥 github에서 source code를 받아서 직접 build하시면 됩니다.
원래 IBM은 작년 11월에 나온 PowerAI toolkit v1.5.4에서 tensorflow 1.12를 지원합니다. 그러나 이 PowerAI v1.5.4는 CUDA 10.0을 필요로 합니다. 따라서 이 PowerAI v1.5.4에 포함된 tensorflow를 쓰시려면 기존의 CUDA 9.2 환경을 뒤집어 엎고 CUDA 10.0으로 upgrade를 하셔야 합니다. 이건 기존에 쓰시던 다른 python package들과도 연관되는 일이니 그렇게 간단히 진행하실 일은 아니지요.
그래서 제가 tensorflow v1.12를 Redhat 7.4 ppc64le 플랫폼에서 python 3.6.8 + CUDA 9.2 환경용으로 build했고, 그 wheel file을 아래 google drive에 올려놓았습니다. 제가 가난하여 GPU 서버가 없는지라 test된 것은 아니라는 점은 양해 부탁드립니다.
tensorflow v1.12 wheel file --> https://drive.google.com/open?id=1plqSuw9WnWuOPJCPEiVYSp3uK3IilQMy
위의 wheel file을 download 받아서 아래 명령으로 설치하시면 됩니다.
[u0017649@sys-97058 files]$ pip install /tmp/tensorflow-1.12.0-cp36-cp36m-linux_ppc64le.whl
단 위의 tensorflow-*.whl 파일을 설치하실 때 pip가 termcolor, astor, grpcio 등의 필요 python package들을 추가로 internet에서 download하여 설치하므로, 만약 internet이 없는 환경이라면 intranet에 있는 PYPI repository에서 그런 package들을 download 할 수 있도록 설정이 필요하다는 점 유의하십시요.
설치가 끝난 뒤 확인하는 방법은 다음과 같습니다.
[bsyu@redhat74 tensorflow]$ pip list | grep tensor
tensorboard 1.12.2
tensorflow 1.12.0
[bsyu@redhat74 files]$ python
Python 3.6.8 |Anaconda, Inc.| (default, Dec 30 2018, 01:34:02)
[GCC 7.3.0] on linux
>>> import tensorflow as tf
/home/bsyu/anaconda3/lib/python3.6/site-packages/h5py/__init__.py:36: FutureWarning: Conversion of the second argument of issubdtype from `float` to `np.floating` is deprecated. In future, it will be treated as `np.float64 == np.dtype(float).type`.
from ._conv import register_converters as _register_converters
>>> sess=tf.Session()
2019-02-22 22:14:15.250972: E tensorflow/stream_executor/cuda/cuda_driver.cc:300] failed call to cuInit: CUDA_ERROR_UNKNOWN: unknown error
2019-02-22 22:14:15.251021: I tensorflow/stream_executor/cuda/cuda_diagnostics.cc:150] kernel driver does not appear to be running on this host (redhat74): /proc/driver/nvidia/version does not exist
제가 GPU가 없는 서버에서 이걸 수행했기 때문에 위에서는 error가 났습니다만, GPU가 장착된 서버에서는 error가 없어야 하고 nvidia-smi로 보았을 때 python이 GPU를 점거하는 것으로 보일 것입니다.
PS1. 혹시 위의 wheel file 설치가 무슨 이유로든 잘 안 될 경우에 대비하여, 최후의 수단으로 tensorflow 및 위에 언급된 버전의 전체 python package들을 포함한 anaconda3 directory 전체를 tar로 말아서 아래의 google drive에 올려두겠습니다.
anaconda3 directory 전체의 tarball : https://drive.google.com/open?id=1vnmi8t2L_XKgRqfhQbBQbJgjVU7vNGav
위의 anaconda3_tf1.12.tgz를 다음과 같이 기존 anaconda3 directory 위치 또는 $HOME 밑에서 풀어놓으면 됩니다. 기존의 anaconda3 directory는 mv 명령으로 잠시 다른 이름으로 바꿔 놓으셨다가, 혹시 이 새로운 anaconda3가 정상 작동하지 않을 경우 다시 원복시키시기를 권고드립니다.
[root@sys-97264 opt]# ls
anaconda3 at11.0 ibm
이 opt_anaconda3_tf1.12.tgz를 다른 서버에 올려놓은 뒤에 풀어놓아 보았습니다. 먼저 기존 anaconda3를 다른 이름으로 바꿔놓습니다.
[root@sys-97269 ~]# cd /opt
[root@sys-97269 ~]# mv anaconda3 anaconda3_org
/opt/anaconda3/bin/python
아래와 같이 잘 작동하는 것을 보실 수 있습니다.
[root@sys-97269 opt]# pip list | egrep 'pandas|Keras|numpy|scikit-learn|scipy|tensorflow'
Keras 2.2.4
Keras-Applications 1.0.7
Keras-Preprocessing 1.0.9
numpy 1.16.1
numpydoc 0.8.0
pandas 0.24.0
scikit-learn 0.20.2
scipy 1.2.0
tensorflow 1.12.0
[root@sys-97269 opt]# cd
[root@sys-97269 ~]# which python
/opt/anaconda3/bin/python
[root@sys-97269 ~]# python
Python 3.6.5 |Anaconda, Inc.| (default, Apr 29 2018, 16:38:54)
[GCC 7.2.0] on linux
[root@sys-97269 ~]# which python
/opt/anaconda3/bin/python
[root@sys-97269 ~]# python
Python 3.6.5 |Anaconda, Inc.| (default, Apr 29 2018, 16:38:54)
[GCC 7.2.0] on linux
>>> import keras
/opt/anaconda3/lib/python3.6/site-packages/h5py/__init__.py:36: FutureWarning: Conversion of the second argument of issubdtype from `float` to `np.floating` is deprecated. In future, it will be treated as `np.float64 == np.dtype(float).type`.
from ._conv import register_converters as _register_converters
Using TensorFlow backend.
>>> import numpy
>>> import pandas
>>> import tensorflow
>>>
/opt/anaconda3/lib/python3.6/site-packages/h5py/__init__.py:36: FutureWarning: Conversion of the second argument of issubdtype from `float` to `np.floating` is deprecated. In future, it will be treated as `np.float64 == np.dtype(float).type`.
from ._conv import register_converters as _register_converters
Using TensorFlow backend.
>>> import numpy
>>> import pandas
>>> import tensorflow
>>>
PS2. 혹시 위의 anaconda3 directory를 통째로 풀어놓는 것이 무슨 이유에서든 잘 안될 경우에 대비해서, 아래 site에 해당 tensorflow 등의 pacakge들을 모두 갖춘 CUDA 9.2를 설치한 Redhat 7.5 ppc64le 기반의 docker image를 올려놓았습니다.
https://hub.docker.com/r/bsyu/rhel75_ppc64le_cuda92_tf1.12_py3
다음과 같이 받아서 사용하시면 됩니다.
[u0017649@sys-97269 ~]$ sudo docker pull bsyu/rhel75_ppc64le_cuda92_tf1.12_py3:v0.2
2019년 1월 30일 수요일
IBM POWER8/9 (ppc64le) 환경에서의 Darknet 설치 및 test
Darknet은 C로 구현된 open source neural network famework입니다. IBM POWER8 또는 POWER9, 즉 ppc64le 환경에서도 당연히 잘 설치됩니다. 여기서는 CentOS 7 on POWER8에서 구현했습니다.
설치는 source를 받아서 다음과 같이 compile 하기만 하면 됩니다. Source를 수정할 필요 전혀 없습니다.
[bsyu@centos01 files]$ git clone https://github.com/pjreddie/darknet.git
[bsyu@centos01 files]$ cd darknet
[bsyu@centos01 darknet]$ make -j8
[bsyu@centos01 darknet]$ ./darknet
usage: ./darknet <function>
다만 혹시 GPU를 사용하고자 할 때는 아래와 같이 CUDA로 build되도록 Makefile을 살짝 수정해주시면 됩니다. 이 또한 ppc64le 환경에서도 build는 잘 됩니다만, 제가 가난하여 GPU가 없기 때문에 테스트는 이것으로 못했습니다.
[bsyu@centos01 darknet]$ vi Makefile
GPU=1 # default 0
CUDNN=1 # default 0
...
[bsyu@centos01 darknet]$ make -j8
[bsyu@centos01 darknet]$ ./darknet
usage: ./darknet <function>
CUDA 없이, 처음에 build한 CPU-only 버전으로도 darknet을 통해 YOLO를 테스트해볼 수 있습니다. 이 darknet 속에는 이미 YOLO를 위한 cfg 파일과 샘플용 멍멍이 사진이 들어있거든요.
[bsyu@centos01 darknet]$ ls -l cfg/yolov3.cfg data/dog.jpg
-rw-r--r-- 1 bsyu bsyu 8342 Jan 30 15:19 cfg/yolov3.cfg
-rw-r--r-- 1 bsyu bsyu 163759 Jan 30 15:19 data/dog.jpg
이 dog.jpg를 download 받아보면 아래와 같습니다.

이제 테스트를 위해, 미리 멍멍이를 감지하도록 YOLO v3로 pre-train된 weight file을 download 합니다.
[bsyu@centos01 darknet]$ wget https://pjreddie.com/media/files/yolov3.weights
이것으로 data/dog.jpg 사진 속의 object를 'detect' 하는 명령을 내려보겠습니다.
[bsyu@centos01 darknet]$ ./darknet detect cfg/yolov3.cfg yolov3.weights data/dog.jpg
layer filters size input output
0 conv 32 3 x 3 / 1 608 x 608 x 3 -> 608 x 608 x 32 0.639 BFLOPs
1 conv 64 3 x 3 / 2 608 x 608 x 32 -> 304 x 304 x 64 3.407 BFLOPs
2 conv 32 1 x 1 / 1 304 x 304 x 64 -> 304 x 304 x 32 0.379 BFLOPs
3 conv 64 3 x 3 / 1 304 x 304 x 32 -> 304 x 304 x 64 3.407 BFLOPs
4 res 1 304 x 304 x 64 -> 304 x 304 x 64
5 conv 128 3 x 3 / 2 304 x 304 x 64 -> 152 x 152 x 128 3.407 BFLOPs
6 conv 64 1 x 1 / 1 152 x 152 x 128 -> 152 x 152 x 64 0.379 BFLOPs
...
104 conv 256 3 x 3 / 1 76 x 76 x 128 -> 76 x 76 x 256 3.407 BFLOPs
105 conv 255 1 x 1 / 1 76 x 76 x 256 -> 76 x 76 x 255 0.754 BFLOPs
106 yolo
Loading weights from yolov3.weights...Done!
data/dog.jpg: Predicted in 27.192135 seconds.
dog: 100%
truck: 92%
bicycle: 99%
우리가 OpenCV로 darknet을 build하지 않았기 때문에 직접 사진이 나오지는 않지만 darknet은 predictions.jpg로 그 결과를 저장합니다.
[bsyu@centos01 darknet]$ ls -ltr | tail -n 3
-rwxr-xr-x 1 bsyu bsyu 719872 Jan 30 15:29 libdarknet.so
-rwxr-xr-x 1 bsyu bsyu 841976 Jan 30 15:29 darknet
-rw-r--r-- 1 bsyu bsyu 119208 Jan 30 15:41 predictions.jpg
이 predictions.jpg을 PC로 download 받아보면 그 결과는 아래와 같습니다.

2019년 1월 25일 금요일
이공계 연구를 위한 H2O Driverless의 활용 - 분자 에너지 값의 예측
이번에는 화학이나 제조 공정 연구 등에 H2O DriverlessAI를 활용하는 가능성에 대해서 보도록 하겠습니다. 신물질 개발이나 기계적 특성 연구 등에는 다양한 성분 또는 온도, airflow 등의 다양한 조건들의 결합과 그에 따른 결과값 예측이 필요합니다. 그러나 비용과 시간의 문제 때문에 그 엄청난 수의 조합에 대해 모두 다 일일이 테스트를 해볼 수는 없지요. 공장이나 연구실의 각종 계측기를 통해 수집한 data가 어느 정도 축적되어 있다면, machine learning을 통해 기존 data를 분석하여 가장 좋은 결과값을 낼 성분 및 조건 등에 대한 조합을 미리 예측할 수 있습니다. 그를 통해 실제 테스트 회수를 크게 줄일 수 있으므로 비용 절감은 물론이고 더 빠른 개발도 가능합니다. 이때 그 machine learning이 빨리 이루어질 수록, 그리고 그 accuracy가 정확할 수록 그 효과는 커질 것입니다.
Kaggle에 올라온 public dataset 중에는 분자 및 그 내부의 원자 구조, 그리고 그에 따른 분자의 에너지값을 담은 json file들이 있습니다.
https://www.kaggle.com/burakhmmtgl/predict-molecular-properties/home
이 dataset은 다음과 같은 zip 형태로 download 받을 수 있는데, 이걸 unzip 해보면 10개의 json file들이 들어 있습니다.
[u0017649@sys-96775 files]$ unzip ./predict-molecular-properties.zip
Archive: ./predict-molecular-properties.zip
inflating: pubChem_p_00000001_00025000.json
inflating: pubChem_p_00025001_00050000.json
inflating: pubChem_p_00050001_00075000.json
inflating: pubChem_p_00075001_00100000.json
inflating: pubChem_p_00100001_00125000.json
inflating: pubChem_p_00125001_00150000.json
inflating: pubChem_p_00150001_00175000.json
inflating: pubChem_p_00175001_00200000.json
inflating: pubChem_p_00200001_00225000.json
inflating: pubChem_p_00225001_00250000.json
각 json file들의 크기와 row 수는 아래와 같습니다.
[u0017649@sys-96775 files]$ ls -l *.json
-rw-rw-r--. 1 u0017649 u0017649 111430473 Aug 14 2017 pubChem_p_00000001_00025000.json
-rw-rw-r--. 1 u0017649 u0017649 115752953 Aug 14 2017 pubChem_p_00025001_00050000.json
-rw-rw-r--. 1 u0017649 u0017649 119400902 Aug 14 2017 pubChem_p_00050001_00075000.json
-rw-rw-r--. 1 u0017649 u0017649 116769374 Aug 14 2017 pubChem_p_00075001_00100000.json
-rw-rw-r--. 1 u0017649 u0017649 116383795 Aug 14 2017 pubChem_p_00100001_00125000.json
-rw-rw-r--. 1 u0017649 u0017649 122537630 Aug 14 2017 pubChem_p_00125001_00150000.json
-rw-rw-r--. 1 u0017649 u0017649 96286512 Aug 14 2017 pubChem_p_00150001_00175000.json
-rw-rw-r--. 1 u0017649 u0017649 126743707 Aug 14 2017 pubChem_p_00175001_00200000.json
-rw-rw-r--. 1 u0017649 u0017649 129597062 Aug 14 2017 pubChem_p_00200001_00225000.json
-rw-rw-r--. 1 u0017649 u0017649 147174708 Aug 14 2017 pubChem_p_00225001_00250000.json
[u0017649@sys-96775 files]$ wc -l *.json
4924343 pubChem_p_00000001_00025000.json
5096119 pubChem_p_00025001_00050000.json
5258731 pubChem_p_00050001_00075000.json
5159241 pubChem_p_00075001_00100000.json
5120705 pubChem_p_00100001_00125000.json
5401395 pubChem_p_00125001_00150000.json
4234059 pubChem_p_00150001_00175000.json
5570529 pubChem_p_00175001_00200000.json
5698247 pubChem_p_00200001_00225000.json
6485207 pubChem_p_00225001_00250000.json
52948576 total
각각의 json 파일에는 En(에너지 값), atoms(원자 종류와 구조), id(일련번호), shapeM(shape multipole)의 4개 값이 들어있습니다.
{
'En': 37.801,
'atoms': [
{'type': 'O', 'xyz': [0.3387, 0.9262, 0.46]},
{'type': 'O', 'xyz': [3.4786, -1.7069, -0.3119]},
{'type': 'O', 'xyz': [1.8428, -1.4073, 1.2523]},
{'type': 'O', 'xyz': [0.4166, 2.5213, -1.2091]},
{'type': 'N', 'xyz': [-2.2359, -0.7251, 0.027]},
{'type': 'C', 'xyz': [-0.7783, -1.1579, 0.0914]},
{'type': 'C', 'xyz': [0.1368, -0.0961, -0.5161]},
...
{'type': 'H', 'xyz': [1.5832, 2.901, 1.6404]}
],
'id': 1,
'shapeM': [259.66, 4.28, 3.04, 1.21, 1.75, 2.55, 0.16, -3.13, -0.22, -2.18, -0.56, 0.21, 0.17, 0.09]
}
이 json 파일 하나하나에는 다음과 같이 18205개의 atoms 항목이 들어있습니다.
[u0017649@sys-96775 files]$ grep atoms pubChem_p_00000001_00025000.json | wc -l
18205
json 파일 하나의 row 수가 4924343이니까 4924343/18205 = 270 즉, 하나의 atoms 항목 안에 270줄의 data가 들어있는 셈이지요.
[u0017649@sys-96775 files]$ grep type pubChem_p_00000001_00025000.json | wc -l
565479
또 json 파일 하나에는 type이라는 단어가 565479 줄이 나옵니다.
[u0017649@sys-96775 files]$ echo "565479/18205" | bc -l
31.06174127986816808569
즉 하나의 atoms 당 평균 31개의 type가 존재한다는 것인데, 그나마 모든 atoms 항목에 균등한 개수의 type이 들어있는 것도 아니라는 뜻입니다. 하긴 각 분자마다 들어있는 원자의 종류와 개수가 각기 다를 수 밖에 없지요.
특히 atoms와 shapeM라는 항목들은 그 하나하나가 비정형 array로 되어 있습니다. 즉 분자마다 들어있는 원자 개수도 다르고 그에 따라 shape multipole 값도 다릅니다. 이런 비정형 array로 되어 있는 string 값을 분석하여 일정한 pattern을 모델링한다는 것은 매우 어려운 일이 될 것입니다.
이를 수치적으로 분석하려고 해도, atoms 항목 내의 저 많은 값들을 어떻게 분리하고 어떤 이름의 column으로 재정비해야 할지 골치가 아플 수 밖에 없습니다. 원래 그런 고민스러운 작업을 feature engineering이라고 하지요. 이 feature engineering을 어떻게 하느냐에 따라 machine learning으로 만들어낸 model의 성능과 accuracy가 크게 좌우됩니다. 이런 숙제는 data scientist들에게 돌아가는데, 숙련된 data scientist에게도 이는 크게 골치 아픈 일이며 또 과중한 업무 부담으로 이어지게 됩니다.
하지만 이 모든 것을 간단하게 해결해주는 것이 바로 H2O DriverlessAI입니다 ! H2O DriverlessAI의 가장 큰 혜택 중 하나가 자동화된 feature engineering 아니겠습니까 ?
하지만 전에 H2O DriverlessAI는 comma(,)나 pipe(|) 등으로 분리된 CSV 파일이나 Excel(xls, xlsx) 파일만 다룰 수 있다고 하지 않았던 가요 ? 저런 json 파일도 가공없이 통째로 분석할 수 있나요 ? 불행히도 그렇게는 안됩니다.
하지만 json 파일을 csv 파일로 가공하는 것은 매우 쉽습니다. 저는 개발자가 아니며 python program이라고는 Hello World 조차 제대로 할 줄 모르는 젬병이지만, 구글링해보면 구할 수 있는 아래의 샘플 코드 하나로 금방 이걸 전환할 수 있었습니다.
https://gist.github.com/pbindustries/803464d20f48a0a23d5934e3d11dadd6
위의 github에 올려진 sample을 이용하여 아래와 같이 j2c.py라는 이름의 매우 간단한 python code를 짰습니다. 짠 것이 아니라 그대로 copy & paste 했습니다.
[u0017649@sys-96775 files]$ vi j2c.py
import csv, json, sys
#check if you pass the input file and output file
if sys.argv[1] is not None and sys.argv[2] is not None:
fileInput = sys.argv[1]
fileOutput = sys.argv[2]
inputFile = open(fileInput) #open json file
outputFile = open(fileOutput, 'w') #load csv file
data = json.load(inputFile) #load json content
inputFile.close() #close the input file
output = csv.writer(outputFile) #create a csv.write
output.writerow(data[0].keys()) # header row
for row in data:
output.writerow(row.values()) #values row
이제 이를 이용하여 json 파일들을 csv 파일 형태로 변환하겠습니다.
[u0017649@sys-96775 files]$ for i in `ls *.json`
> do
> python j2c.py ./$i ./${i}.csv
> done
거의 날로 먹기지요 ? 아래와 같이 순식간에 csv 파일들이 새로 생성되었습니다.
[u0017649@sys-96775 files]$ ls *.csv
pubChem_p_00000001_00025000.json.csv pubChem_p_00125001_00150000.json.csv
pubChem_p_00025001_00050000.json.csv pubChem_p_00150001_00175000.json.csv
pubChem_p_00050001_00075000.json.csv pubChem_p_00175001_00200000.json.csv
pubChem_p_00075001_00100000.json.csv pubChem_p_00200001_00225000.json.csv
pubChem_p_00100001_00125000.json.csv pubChem_p_00225001_00250000.json.csv
csv 파일 속의 Row 수는 header까지 포함하여 18206, 즉 atoms 개수대로 만들어졌습니다.
[u0017649@sys-96775 files]$ wc -l pubChem_p_00000001_00025000.json.csv
18206 pubChem_p_00000001_00025000.json.csv
각 csv의 형태는 아래와 같습니다. En, id, shapeM, atoms의 4개 column으로 되어있는데, shapeM과 atoms는 여전히 무지막지한 형태의 비정형 string으로 되어 있습니다. id column은 분석에는 사실상 무의미한 column이지요. (보시기 편하도록 제가 shapeM에는 빨간색, atoms에는 파란색으로 글자색을 바꿨습니다.)
[u0017649@sys-96775 files]$ head -n 2 pubChem_p_00000001_00025000.json.csv
En,id,shapeM,atoms
37.801,1,"[259.66, 4.28, 3.04, 1.21, 1.75, 2.55, 0.16, -3.13, -0.22, -2.18, -0.56, 0.21, 0.17, 0.09]","[{u'xyz': [0.3387, 0.9262, 0.46], u'type': u'O'}, {u'xyz': [3.4786, -1.7069, -0.3119], u'type': u'O'}, {u'xyz': [1.8428, -1.4073, 1.2523], u'type': u'O'}, {u'xyz': [0.4166, 2.5213, -1.2091], u'type': u'O'}, {u'xyz': [-2.2359, -0.7251, 0.027], u'type': u'N'}, {u'xyz': [-0.7783, -1.1579, 0.0914], u'type': u'C'}, {u'xyz': [0.1368, -0.0961, -0.5161], u'type': u'C'}, {u'xyz': [-3.1119, -1.7972, 0.659], u'type': u'C'}, {u'xyz': [-2.4103, 0.5837, 0.784], u'type': u'C'}, {u'xyz': [-2.6433, -0.5289, -1.426], u'type': u'C'}, {u'xyz': [1.4879, -0.6438, -0.9795], u'type': u'C'}, {u'xyz': [2.3478, -1.3163, 0.1002], u'type': u'C'}, {u'xyz': [0.4627, 2.1935, -0.0312], u'type': u'C'}, {u'xyz': [0.6678, 3.1549, 1.1001], u'type': u'C'}, {u'xyz': [-0.7073, -2.1051, -0.4563], u'type': u'H'}, {u'xyz': [-0.5669, -1.3392, 1.1503], u'type': u'H'}, {u'xyz': [-0.3089, 0.3239, -1.4193], u'type': u'H'}, {u'xyz': [-2.9705, -2.7295, 0.1044], u'type': u'H'}, {u'xyz': [-2.8083, -1.921, 1.7028], u'type': u'H'}, {u'xyz': [-4.1563, -1.4762, 0.6031], u'type': u'H'}, {u'xyz': [-2.0398, 1.417, 0.1863], u'type': u'H'}, {u'xyz': [-3.4837, 0.7378, 0.9384], u'type': u'H'}, {u'xyz': [-1.9129, 0.5071, 1.7551], u'type': u'H'}, {u'xyz': [-2.245, 0.4089, -1.819], u'type': u'H'}, {u'xyz': [-2.3, -1.3879, -2.01], u'type': u'H'}, {u'xyz': [-3.7365, -0.4723, -1.463], u'type': u'H'}, {u'xyz': [1.3299, -1.3744, -1.7823], u'type': u'H'}, {u'xyz': [2.09, 0.1756, -1.3923], u'type': u'H'}, {u'xyz': [-0.1953, 3.128, 1.7699], u'type': u'H'}, {u'xyz': [0.7681, 4.1684, 0.7012], u'type': u'H'}, {u'xyz': [1.5832, 2.901, 1.6404], u'type': u'H'}]"
이 10개의 파일들로부터 마지막 5줄씩을 미리 잘라내어 총 50줄 (column까지 합하면 51줄)의 pubChem_test1.xlsx라는 test용 dataset을 만들어두겠습니다.
그리고나서 5줄씩 줄어든 이 10개의 파일들을 upload 하기 편하도록 하나의 pubChem1.zip 파일로 zip으로 압축하겠습니다.
[u0017649@sys-96775 files]$ zip pubChem1.zip *.csv
adding: pubChem_p_00000001_00025000.json.csv (deflated 78%)
adding: pubChem_p_00025001_00050000.json.csv (deflated 78%)
adding: pubChem_p_00050001_00075000.json.csv (deflated 78%)
adding: pubChem_p_00075001_00100000.json.csv (deflated 78%)
adding: pubChem_p_00100001_00125000.json.csv (deflated 77%)
adding: pubChem_p_00125001_00150000.json.csv (deflated 78%)
adding: pubChem_p_00150001_00175000.json.csv (deflated 77%)
adding: pubChem_p_00175001_00200000.json.csv (deflated 78%)
adding: pubChem_p_00200001_00225000.json.csv (deflated 78%)
adding: pubChem_p_00225001_00250000.json.csv (deflated 78%)
이제 H2O DAI의 web interface에 접속합니다. Dataset 메뉴에서 이 pubChem1.zip을 H2O DAI 서버로 upload하고 'Details' 항목을 보겠습니다.

보시는 바와 같이 En과 id는 각각 real과 integer로 인식되는데, shapeM과 atoms는 무지막지한 길이와 형태의 string으로 인식됩니다.

하지만 그냥 H2O DAI가 알아서 제대로 해줄 것이라고 믿고 그냥 그대로 prediction (training)으로 들어가겠습니다. 우리가 예측하려는 분자의 energy 값인 En을 Target column으로 정하고 Accuracy와 Time, Interpretability는 각각 10, 7, 7 정도로 세팅해서 돌리겠습니다.

참고로 이렇게 10-7-7로 맞출 경우의 algorithm과 iteration 회수, 그리고 model 및 feature 개수 등은 아래와 같이 설정됩니다. 위 사진의 왼쪽 상세 부분인데 글자가 너무 작아 잘 안 보이실 것 같아서 확대해서 캡춰했습니다.

이제 'Launch experiment'를 클릭하여 training을 시작합니다. 제가 가난하여 GPU가 없는 관계로, 이 training은 모두 2-core짜리 POWER8 가상 머신에서 수행했습니다. (SMT8 때문에 H2O는 이를 2 * 8 = 16-core 짜리 장비라고 인식합니다.) 그래서 꽤 오랜 시간이 걸렸습니다.

Training 중간 과정을 보면 중앙 하단에 'Variable Importance'라는 항목이 보입니다. 이는 dataset 내부의 여러 column 중 어느 column이 En 값 예측에 가장 중요한지 중요도 순으로 보여주는 것인데, 이 값들은 training이 진행됨에 따라 변하기도 하고 새로 나타나기도 합니다. 보시면 우리가 우겨넣은 column은 분명히 En, id, shapeM과 atoms 4개 밖에 없었는데, 이 메뉴에 보여지는 column 이름들은 atoms_0, atoms_18 등 새로운 column 이름들이 많이 나온 것을 보실 수 있습니다. 즉, H2O DAI가 내부에서 자동으로 feature engineering을 수행한 것이지요.

이제 experiment, 즉 training이 끝났습니다. Train된 model을 이용하여 prediction을 해보도록 하겠습니다.
'Score on Another Dataset'이라는 항목을 클릭한 뒤, 아까 따로 잘라놓았던 50줄짜리 pubChem_test1.xlsx를 선택합니다. 그러면 이 excel 표의 shapeM과 atoms column을 분석하고 아까 만들어진 model에 대입한 뒤, En 값이 어떨지 예측을 하여 그 결과를 csv 파일로 download 시켜줍니다.
실제 En 값과 H2O DAI가 예측한 En 값을 비교하여 그래프로 만들면 아래와 같습니다. 나름 꽤 그럴싸한 예측을 했다는 것을 보실 수 있습니다.

이렇게 H2O DAI는 data scientist의 업무 부담을 크게 줄여주고 더 빠른 feature engineering과 modeling을 통해 화학, 생명, 제조 등의 연구실에서도 유용하게 사용하실 수 있습니다.
피드 구독하기:
글 (Atom)