2020년 2월 4일 화요일
WML-CE (Watson Machine Learning Community Edition, 구 PowerAI) 1.6.2 설치
IBM POWER 아키텍처 (POWER8/9, 즉 ppc64le)에서 tensorflow나 caffe 등 각종 deep learning framework을 제공해주던 무료 toolkit인 기존 PowerAI는 이미 다들 아시는 바와 같이 이름을 Watson Machine Learning Community Edition (WML-CE)로 변경했습니다. 물론 여전히 무료입니다만, 기존처럼 *.rpm이나 *.deb의 형태로 제공하지 않고 아예 별도의 conda channel을 만들어서 conda에서 설치하도록 하고 있습니다. 따라서, Anaconda가 prerequsite이며, 2020년 2월 초 현재 최신 버전인 1.6.2는 Ananconda 2019.07을 prerequisite으로 하고 있습니다. 아예 모든 것이 설치된 docker image 형태로도 제공됩니다.
자세한 원본 manual은 아래 link를 참조하시면 됩니다.
https://www.ibm.com/support/knowledgecenter/SS5SF7_1.6.2/navigation/wmlce_planning.html
https://www.ibm.com/support/knowledgecenter/SS5SF7_1.6.2/navigation/wmlce_install.html
여기서는 ppc64le Ubuntu 18.04, Python 3.7.5 환경에서 WML-CE 1.6.2를 설치해보겠습니다.
cecuser@p1234-kvm1:~$ lsb_release -a
No LSB modules are available.
Distributor ID: Ubuntu
Description: Ubuntu 18.04.2 LTS
Release: 18.04
Codename: bionic
먼저 Anaconda 2019.07 버전을 download 받아 설치합니다.
cecuser@p1234-kvm1:~$ wget https://repo.continuum.io/archive/Anaconda3-2019.07-Linux-ppc64le.sh
cecuser@p1234-kvm1:~$ chmod a+x Anaconda3-2019.07-Linux-ppc64le.sh
cecuser@p1234-kvm1:~$ ./Anaconda3-2019.07-Linux-ppc64le.sh
설치가 끝나면 ~/.bashrc를 수행하여 conda init을 수행합니다.
cecuser@p1234-kvm1:~$ . ~/.bashrc
이제 IBM이 제공하는 WML-CE를 위한 conda channel을 conda에 추가합니다.
(base) cecuser@p1234-kvm1:~$ conda config --prepend channels https://public.dhe.ibm.com/ibmdl/export/pub/software/server/ibm-ai/conda/
Conda 가상 환경을 생성하여 거기에 WML-CE를 설치하기를 권장하므로, 먼저 python 3.7.5 환경으로 wmlce_env라는 이름의 virtual env를 만듭니다.
(base) cecuser@p1234-kvm1:~$ conda create --name wmlce_env python=3.7.5
...
The following NEW packages will be INSTALLED:
_libgcc_mutex pkgs/main/linux-ppc64le::_libgcc_mutex-0.1-main
ca-certificates pkgs/main/linux-ppc64le::ca-certificates-2020.1.1-0
certifi pkgs/main/linux-ppc64le::certifi-2019.11.28-py37_0
libedit pkgs/main/linux-ppc64le::libedit-3.1.20181209-hc058e9b_0
libffi pkgs/main/linux-ppc64le::libffi-3.2.1-hf62a594_5
libgcc-ng pkgs/main/linux-ppc64le::libgcc-ng-8.2.0-h822a55f_1
libstdcxx-ng pkgs/main/linux-ppc64le::libstdcxx-ng-8.2.0-h822a55f_1
ncurses pkgs/main/linux-ppc64le::ncurses-6.1-he6710b0_1
openssl pkgs/main/linux-ppc64le::openssl-1.1.1d-h7b6447c_3
pip pkgs/main/linux-ppc64le::pip-20.0.2-py37_1
python pkgs/main/linux-ppc64le::python-3.7.5-h4134adf_0
readline pkgs/main/linux-ppc64le::readline-7.0-h7b6447c_5
setuptools pkgs/main/linux-ppc64le::setuptools-45.1.0-py37_0
sqlite pkgs/main/linux-ppc64le::sqlite-3.30.1-h7b6447c_0
tk pkgs/main/linux-ppc64le::tk-8.6.8-hbc83047_0
wheel pkgs/main/linux-ppc64le::wheel-0.34.1-py37_0
xz pkgs/main/linux-ppc64le::xz-5.2.4-h14c3975_4
zlib pkgs/main/linux-ppc64le::zlib-1.2.11-h7b6447c_3
Proceed ([y]/n)? y
...
Downloading and Extracting Packages
ca-certificates-2020 | 125 KB | ##################################### | 100%
setuptools-45.1.0 | 511 KB | ##################################### | 100%
pip-20.0.2 | 1.7 MB | ##################################### | 100%
sqlite-3.30.1 | 2.3 MB | ##################################### | 100%
wheel-0.34.1 | 50 KB | ##################################### | 100%
python-3.7.5 | 32.5 MB | ##################################### | 100%
openssl-1.1.1d | 3.8 MB | ##################################### | 100%
certifi-2019.11.28 | 156 KB | ##################################### | 100%
Preparing transaction: done
Verifying transaction: done
Executing transaction: done
#
# To activate this environment, use
#
# $ conda activate wmlce_env
#
# To deactivate an active environment, use
#
# $ conda deactivate
이제 conda 가상환경인 wmlce_env를 활성화합니다.
(base) cecuser@p1234-kvm1:~$ conda activate wmlce_env
이제 WML-CE를 설치합니다. Conda package 이름은 여전히 PowerAI로 되어 있는 점에 유의하십시요. 아래와 같이 하면 tensorflow와 caffe2, pytorch 등 WML-CE에서 지원하는 모든 deep learning framework이 한꺼번에 다 설치됩니다. 혹시 WML-CE 전체를 설치하지 않고 가령 PyTorch만 설치하려 할 때는 그냥 conda install pytorch 라고 하시면 됩니다.
아래의 명령어로 어느어느 package들이 설치되는지 보여드리기 위해 긴 ouput을 일부러 다 옮겨 붙였습니다.
(wmlce_env) cecuser@p1234-kvm1:~$ conda install powerai
....
The following NEW packages will be INSTALLED:
_py-xgboost-mutex ibmdl/export/pub/software/server/ibm-ai/conda/linux-ppc64le::_py-xgboost-mutex-1.0-gpu_590.g8a21f75
_pytorch_select ibmdl/export/pub/software/server/ibm-ai/conda/linux-ppc64le::_pytorch_select-2.0-gpu_20238.g1faf942
_tflow_select ibmdl/export/pub/software/server/ibm-ai/conda/linux-ppc64le::_tflow_select-2.1.0-gpu_840.g50de12c
absl-py pkgs/main/linux-ppc64le::absl-py-0.7.1-py37_0
apex ibmdl/export/pub/software/server/ibm-ai/conda/linux-ppc64le::apex-0.1.0_1.6.2-py37_596.g1eb5c77
asn1crypto pkgs/main/linux-ppc64le::asn1crypto-1.3.0-py37_0
astor pkgs/main/linux-ppc64le::astor-0.7.1-py37_0
atomicwrites pkgs/main/linux-ppc64le::atomicwrites-1.3.0-py37_1
attrs pkgs/main/noarch::attrs-19.3.0-py_0
blas pkgs/main/linux-ppc64le::blas-1.0-openblas
bokeh pkgs/main/linux-ppc64le::bokeh-1.4.0-py37_0
boost pkgs/main/linux-ppc64le::boost-1.67.0-py37_4
bzip2 pkgs/main/linux-ppc64le::bzip2-1.0.8-h7b6447c_0
c-ares pkgs/main/linux-ppc64le::c-ares-1.15.0-h7b6447c_1001
caffe ibmdl/export/pub/software/server/ibm-ai/conda/linux-ppc64le::caffe-1.0_1.6.2-5184.g7b10df4
caffe-base ibmdl/export/pub/software/server/ibm-ai/conda/linux-ppc64le::caffe-base-1.0_1.6.2-gpu_py37_5184.g7b10df4
cairo pkgs/main/linux-ppc64le::cairo-1.14.12-h8948797_3
cffi pkgs/main/linux-ppc64le::cffi-1.12.3-py37h2e261b9_0
chardet pkgs/main/linux-ppc64le::chardet-3.0.4-py37_1003
click pkgs/main/linux-ppc64le::click-7.0-py37_0
cloudpickle pkgs/main/noarch::cloudpickle-1.2.2-py_0
coverage pkgs/main/linux-ppc64le::coverage-5.0-py37h7b6447c_0
cryptography pkgs/main/linux-ppc64le::cryptography-2.8-py37h1ba5d50_0
cudatoolkit ibmdl/export/pub/software/server/ibm-ai/conda/linux-ppc64le::cudatoolkit-10.1.243-616.gc122b8b
cudnn ibmdl/export/pub/software/server/ibm-ai/conda/linux-ppc64le::cudnn-7.6.3_10.1-590.g5627c5e
cycler pkgs/main/linux-ppc64le::cycler-0.10.0-py37_0
cytoolz pkgs/main/linux-ppc64le::cytoolz-0.10.1-py37h7b6447c_0
dask pkgs/main/noarch::dask-2.3.0-py_0
dask-core pkgs/main/noarch::dask-core-2.3.0-py_0
dask-cuda ibmdl/export/pub/software/server/ibm-ai/conda/linux-ppc64le::dask-cuda-0.9.1-py37_573.g9af8baa
dask-xgboost ibmdl/export/pub/software/server/ibm-ai/conda/linux-ppc64le::dask-xgboost-0.1.7-py37_579.g8a31cf5
ddl ibmdl/export/pub/software/server/ibm-ai/conda/linux-ppc64le::ddl-1.5.0-py37_1287.gc90c6f2
ddl-tensorflow ibmdl/export/pub/software/server/ibm-ai/conda/linux-ppc64le::ddl-tensorflow-1.5.0-py37_1007.g8dbb51d
decorator pkgs/main/noarch::decorator-4.4.1-py_0
distributed pkgs/main/noarch::distributed-2.3.2-py_1
ffmpeg pkgs/main/linux-ppc64le::ffmpeg-4.0-hcdf2ecd_0
fontconfig pkgs/main/linux-ppc64le::fontconfig-2.13.0-h9420a91_0
freeglut pkgs/main/linux-ppc64le::freeglut-3.0.0-hf484d3e_5
freetype pkgs/main/linux-ppc64le::freetype-2.9.1-h8a8886c_0
fsspec pkgs/main/noarch::fsspec-0.6.2-py_0
future pkgs/main/linux-ppc64le::future-0.17.1-py37_0
gast pkgs/main/linux-ppc64le::gast-0.2.2-py37_0
gflags ibmdl/export/pub/software/server/ibm-ai/conda/linux-ppc64le::gflags-2.2.2-1624.g17209b3
glib pkgs/main/linux-ppc64le::glib-2.63.1-h5a9c865_0
glog ibmdl/export/pub/software/server/ibm-ai/conda/linux-ppc64le::glog-0.3.5-1613.gd054598
google-pasta ibmdl/export/pub/software/server/ibm-ai/conda/linux-ppc64le::google-pasta-0.1.6-py37_564.g04df2d9
graphite2 pkgs/main/linux-ppc64le::graphite2-1.3.13-h23475e2_0
graphsurgeon ibmdl/export/pub/software/server/ibm-ai/conda/linux-ppc64le::graphsurgeon-0.4.1-py37_612.gb2bf6b9
grpcio pkgs/main/linux-ppc64le::grpcio-1.16.1-py37hf8bcb03_1
h5py pkgs/main/linux-ppc64le::h5py-2.8.0-py37h8d01980_0
harfbuzz pkgs/main/linux-ppc64le::harfbuzz-1.8.8-hffaf4a1_0
hdf5 pkgs/main/linux-ppc64le::hdf5-1.10.2-hba1933b_1
heapdict pkgs/main/noarch::heapdict-1.0.1-py_0
hypothesis pkgs/main/linux-ppc64le::hypothesis-3.59.1-py37h39e3cac_0
icu pkgs/main/linux-ppc64le::icu-58.2-h64fc554_1
idna pkgs/main/linux-ppc64le::idna-2.8-py37_0
imageio pkgs/main/linux-ppc64le::imageio-2.6.1-py37_0
importlib_metadata pkgs/main/linux-ppc64le::importlib_metadata-1.4.0-py37_0
jasper pkgs/main/linux-ppc64le::jasper-2.0.14-h07fcdf6_1
jinja2 pkgs/main/noarch::jinja2-2.10.3-py_0
joblib pkgs/main/linux-ppc64le::joblib-0.13.2-py37_0
jpeg pkgs/main/linux-ppc64le::jpeg-9b-hcb7ba68_2
keras-applications pkgs/main/noarch::keras-applications-1.0.8-py_0
keras-preprocessi~ pkgs/main/noarch::keras-preprocessing-1.1.0-py_1
kiwisolver pkgs/main/linux-ppc64le::kiwisolver-1.1.0-py37he6710b0_0
leveldb pkgs/main/linux-ppc64le::leveldb-1.20-hf484d3e_1
libboost pkgs/main/linux-ppc64le::libboost-1.67.0-h46d08c1_4
libgfortran-ng pkgs/main/linux-ppc64le::libgfortran-ng-7.3.0-h822a55f_1
libglu pkgs/main/linux-ppc64le::libglu-9.0.0-hf484d3e_1
libopenblas pkgs/main/linux-ppc64le::libopenblas-0.3.6-h5a2b251_1
libopencv ibmdl/export/pub/software/server/ibm-ai/conda/linux-ppc64le::libopencv-3.4.7-725.g92aa195
libopus pkgs/main/linux-ppc64le::libopus-1.3-h7b6447c_0
libpng pkgs/main/linux-ppc64le::libpng-1.6.37-hbc83047_0
libprotobuf ibmdl/export/pub/software/server/ibm-ai/conda/linux-ppc64le::libprotobuf-3.8.0-577.g45759bb
libtiff pkgs/main/linux-ppc64le::libtiff-4.1.0-h2733197_0
libuuid pkgs/main/linux-ppc64le::libuuid-1.0.3-h1bed415_2
libvpx pkgs/main/linux-ppc64le::libvpx-1.7.0-hf484d3e_0
libxcb pkgs/main/linux-ppc64le::libxcb-1.13-h1bed415_0
libxgboost-base ibmdl/export/pub/software/server/ibm-ai/conda/linux-ppc64le::libxgboost-base-0.90-gpu_590.g8a21f75
libxml2 pkgs/main/linux-ppc64le::libxml2-2.9.9-hea5a465_1
llvmlite pkgs/main/linux-ppc64le::llvmlite-0.29.0-py37hd408876_0
lmdb pkgs/main/linux-ppc64le::lmdb-0.9.22-hf484d3e_1
locket pkgs/main/linux-ppc64le::locket-0.2.0-py37_1
markdown pkgs/main/linux-ppc64le::markdown-3.1.1-py37_0
markupsafe pkgs/main/linux-ppc64le::markupsafe-1.1.1-py37h7b6447c_0
matplotlib pkgs/main/linux-ppc64le::matplotlib-3.1.2-py37_1
matplotlib-base pkgs/main/linux-ppc64le::matplotlib-base-3.1.2-py37h4fdacc2_1
mock pkgs/main/linux-ppc64le::mock-2.0.0-py37_0
more-itertools pkgs/main/noarch::more-itertools-8.0.2-py_0
msgpack-python pkgs/main/linux-ppc64le::msgpack-python-0.6.1-py37hfd86e86_1
nccl ibmdl/export/pub/software/server/ibm-ai/conda/linux-ppc64le::nccl-2.4.8-586.gdba67b7
networkx pkgs/main/linux-ppc64le::networkx-2.2-py37_1
ninja pkgs/main/linux-ppc64le::ninja-1.9.0-py37hfd86e86_0
nomkl pkgs/main/linux-ppc64le::nomkl-3.0-0
numactl ibmdl/export/pub/software/server/ibm-ai/conda/linux-ppc64le::numactl-2.0.12-573.gdf5dc62
numba pkgs/main/linux-ppc64le::numba-0.45.1-py37h962f231_0
numpy pkgs/main/linux-ppc64le::numpy-1.16.6-py37h30dfecb_0
numpy-base pkgs/main/linux-ppc64le::numpy-base-1.16.6-py37h2f8d375_0
olefile pkgs/main/linux-ppc64le::olefile-0.46-py37_0
onnx ibmdl/export/pub/software/server/ibm-ai/conda/linux-ppc64le::onnx-1.5.0-py37_614.gd049fd7
openblas pkgs/main/linux-ppc64le::openblas-0.3.6-1
openblas-devel pkgs/main/linux-ppc64le::openblas-devel-0.3.6-1
opencv ibmdl/export/pub/software/server/ibm-ai/conda/linux-ppc64le::opencv-3.4.7-py37_725.g92aa195
packaging pkgs/main/noarch::packaging-20.1-py_0
pai4sk ibmdl/export/pub/software/server/ibm-ai/conda/linux-ppc64le::pai4sk-1.5.0-py37_1071.g5abf42e
pandas pkgs/main/linux-ppc64le::pandas-1.0.0-py37h0573a6f_0
partd pkgs/main/noarch::partd-1.1.0-py_0
pbr pkgs/main/noarch::pbr-5.4.4-py_0
pciutils ibmdl/export/pub/software/server/ibm-ai/conda/linux-ppc64le::pciutils-3.6.2-571.g2316d13
pcre pkgs/main/linux-ppc64le::pcre-8.43-he6710b0_0
pillow pkgs/main/linux-ppc64le::pillow-6.2.1-py37h0d2faf8_0
pixman pkgs/main/linux-ppc64le::pixman-0.34.0-h1f8d8dc_3
pluggy pkgs/main/linux-ppc64le::pluggy-0.13.1-py37_0
powerai ibmdl/export/pub/software/server/ibm-ai/conda/linux-ppc64le::powerai-1.6.2-615.g1dade79
powerai-license ibmdl/export/pub/software/server/ibm-ai/conda/linux-ppc64le::powerai-license-1.6.2-716.g7081e12
powerai-release ibmdl/export/pub/software/server/ibm-ai/conda/linux-ppc64le::powerai-release-1.6.2-572.gb216c2c
powerai-tools ibmdl/export/pub/software/server/ibm-ai/conda/linux-ppc64le::powerai-tools-1.6.2-565.g97f2c3f
protobuf ibmdl/export/pub/software/server/ibm-ai/conda/linux-ppc64le::protobuf-3.8.0-py37_587.gab45ad3
psutil pkgs/main/linux-ppc64le::psutil-5.5.0-py37h7b6447c_0
py pkgs/main/noarch::py-1.8.1-py_0
py-boost pkgs/main/linux-ppc64le::py-boost-1.67.0-py37h04863e7_4
py-opencv ibmdl/export/pub/software/server/ibm-ai/conda/linux-ppc64le::py-opencv-3.4.7-py37_725.g92aa195
py-xgboost-base ibmdl/export/pub/software/server/ibm-ai/conda/linux-ppc64le::py-xgboost-base-0.90-gpu_py37_590.g8a21f75
py-xgboost-gpu ibmdl/export/pub/software/server/ibm-ai/conda/linux-ppc64le::py-xgboost-gpu-0.90-590.g8a21f75
pycparser pkgs/main/linux-ppc64le::pycparser-2.19-py37_0
pyopenssl pkgs/main/linux-ppc64le::pyopenssl-19.1.0-py37_0
pyparsing pkgs/main/noarch::pyparsing-2.4.6-py_0
pysocks pkgs/main/linux-ppc64le::pysocks-1.7.1-py37_0
pytest pkgs/main/linux-ppc64le::pytest-4.4.2-py37_0
python-dateutil pkgs/main/noarch::python-dateutil-2.8.1-py_0
python-lmdb pkgs/main/linux-ppc64le::python-lmdb-0.94-py37h14c3975_0
pytorch ibmdl/export/pub/software/server/ibm-ai/conda/linux-ppc64le::pytorch-1.2.0-20238.g1faf942
pytorch-base ibmdl/export/pub/software/server/ibm-ai/conda/linux-ppc64le::pytorch-base-1.2.0-gpu_py37_20238.g1faf942
pytz pkgs/main/noarch::pytz-2019.3-py_0
pywavelets pkgs/main/linux-ppc64le::pywavelets-1.1.1-py37h7b6447c_0
pyyaml pkgs/main/linux-ppc64le::pyyaml-5.1.2-py37h7b6447c_0
requests pkgs/main/linux-ppc64le::requests-2.22.0-py37_1
scikit-image pkgs/main/linux-ppc64le::scikit-image-0.15.0-py37he6710b0_0
scikit-learn pkgs/main/linux-ppc64le::scikit-learn-0.21.3-py37h22eb022_0
scipy pkgs/main/linux-ppc64le::scipy-1.3.1-py37he2b7bc3_0
simsearch ibmdl/export/pub/software/server/ibm-ai/conda/linux-ppc64le::simsearch-1.1.0-py37_764.g7c5f6cf
six pkgs/main/linux-ppc64le::six-1.12.0-py37_0
snapml-spark ibmdl/export/pub/software/server/ibm-ai/conda/linux-ppc64le::snapml-spark-1.4.0-py37_942.gc873569
snappy pkgs/main/linux-ppc64le::snappy-1.1.7-h1532aa0_3
sortedcontainers pkgs/main/linux-ppc64le::sortedcontainers-2.1.0-py37_0
spectrum-mpi ibmdl/export/pub/software/server/ibm-ai/conda/linux-ppc64le::spectrum-mpi-10.03-622.gfc88b70
tabulate pkgs/main/linux-ppc64le::tabulate-0.8.2-py37_0
tblib pkgs/main/noarch::tblib-1.6.0-py_0
tensorboard ibmdl/export/pub/software/server/ibm-ai/conda/linux-ppc64le::tensorboard-1.15.0-py37_ab7f72a_3645.gf4f525e
tensorflow ibmdl/export/pub/software/server/ibm-ai/conda/linux-ppc64le::tensorflow-1.15.0-gpu_py37_841.g50de12c
tensorflow-base ibmdl/export/pub/software/server/ibm-ai/conda/linux-ppc64le::tensorflow-base-1.15.0-gpu_py37_590d6ee_64210.g4a039ec
tensorflow-estima~ ibmdl/export/pub/software/server/ibm-ai/conda/linux-ppc64le::tensorflow-estimator-1.15.1-py37_a5f60ce_1351.g50de12c
tensorflow-gpu ibmdl/export/pub/software/server/ibm-ai/conda/linux-ppc64le::tensorflow-gpu-1.15.0-841.g50de12c
tensorflow-large-~ ibmdl/export/pub/software/server/ibm-ai/conda/linux-ppc64le::tensorflow-large-model-support-2.0.2-py37_970.gfa57a9e
tensorflow-probab~ ibmdl/export/pub/software/server/ibm-ai/conda/linux-ppc64le::tensorflow-probability-0.8.0-py37_b959b26_2686.g50de12c
tensorflow-servin~ ibmdl/export/pub/software/server/ibm-ai/conda/linux-ppc64le::tensorflow-serving-api-1.15.0-py37_748217e_5094.g89559ef
tensorrt ibmdl/export/pub/software/server/ibm-ai/conda/linux-ppc64le::tensorrt-6.0.1.5-py37_612.gb2bf6b9
termcolor pkgs/main/linux-ppc64le::termcolor-1.1.0-py37_1
tf_cnn_benchmarks ibmdl/export/pub/software/server/ibm-ai/conda/linux-ppc64le::tf_cnn_benchmarks-1.15-gpu_py37_1374.g5e94b18
toolz pkgs/main/noarch::toolz-0.10.0-py_0
torchtext ibmdl/export/pub/software/server/ibm-ai/conda/linux-ppc64le::torchtext-0.4.0-py37_578.g5bf3960
torchvision-base ibmdl/export/pub/software/server/ibm-ai/conda/linux-ppc64le::torchvision-base-0.4.0-gpu_py37_593.g80f339d
tornado pkgs/main/linux-ppc64le::tornado-6.0.3-py37h7b6447c_0
tqdm pkgs/main/noarch::tqdm-4.32.1-py_0
typing pkgs/main/linux-ppc64le::typing-3.6.4-py37_0
uff ibmdl/export/pub/software/server/ibm-ai/conda/linux-ppc64le::uff-0.6.5-py37_612.gb2bf6b9
urllib3 pkgs/main/linux-ppc64le::urllib3-1.25.8-py37_0
werkzeug pkgs/main/noarch::werkzeug-0.15.4-py_0
wrapt pkgs/main/linux-ppc64le::wrapt-1.11.2-py37h7b6447c_0
yaml pkgs/main/linux-ppc64le::yaml-0.1.7-h1bed415_2
zict pkgs/main/noarch::zict-1.0.0-py_0
zipp pkgs/main/noarch::zipp-0.6.0-py_0
zstd pkgs/main/linux-ppc64le::zstd-1.3.7-h0b5b093_0
Proceed ([y]/n)? y
...
아래와 같이 설치된 package들을 각각 확인하시면 됩니다.
(wmlce_env) cecuser@p1234-kvm1:~$ conda list | grep tensorflow
ddl-tensorflow 1.5.0 py37_1007.g8dbb51d https://public.dhe.ibm.com/ibmdl/export/pub/software/server/ibm-ai/conda
tensorflow 1.15.0 gpu_py37_841.g50de12c https://public.dhe.ibm.com/ibmdl/export/pub/software/server/ibm-ai/conda
tensorflow-base 1.15.0 gpu_py37_590d6ee_64210.g4a039ec https://public.dhe.ibm.com/ibmdl/export/pub/software/server/ibm-ai/conda
tensorflow-estimator 1.15.1 py37_a5f60ce_1351.g50de12c https://public.dhe.ibm.com/ibmdl/export/pub/software/server/ibm-ai/conda
tensorflow-gpu 1.15.0 841.g50de12c https://public.dhe.ibm.com/ibmdl/export/pub/software/server/ibm-ai/conda
tensorflow-large-model-support 2.0.2 py37_970.gfa57a9e https://public.dhe.ibm.com/ibmdl/export/pub/software/server/ibm-ai/conda
tensorflow-probability 0.8.0 py37_b959b26_2686.g50de12c https://public.dhe.ibm.com/ibmdl/export/pub/software/server/ibm-ai/conda
tensorflow-serving-api 1.15.0 py37_748217e_5094.g89559ef https://public.dhe.ibm.com/ibmdl/export/pub/software/server/ibm-ai/conda
(wmlce_env) cecuser@p1234-kvm1:~$ conda list | grep caffe
caffe 1.0_1.6.2 5184.g7b10df4 https://public.dhe.ibm.com/ibmdl/export/pub/software/server/ibm-ai/conda
caffe-base 1.0_1.6.2 gpu_py37_5184.g7b10df4 https://public.dhe.ibm.com/ibmdl/export/pub/software/server/ibm-ai/conda
(wmlce_env) cecuser@p1234-kvm1:~$ conda list | grep pytorch
_pytorch_select 2.0 gpu_20238.g1faf942 https://public.dhe.ibm.com/ibmdl/export/pub/software/server/ibm-ai/conda
pytorch 1.2.0 20238.g1faf942 https://public.dhe.ibm.com/ibmdl/export/pub/software/server/ibm-ai/conda
pytorch-base 1.2.0 gpu_py37_20238.g1faf942 https://public.dhe.ibm.com/ibmdl/export/pub/software/server/ibm-ai/conda
WML-CE에서는 NCCL와 CUDNN 등 base facility도 함께 제공되어 설치됩니다.
(wmlce_env) cecuser@p1234-kvm1:~$ conda list | grep -i nccl
nccl 2.4.8 586.gdba67b7 https://public.dhe.ibm.com/ibmdl/export/pub/software/server/ibm-ai/conda
(wmlce_env) cecuser@p1234-kvm1:~$ conda list | grep -i dnn
cudnn 7.6.3_10.1 590.g5627c5e https://public.dhe.ibm.com/ibmdl/export/pub/software/server/ibm-ai/conda
아래와 같이 python에서 import를 해보셔도 됩니다.
(wmlce_env) cecuser@p1234-kvm1:~$ python
Python 3.7.5 (default, Oct 25 2019, 16:29:01)
[GCC 7.3.0] :: Anaconda, Inc. on linux
Type "help", "copyright", "credits" or "license" for more information.
>>> import caffe
>>> import tensorflow as tf
2020-02-03 21:31:31.095570: I tensorflow/stream_executor/platform/default/dso_loader.cc:44] Successfully opened dynamic library libcudart.so.10.1
>>>
다만 "conda install powerai" 만으로는 RAPIDS까지 설치되지는 않기 때문에, 아래와 같이 별도로 설치하셔야 합니다.
(wmlce_env) cecuser@p1234-kvm1:~$ conda install powerai-rapids
...
The following NEW packages will be INSTALLED:
arrow-cpp ibmdl/export/pub/software/server/ibm-ai/conda/linux-ppc64le::arrow-cpp-0.15.1-py37_603.g702c836
boost-cpp pkgs/main/linux-ppc64le::boost-cpp-1.67.0-h14c3975_4
brotli pkgs/main/linux-ppc64le::brotli-1.0.6-he6710b0_0
cudf ibmdl/export/pub/software/server/ibm-ai/conda/linux-ppc64le::cudf-0.9.0-cuda10.1_py37_626.gddcad2d
cuml ibmdl/export/pub/software/server/ibm-ai/conda/linux-ppc64le::cuml-0.9.1-cuda10.1_py37_605.gfe9e07b
cupy ibmdl/export/pub/software/server/ibm-ai/conda/linux-ppc64le::cupy-6.2.0-py37_567.g0f1e2ef
cython pkgs/main/linux-ppc64le::cython-0.29.14-py37he6710b0_0
dask-cudf ibmdl/export/pub/software/server/ibm-ai/conda/linux-ppc64le::dask-cudf-0.9.0-py37_575.g0416adf
dlpack ibmdl/export/pub/software/server/ibm-ai/conda/linux-ppc64le::dlpack-0.2-562.g28dffd9
double-conversion ibmdl/export/pub/software/server/ibm-ai/conda/linux-ppc64le::double-conversion-3.1.5-564.g4b43169
fastavro ibmdl/export/pub/software/server/ibm-ai/conda/linux-ppc64le::fastavro-0.22.4-py37_562.g9525976
fastrlock pkgs/main/linux-ppc64le::fastrlock-0.4-py37he6710b0_0
grpc-cpp ibmdl/export/pub/software/server/ibm-ai/conda/linux-ppc64le::grpc-cpp-1.23.0-568.g4f71a06
libcudf ibmdl/export/pub/software/server/ibm-ai/conda/linux-ppc64le::libcudf-0.9.0-cuda10.1_609.g113236a
libcuml ibmdl/export/pub/software/server/ibm-ai/conda/linux-ppc64le::libcuml-0.9.1-cuda10.1_576.ga304a0a
libevent ibmdl/export/pub/software/server/ibm-ai/conda/linux-ppc64le::libevent-2.1.8-561.ge1d98f7
libnvstrings ibmdl/export/pub/software/server/ibm-ai/conda/linux-ppc64le::libnvstrings-0.9.0-cuda10.1_570.ga04797c
librmm ibmdl/export/pub/software/server/ibm-ai/conda/linux-ppc64le::librmm-0.9.0-cuda10.1_567.gff1b1a1
lz4-c pkgs/main/linux-ppc64le::lz4-c-1.8.1.2-h14c3975_0
nvstrings ibmdl/export/pub/software/server/ibm-ai/conda/linux-ppc64le::nvstrings-0.9.0-cuda10.1_py37_580.gdbb6546
parquet-cpp ibmdl/export/pub/software/server/ibm-ai/conda/linux-ppc64le::parquet-cpp-1.5.1-579.g6eecc60
powerai-rapids ibmdl/export/pub/software/server/ibm-ai/conda/linux-ppc64le::powerai-rapids-1.6.2-560.ga7c5a47
pyarrow ibmdl/export/pub/software/server/ibm-ai/conda/linux-ppc64le::pyarrow-0.15.1-py37_609.g3a6717a
re2 ibmdl/export/pub/software/server/ibm-ai/conda/linux-ppc64le::re2-2019.08.01-561.gef92448
rmm ibmdl/export/pub/software/server/ibm-ai/conda/linux-ppc64le::rmm-0.9.0-cuda10.1_py37_569.g04c75fb
thrift-cpp ibmdl/export/pub/software/server/ibm-ai/conda/linux-ppc64le::thrift-cpp-0.12.0-580.gf96fa62
uriparser ibmdl/export/pub/software/server/ibm-ai/conda/linux-ppc64le::uriparser-0.9.3-561.g7465fef
The following packages will be DOWNGRADED:
pandas 1.0.0-py37h0573a6f_0 --> 0.24.2-py37he6710b0_0
Proceed ([y]/n)? y
...
만약 GPU가 없는 시스템에서 tensorflow나 pytorch 등을 사용하시고자 할 때는, 아래와 같이 CPU-only 버전의 WML-CE를 설치하시면 됩니다.
(wmlce_env) cecuser@p1234-kvm1:~$ conda install powerai-cpu
2019년 6월 14일 금요일
H2O Driverless AI의 NLP (자연어처리) demo
H2O Driverless AI의 최신 버전에서는 자연어처리(NLP, Natural Language Processing) 기능도 제공합니다. Expert tab을 눌러 보면 tensorflow를 사용할 수 있게 되어있지요. 이번 posting에서는 H2O Driverless AI의 자연어처리를 이용한 예측 모델을 만들어보겠습니다.
먼저, dataset은 아래에서 제공하는 항공사 고객 만족도 data를 사용했습니다. 이 csv 표에는 여러가지 column이 난잡하게 들어가 있는데, 여기서는 airline_sentiment라는 column의 'positive'냐 'negative'냐라는 값을 예측해 보겠습니다. 이를 위해 사용되는 column은 딱 하나, text라는 column입니다. 이는 이 항공사를 사용한 고객이 올린 tweeter의 문장입니다. 나머지는 다 불필요한 column로서 출발일자, 출발지 등등의 data입니다.
Dataset은 다음과 같이 download 받을 수 있습니다.
root@63e8f0c0eac9:/home# wget https://www.figure-eight.com/wp-content/uploads/2016/03/Airline-Sentiment-2-w-AA.csv
이 dataset 중에서 10%를 test data로 떼어내겠습니다. 이를 위해서는 아래의 간단한 python code를 이용합니다.
root@63e8f0c0eac9:/home# vi split_sentiment.py
import numpy as np
import pandas as pd
from sklearn import model_selection
al = pd.read_csv("Airline-Sentiment-2-w-AA.csv", encoding='ISO-8859-1')
train_al, test_al = model_selection.train_test_split(al, test_size=0.1, random_state=2018)
train_al.to_csv("train_airline_sentiment.csv", index=False)
test_al.to_csv("test_airline_sentiment.csv", index=False)
이를 아래와 같이 수행하면 9대1로 나누어진 train 및 test csv 파일이 각각 생성됩니다.
root@63e8f0c0eac9:/home# python split_sentiment.py
root@63e8f0c0eac9:/home# ls -ltr *.csv
-rw-r--r-- 1 root root 3704908 Apr 26 2018 Airline-Sentiment-2-w-AA.csv
-rw-r--r-- 1 root root 3368890 Jun 14 02:43 train_airline_sentiment.csv
-rw-r--r-- 1 root root 376891 Jun 14 02:43 test_airline_sentiment.csv
root@63e8f0c0eac9:/home# wc -l *.csv
232 Airline-Sentiment-2-w-AA.csv
1486 test_airline_sentiment.csv
13388 train_airline_sentiment.csv
15106 total
이 중 train_airline_sentiment.csv의 구조를 살짝 보겠습니다. Header 포함해서 딱 2줄만 보시지요. 여기서의 text는 @USAirways this is crazy. Haven't spoken to a human yet. There has to be a better way. http://t.co/mEOAlCIPdD 인데, 이런 tweet을 남긴 고객의 평가는 당연히 negative였습니다.
root@63e8f0c0eac9:/home# head -n 2 train_airline_sentiment.csv
_unit_id,_golden,_unit_state,_trusted_judgments,_last_judgment_at,airline_sentiment,airline_sentiment:confidence,negativereason,negativereason:confidence,airline,airline_sentiment_gold,name,negativereason_gold,retweet_count,text,tweet_coord,tweet_created,tweet_id,tweet_location,user_timezone
681462771,False,finalized,3,2/25/15 3:38,negative,1.0,Customer Service Issue,1.0,US Airways,,djxsv,,0,@USAirways this is crazy. Haven't spoken to a human yet. There has to be a better way. http://t.co/mEOAlCIPdD,,2/18/15 8:27,5.68084e+17,"Charlottesville, VA.",Eastern Time (US & Canada)
그에 비해 test_airline_sentiment.csv의 (header 제외하고) 첫줄을 보면, 이 고객이 남긴 tweet 문장은 @USAirways We did. @AmericanAir said to open one with you, too. 인데 평가는 negative였습니다. 이것만 보면 tweet 문장과 postive/negative의 관계가 이해는 가지 않는군요.
root@63e8f0c0eac9:/home# head -n 2 test_airline_sentiment.csv
_unit_id,_golden,_unit_state,_trusted_judgments,_last_judgment_at,airline_sentiment,airline_sentiment:confidence,negativereason,negativereason:confidence,airline,airline_sentiment_gold,name,negativereason_gold,retweet_count,text,tweet_coord,tweet_created,tweet_id,tweet_location,user_timezone
681461790,False,finalized,3,2/25/15 1:47,negative,1.0,Lost Luggage,1.0,US Airways,,LindsaySweeting,,0,"@USAirways We did. @AmericanAir said to open one with you, too.",,2/21/15 13:32,5.69248e+17,"Asheville, NC",Central Time (US & Canada)
아무튼 이 dataset을 H2O Driverless AI에 다음과 같이 올립니다.

올리고나서 training dataset의 'Details' 항목을 보면 다음과 같이 각 column들의 구조와 맨 위의 20줄 값을 볼 수 있습니다. 아래 화면은 우리가 training의 대상으로 삼을 text column에 cursor를 올려 놓은 화면입니다.

이제 predict 메뉴를 이용해서 training에 들어갑니다.

예측하고자 하는 대상인 Target column은 당연히 'airline_sentiment' column을 택하면 됩니다.


그리고 이번에는 'text' column 외에는 모두 필요없으므로 상단의 'Drop columns...' 메뉴에서 'text' 이외의 모든 column을 선택합니다.
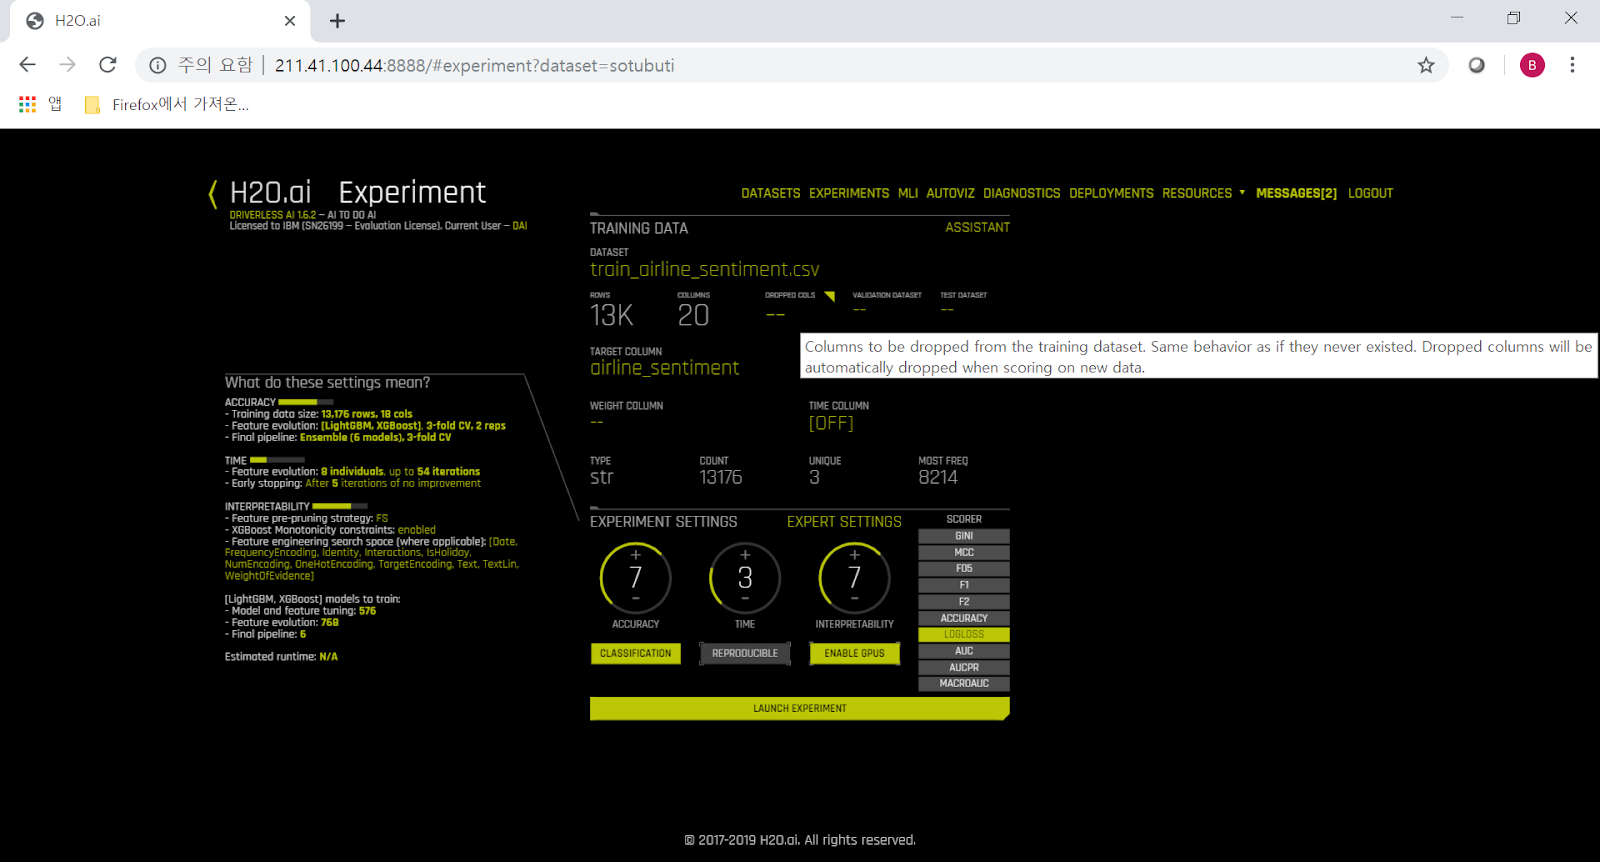

이번 training에서는 NLP를 위해 tensorflow를 사용하므로, Expert Tab에서 tensorflow를 ON 시켜줍니다.


그리고 dial을 8(Accuracy)-5(Time)-8(Interpretation)에 놓고 'Launch Experiment' 버튼을 눌러 training을 시작합니다.

칼럼이 딱 하나, 'text' 뿐이므로 기본 feature는 1개 뿐이지만, training이 진행되면서 H2O DAI의 자랑인 auto feature engineering에 의해 feature 수는 점점 늘어납니다. 21% 진행시에는 76개 feature에 대해 2188개의 model을 train 중이고, 45% 진행시에는 247개 feature, 90% 진행시에는 818개 feature에 대해 train 중인 것을 보실 수 있습니다.


Training이 끝나면 다음과 같이 'Score on another dataset'을 눌러 아까 준비해둔 test dataset을 선택합니다.


Download prediction을 하면 이 dataset에 대한 'airline_sentiment' column의 예측치를 보실 수 있습니다.
쉽게 비교를 해보기 위해서는 'Diagnose Model on New Dataset' 메뉴를 사용하셔도 됩니다. 여기서도 아까 준비해둔 test dataset을 선택하면 되는데, 그러면 GINI, MCC 등 각종 scoring 기준에 따른 정확도가 평가되어 나올 뿐만 아니라 오른쪽 상단의 'Download predictions' 버튼을 누르면 예측치와 함께 test dataset 속의 실제값도 함께 나와 비교하기 좋습니다.


이 예측치는 negative, neutral, positive의 3개 값에 대한 classification이므로 각 값일 확률이 세개의 column에 나오고, 네번째 column에는 test dataset 속의 실제값이 제시되는 것입니다. 이대로는 한눈에 보기 어려우니, 간단한 excel 함수 IFS와 countif 등을 써서 아래와 같이 정리했습니다.

즉, 제대로 맟춘 것은 1464개 중 1160개로서, 적중률은 79% 입니다. 이 정도면 매우 훌륭합니다.
Accuracy-Time-Interpretability의 dial을 10-10-4로 높여보면 어떨까요 ? 일단 생성되는 feature들과 model들의 수가 확 늘어납니다.

그리고 당연히 그 정확도도 향상됩니다. 이번에는 83%까지 나오네요. Dataset이 더 커지면 그 정확도도 더 늘어날 것으로 예상할 수 있습니다.

단, 이렇게 NLP를 사용한 예측 모델을 만들 때는 H2O DAI의 또다른 자랑거리인 XAI (혹은 MLI, 즉 eXplainable AI)는 제대로 사용하실 수가 없습니다. 'Interpret this model'을 눌러보면 다음과 같은 error가 나오는데, 충분히 이해가 가는 일이지요.
Model interpretation failed.
Traceback (most recent call last):
File "/root/dai-1.6.2-linux-ppc64le/python/lib/python3.6/site-packages/h2oai/procedures.py", line 3297, in do_mli_api
dt_tree_depth, config_overrides, logger=logger, id_columns=id_columns)
File "h2oaicore/mli.py", line 807, in h2oaicore.mli.do_mli
File "h2oaicore/mli.py", line 1485, in h2oaicore.mli.input_check
h2oaicore.systemutils.InvalidDataError: All input columns are of type string and have cardinality > max allowed(25), which is currently not useful for MLI
2018년 9월 10일 월요일
ILSVRC2012 dataset 중 강아지 사진만을 이용한 짧은 TF inception v3 테스트 방법
다음과 같이 benchmark/tensorflow 디렉토리에 들어가서, exec_img.sh를 수행하시면 됩니다. 이때 아래와 같이 nohup으로 수행하시면 도중에 연결 세션이 끊어져도 백그라운드로 job은 계속 수행될 뿐만 아니라, 수행 기록이 nohup.out에도 기록되므로 편리하실 것입니다.
[root@ac922 tensorflow]# pwd
/home/files/ilsvrc12/tensorflow
[root@ac922 tensorflow]# ls
benchmark exec_img.sh models nohup.out.final.tf output_final
[root@ac922 tensorflow]# nohup ./exec_img.sh &
위와 같이 exec_img.sh를 한번 수행하시면 그 속에서 아래와 같이 ./models/run_model.sh 스크립트가 batch_size=128로 순차적으로 GPU 개수 4, 2, 1에 대해서 각각 1번씩 총 3번을 수행합니다. 각 수행이 끝날 때마다 time 명령에 의해 수행 시간에 걸린 시간이 nohup.out에 기록됩니다. 원래 NVIDIA에서 준 script를 수행해보니, 매번 exec을 수행할 때마다 output directory를 새로 만들어야 제대로 수행되는 것 같아 아래와 같이 exec 수행시마다 ouput directory를 다른 이름으로 옮기고 새로 output을 만드는 문장을 추가했습니다.
mkdir output
time exec tf inception3 128 4 0
mv output output4gpu
mkdir output
time exec tf inception3 128 2 0
mv output output2gpu
mkdir output
time exec tf inception3 128 1 0
mv output output1gpu
결과 확인은 ouput directory에 쌓이는 아래의 log를 보셔도 되고, nohup.out을 보셔도 됩니다. 이 script에서는 total images/sec이 python 자체적으로 합산되어 표시되므로 그것을 기록하시면 됩니다. 단, python에서 계산되는 Elapsed Time은 일부 로직이 잘못되어 분:초 단위만 맞고 시간 단위는 9시간으로 나오니 그건 무시하십시요.
이 테스트를 위해 필요한 python code 및 model file을 아래 google drive에 올려 놓았습니다.
https://drive.google.com/open?id=1DNn-Nv4rlOiv2NLqk6Y0j2ANlJjw9VP6
그리고 이 테스트를 위해 필요한 종류별로 labeling된 강아지 사진을 tfrecord 포맷으로 만든 dataset을 아래 google drive에 올려 놓았습니다.
https://drive.google.com/open?id=1rQcxAWeNbByy0Yooj6IbROyVRsdQPn5-
위 dataset을 추출하고 tfrecord로 포맷하는 과정은 아래에 정리되어 있습니다.
http://hwengineer.blogspot.com/2018/04/ilsvrc2012imgtraint3tar-training-dataset.html
** 별첨 : tfrecord file들의 이름과 size
[root@ac922 ilsvrc12]# cd tfrecord/
[root@ac922 tfrecord]# ls -l | head
total 1509860
-rw-rw-r--. 1 1001 1001 6920780 Apr 11 19:20 train-00000-of-00120
-rw-rw-r--. 1 1001 1001 6422535 Apr 11 19:20 train-00001-of-00120
-rw-rw-r--. 1 1001 1001 6959007 Apr 11 19:21 train-00002-of-00120
-rw-rw-r--. 1 1001 1001 6885268 Apr 11 19:21 train-00003-of-00120
-rw-rw-r--. 1 1001 1001 5969364 Apr 11 19:21 train-00004-of-00120
-rw-rw-r--. 1 1001 1001 6143260 Apr 11 19:21 train-00005-of-00120
-rw-rw-r--. 1 1001 1001 6123517 Apr 11 19:21 train-00006-of-00120
-rw-rw-r--. 1 1001 1001 8585788 Apr 11 19:21 train-00007-of-00120
-rw-rw-r--. 1 1001 1001 6149957 Apr 11 19:21 train-00008-of-00120
[root@ac922 tfrecord]# ls -l | tail
-rw-rw-r--. 1 1001 1001 24124729 Apr 11 19:20 validation-00022-of-00032
-rw-rw-r--. 1 1001 1001 23741822 Apr 11 19:20 validation-00023-of-00032
-rw-rw-r--. 1 1001 1001 24759230 Apr 11 19:20 validation-00024-of-00032
-rw-rw-r--. 1 1001 1001 25225023 Apr 11 19:20 validation-00025-of-00032
-rw-rw-r--. 1 1001 1001 25273559 Apr 11 19:20 validation-00026-of-00032
-rw-rw-r--. 1 1001 1001 26820464 Apr 11 19:20 validation-00027-of-00032
-rw-rw-r--. 1 1001 1001 24115323 Apr 11 19:20 validation-00028-of-00032
-rw-rw-r--. 1 1001 1001 24459085 Apr 11 19:20 validation-00029-of-00032
-rw-rw-r--. 1 1001 1001 25246485 Apr 11 19:20 validation-00030-of-00032
-rw-rw-r--. 1 1001 1001 23561132 Apr 11 19:20 validation-00031-of-00032
1475 .
2018년 8월 22일 수요일
PowerAI 5.2 tensorflow의 LMS 테스트
Caffe와는 달리 tensorflow는 그 자체가 python library이므로, tensorflow에서 LMS를 사용하기 위해서는 python coding이 필요하며, 그를 위한 가이드를 이전 posting에 올린 바 있습니다. 이번에는 그렇게 적용된 example code를 이용하여 LMS가 주는 효과를 테스트 해보겠습니다.
먼저, PowerAI에서 제공되는 High Performance Model을 아래 script를 이용해서 원하는 위치로 copy합니다.
[[bsyu@p57a22 ~]$ /opt/DL/tensorflow-performance-models/bin/tensorflow-install-models ~/models
여기서 제공되는 tf_cnn_benchmarks.py를 다음과 같이 이용해서 간단한 테스트가 가능합니다. 이 python code에서는 data_dir을 지정하지 않을 경우 synthetic data, 즉 임의로 합성한 가상 data를 이용해서 training을 합니다. 여기서 image_size=6944라는 것은 6944 * 6944 = 약 48 megapixel의 이미지 크기를 지정하는 것입니다. Color image의 경우 1 pixel이 3 byte이고, black/white image인 경우 1 pixel = 1 byte입니다. 아래와 같이 image_size=6944로 주면 140MB 정도 되는 큰 이미지이므로, batch_size=1이라고 해도 당연히 out-of-memory error가 나는 것을 보실 수 있습니다.
[bsyu@p57a22 tf_cnn_benchmarks]$ python tf_cnn_benchmarks.py --batch_size=1 --num_batches=30 --model=googlenet –num_gpus=1 --image_size=6944
TensorFlow: 1.8
Model: googlenet
Dataset: imagenet (synthetic)
Mode: training
...
ResourceExhaustedError (see above for traceback): OOM when allocating tensor with shape[1,480,868,868] and type float on /job:localhost/replica:0/task:0/device:GPU:0 by allocator GPU_0_bfc
[[Node: v0/tower_0/cg/incept_v10_1/concat = ConcatV2[N=4, T=DT_FLOAT, Tidx=DT_INT32, _device="/job:localhost/replica:0/task:0/device:GPU:0"](v0/tower_0/cg/incept_v10_1/conv9/Relu, v0/tower_0/cg/incept_v10_1/conv11/Relu, v0/tower_0/cg/incept_v10_1/conv13/Relu, v0/tower_0/cg/incept_v10_1/conv14/Relu, v0/tower_0/cg/incept_v10_8/concat/axis)]]
Hint: If you want to see a list of allocated tensors when OOM happens, add report_tensor_allocations_upon_oom to RunOptions for current allocation info.
환경에 따라 다르겠습니다만, googlenet model에서 16GB의 GPU memory로 처리가능한 image 크기는 대략 5000^2 즉 25 megapixel 정도로 알려져 있습니다. 그러나 LMS를 이용하면 더 큰 크기도 error 없이 처리가 가능합니다.
[bsyu@p57a22 tf_cnn_benchmarks]$ time CUDA_VISIBLE_DEVICES=2 python tf_cnn_benchmarks.py --batch_size=1 --num_batches=30 --model=googlenet --num_gpus=1 --lms=True --image_size=8192
TensorFlow: 1.8
Model: googlenet
Dataset: imagenet (synthetic)
…
I0820 08:25:47.774425 70366577052288 tf_logging.py:116] [LMS][0] n_tensors: all tensors
I0820 08:25:47.774482 70366577052288 tf_logging.py:116] [LMS][0] lb: 1
I0820 08:25:49.216497 70366577052288 tf_logging.py:116] [LMS][0] Edited model is valid and logically equivalent to the original one
I0820 08:25:49.216679 70366577052288 tf_logging.py:116] [LMS][0] Added 227 ops into the model
I0820 08:25:49.216750 70366577052288 tf_logging.py:116] [LMS][0] Editing model for LMS, took: 1442.2016143798828 ms
I0820 08:25:49.216805 70366577052288 tf_logging.py:116] [LMS][0] 83 tensors will be swapped out(in) to(from) the host
…
----------------------------------------------------------------
total images/sec: 0.21
----------------------------------------------------------------
real 3m44.957s
저 위 message에서 보시듯이, tensorflow LMS에서도 일부 tuning 가능한 요소가 있습니다.
n_tensors :
host 서버의 RAM으로 swap-out 했다가 필요시 swap-in 할 tensor의 개수입니다. 많을 수록 GPU memory를 적게 쓰지만, 대신 training 성능은 나빠집니다. Default 값은 -1로서, 일단 모든 tensor를 다 swap 대상으로 삼은 뒤, 초기 estimation 후 자동으로 적절한 값을 산정하여 사용합니다.
lb :
Lower Bound의 약자로서, 미리 swap-in 시켜놓을 tensor의 개수입니다. 많을 수록 성능은 좋아지겠지만, 대신 GPU memory를 많이 쓰게 됩니다. Default 값은 1입니다.
이 tf_cnn_benchmarks.py에서는 저 tuning 요소들도 parameter로 받아들이게 되어 있습니다. 다음과 같이 lb를 3으로 해서 해보겠습니다. 확실히 좀 더 빨라지는 것을 보실 수 있습니다.
[bsyu@p57a22 tf_cnn_benchmarks]$ time CUDA_VISIBLE_DEVICES=2 python tf_cnn_benchmarks.py --batch_size=1 --num_batches=30 --model=googlenet --num_gpus=1 --lms=True --image_size=8192 --lms_lb=3
…
I0821 07:06:26.437339 70366510140032 tf_logging.py:116] [LMS][0] Editing model for LMS
I0821 07:06:26.437493 70366510140032 tf_logging.py:116] [LMS][0] n_tensors: all tensors
I0821 07:06:26.437549 70366510140032 tf_logging.py:116] [LMS][0] lb: 3
I0821 07:06:27.872007 70366510140032 tf_logging.py:116] [LMS][0] Edited model is valid and logically equivalent to the original one
I0821 07:06:27.872166 70366510140032 tf_logging.py:116] [LMS][0] Added 227 ops into the model
I0821 07:06:27.872235 70366510140032 tf_logging.py:116] [LMS][0] Editing model for LMS, took: 1434.621810913086 ms
I0821 07:06:27.872288 70366510140032 tf_logging.py:116] [LMS][0] 83 tensors will be swapped out(in) to(from) the host
…
----------------------------------------------------------------
total images/sec: 0.23
----------------------------------------------------------------
real 3m28.466s
참고로 n_tensors는 일부러 크게 키워도 여전히 83개의 tensor만을 처리하고, 또 lb를 5로 주니 LMS에서도 out-of-memory error가 나더군요.
2018년 8월 21일 화요일
Session-based tensorflow training에 LMS 적용한 MNIST python code
이 MNIST training을 위한 tensorflow python code는 원래 /opt/DL/tensorflow/lib/python3.6/site-packages/tensorflow/examples/tutorials/mnist/mnist_deep.py 에 LMS를 적용한 것입니다. 보시다시피 graph라는 단어가 나오기 때문에 Session-based tensorflow training이고, 그에 따라 LMS가 적용되어 있습니다.
실제 LMS 구현을 위한 부분은 굵은 파란색으로 표시했습니다. 의외로 간단하다는 것을 보실 수 있습니다. 해당 부분들을 제거하면 그냥 LMS 없는 평범한 MNIST training code가 됩니다.
이 example code도 PowerAI 5.2를 설치하면 딸려오는 /opt/DL/tensorflow/lib/python3.6/site-packages/tensorflow/contrib/lms/examples/mnist_deep_lms.py 을 그대로 가져다 놓은 것입니다.
실제 수행해보면 다음과 같이 동작하며, 27개의 tensor가 host 서버의 RAM으로 swap-out/in 되는 것을 보실 수 있습니다.
[bsyu@p57a22 examples]$ CUDA_VISIBLE_DEVICES=3 python mnist_deep_lms.py
INFO:tensorflow:[LMS][0] n_tensors: all tensors
INFO:tensorflow:[LMS][0] lb: 3
INFO:tensorflow:[LMS][0] Edited model is valid and logically equivalent to the original one
INFO:tensorflow:[LMS][0] Added 53 ops into the model
INFO:tensorflow:[LMS][0] Editing model for LMS, took: 179.62193489074707 ms
INFO:tensorflow:[LMS][0] 27 tensors will be swapped out(in) to(from) the host
Saving graph to: /tmp/tmpz5ozc9jr
2018-08-20 21:37:47.954552: I tensorflow/core/common_runtime/gpu/gpu_device.cc:1356] Found device 0 with properties:
....
[bsyu@p57a22 doc]$ cd /opt/DL/tensorflow/lib/python3.6/site-packages/tensorflow/contrib/lms/examples/
[bsyu@p57a22 examples]$ source /opt/DL/tensorflow/bin/tensorflow-activate
[bsyu@p57a22 examples]$ cat /opt/DL/tensorflow/lib/python3.6/site-packages/tensorflow/contrib/lms/examples/mnist_deep_lms.py
# Copyright 2015 The TensorFlow Authors. All Rights Reserved.
#
# Licensed under the Apache License, Version 2.0 (the "License");
# you may not use this file except in compliance with the License.
# You may obtain a copy of the License at
#
# http://www.apache.org/licenses/LICENSE-2.0
#
# Unless required by applicable law or agreed to in writing, software
# distributed under the License is distributed on an "AS IS" BASIS,
# WITHOUT WARRANTIES OR CONDITIONS OF ANY KIND, either express or implied.
# See the License for the specific language governing permissions and
# limitations under the License.
# ==============================================================================
"""A deep MNIST classifier using convolutional layers.
See extensive documentation at
https://www.tensorflow.org/get_started/mnist/pros
"""
# Disable linter warnings to maintain consistency with tutorial.
# pylint: disable=invalid-name
# pylint: disable=g-bad-import-order
from __future__ import absolute_import
from __future__ import division
from __future__ import print_function
import argparse
import sys
import tempfile
from tensorflow.examples.tutorials.mnist import input_data
import tensorflow as tf
tf.logging.set_verbosity(tf.logging.INFO)
FLAGS = None
def deepnn(x):
"""deepnn builds the graph for a deep net for classifying digits.
Args:
x: an input tensor with the dimensions (N_examples, 784), where 784 is the
number of pixels in a standard MNIST image.
Returns:
A tuple (y, keep_prob). y is a tensor of shape (N_examples, 10), with values
equal to the logits of classifying the digit into one of 10 classes (the
digits 0-9). keep_prob is a scalar placeholder for the probability of
dropout.
"""
# Reshape to use within a convolutional neural net.
# Last dimension is for "features" - there is only one here, since images are
# grayscale -- it would be 3 for an RGB image, 4 for RGBA, etc.
with tf.name_scope('reshape'):
x_image = tf.reshape(x, [-1, 28, 28, 1])
# First convolutional layer - maps one grayscale image to 32 feature maps.
with tf.name_scope('conv1'):
W_conv1 = weight_variable([5, 5, 1, 32])
b_conv1 = bias_variable([32])
h_conv1 = tf.nn.relu(conv2d(x_image, W_conv1) + b_conv1)
# Pooling layer - downsamples by 2X.
with tf.name_scope('pool1'):
h_pool1 = max_pool_2x2(h_conv1)
# Second convolutional layer -- maps 32 feature maps to 64.
with tf.name_scope('conv2'):
W_conv2 = weight_variable([5, 5, 32, 64])
b_conv2 = bias_variable([64])
h_conv2 = tf.nn.relu(conv2d(h_pool1, W_conv2) + b_conv2)
# Second pooling layer.
with tf.name_scope('pool2'):
h_pool2 = max_pool_2x2(h_conv2)
# Fully connected layer 1 -- after 2 round of downsampling, our 28x28 image
# is down to 7x7x64 feature maps -- maps this to 1024 features.
with tf.name_scope('fc1'):
W_fc1 = weight_variable([7 * 7 * 64, 1024])
b_fc1 = bias_variable([1024])
h_pool2_flat = tf.reshape(h_pool2, [-1, 7 * 7 * 64])
h_fc1 = tf.nn.relu(tf.matmul(h_pool2_flat, W_fc1) + b_fc1)
# Dropout - controls the complexity of the model, prevents co-adaptation of
# features.
with tf.name_scope('dropout'):
keep_prob = tf.placeholder(tf.float32)
h_fc1_drop = tf.nn.dropout(h_fc1, keep_prob)
# Map the 1024 features to 10 classes, one for each digit
with tf.name_scope('fc2'):
W_fc2 = weight_variable([1024, 10])
b_fc2 = bias_variable([10])
y_conv = tf.matmul(h_fc1_drop, W_fc2) + b_fc2
return y_conv, keep_prob
def conv2d(x, W):
"""conv2d returns a 2d convolution layer with full stride."""
return tf.nn.conv2d(x, W, strides=[1, 1, 1, 1], padding='SAME')
def max_pool_2x2(x):
"""max_pool_2x2 downsamples a feature map by 2X."""
return tf.nn.max_pool(x, ksize=[1, 2, 2, 1],
strides=[1, 2, 2, 1], padding='SAME')
def weight_variable(shape):
"""weight_variable generates a weight variable of a given shape."""
initial = tf.truncated_normal(shape, stddev=0.1)
return tf.Variable(initial)
def bias_variable(shape):
"""bias_variable generates a bias variable of a given shape."""
initial = tf.constant(0.1, shape=shape)
return tf.Variable(initial)
def main(_):
# Import data
mnist = input_data.read_data_sets(FLAGS.data_dir)
# Create the model
x = tf.placeholder(tf.float32, [None, 784])
# Define loss and optimizer
y_ = tf.placeholder(tf.int64, [None])
# Build the graph for the deep net
y_conv, keep_prob = deepnn(x)
with tf.name_scope('loss'):
cross_entropy = tf.losses.sparse_softmax_cross_entropy(
labels=y_, logits=y_conv)
cross_entropy = tf.reduce_mean(cross_entropy)
with tf.name_scope('adam_optimizer'):
train_step = tf.train.AdamOptimizer(1e-4).minimize(cross_entropy)
with tf.name_scope('accuracy'):
correct_prediction = tf.equal(tf.argmax(y_conv, 1), y_)
correct_prediction = tf.cast(correct_prediction, tf.float32)
accuracy = tf.reduce_mean(correct_prediction)
# Enable Large Model Support
from tensorflow.contrib.lms import LMS
lms_model = LMS({'adam_optimizer'},
excl_scopes = {'loss', 'accuracy', 'dropout'},
lb=3)
lms_model.run(tf.get_default_graph())
graph_location = tempfile.mkdtemp()
print('Saving graph to: %s' % graph_location)
train_writer = tf.summary.FileWriter(graph_location)
train_writer.add_graph(tf.get_default_graph())
with tf.Session() as sess:
sess.run(tf.global_variables_initializer())
for i in range(20000):
batch = mnist.train.next_batch(50)
if i % 100 == 0:
train_accuracy = accuracy.eval(feed_dict={
x: batch[0], y_: batch[1], keep_prob: 1.0})
print('step %d, training accuracy %g' % (i, train_accuracy))
train_step.run(feed_dict={x: batch[0], y_: batch[1], keep_prob: 0.5})
print('test accuracy %g' % accuracy.eval(feed_dict={
x: mnist.test.images, y_: mnist.test.labels, keep_prob: 1.0}))
if __name__ == '__main__':
parser = argparse.ArgumentParser()
parser.add_argument('--data_dir', type=str,
default='/tmp/tensorflow/mnist/input_data',
help='Directory for storing input data')
FLAGS, unparsed = parser.parse_known_args()
tf.app.run(main=main, argv=[sys.argv[0]] + unparsed)
실제 LMS 구현을 위한 부분은 굵은 파란색으로 표시했습니다. 의외로 간단하다는 것을 보실 수 있습니다. 해당 부분들을 제거하면 그냥 LMS 없는 평범한 MNIST training code가 됩니다.
이 example code도 PowerAI 5.2를 설치하면 딸려오는 /opt/DL/tensorflow/lib/python3.6/site-packages/tensorflow/contrib/lms/examples/mnist_deep_lms.py 을 그대로 가져다 놓은 것입니다.
실제 수행해보면 다음과 같이 동작하며, 27개의 tensor가 host 서버의 RAM으로 swap-out/in 되는 것을 보실 수 있습니다.
[bsyu@p57a22 examples]$ CUDA_VISIBLE_DEVICES=3 python mnist_deep_lms.py
...
INFO:tensorflow:[LMS][0] Editing model for LMSINFO:tensorflow:[LMS][0] n_tensors: all tensors
INFO:tensorflow:[LMS][0] lb: 3
INFO:tensorflow:[LMS][0] Edited model is valid and logically equivalent to the original one
INFO:tensorflow:[LMS][0] Added 53 ops into the model
INFO:tensorflow:[LMS][0] Editing model for LMS, took: 179.62193489074707 ms
INFO:tensorflow:[LMS][0] 27 tensors will be swapped out(in) to(from) the host
Saving graph to: /tmp/tmpz5ozc9jr
2018-08-20 21:37:47.954552: I tensorflow/core/common_runtime/gpu/gpu_device.cc:1356] Found device 0 with properties:
....
step 19900, training accuracy 1
test accuracy 0.9918
test accuracy 0.9918
[bsyu@p57a22 doc]$ cd /opt/DL/tensorflow/lib/python3.6/site-packages/tensorflow/contrib/lms/examples/
[bsyu@p57a22 examples]$ source /opt/DL/tensorflow/bin/tensorflow-activate
# Copyright 2015 The TensorFlow Authors. All Rights Reserved.
#
# Licensed under the Apache License, Version 2.0 (the "License");
# you may not use this file except in compliance with the License.
# You may obtain a copy of the License at
#
# http://www.apache.org/licenses/LICENSE-2.0
#
# Unless required by applicable law or agreed to in writing, software
# distributed under the License is distributed on an "AS IS" BASIS,
# WITHOUT WARRANTIES OR CONDITIONS OF ANY KIND, either express or implied.
# See the License for the specific language governing permissions and
# limitations under the License.
# ==============================================================================
"""A deep MNIST classifier using convolutional layers.
See extensive documentation at
https://www.tensorflow.org/get_started/mnist/pros
"""
# Disable linter warnings to maintain consistency with tutorial.
# pylint: disable=invalid-name
# pylint: disable=g-bad-import-order
from __future__ import absolute_import
from __future__ import division
from __future__ import print_function
import argparse
import sys
import tempfile
from tensorflow.examples.tutorials.mnist import input_data
import tensorflow as tf
tf.logging.set_verbosity(tf.logging.INFO)
FLAGS = None
def deepnn(x):
"""deepnn builds the graph for a deep net for classifying digits.
Args:
x: an input tensor with the dimensions (N_examples, 784), where 784 is the
number of pixels in a standard MNIST image.
Returns:
A tuple (y, keep_prob). y is a tensor of shape (N_examples, 10), with values
equal to the logits of classifying the digit into one of 10 classes (the
digits 0-9). keep_prob is a scalar placeholder for the probability of
dropout.
"""
# Reshape to use within a convolutional neural net.
# Last dimension is for "features" - there is only one here, since images are
# grayscale -- it would be 3 for an RGB image, 4 for RGBA, etc.
with tf.name_scope('reshape'):
x_image = tf.reshape(x, [-1, 28, 28, 1])
# First convolutional layer - maps one grayscale image to 32 feature maps.
with tf.name_scope('conv1'):
W_conv1 = weight_variable([5, 5, 1, 32])
b_conv1 = bias_variable([32])
h_conv1 = tf.nn.relu(conv2d(x_image, W_conv1) + b_conv1)
# Pooling layer - downsamples by 2X.
with tf.name_scope('pool1'):
h_pool1 = max_pool_2x2(h_conv1)
# Second convolutional layer -- maps 32 feature maps to 64.
with tf.name_scope('conv2'):
W_conv2 = weight_variable([5, 5, 32, 64])
b_conv2 = bias_variable([64])
h_conv2 = tf.nn.relu(conv2d(h_pool1, W_conv2) + b_conv2)
# Second pooling layer.
with tf.name_scope('pool2'):
h_pool2 = max_pool_2x2(h_conv2)
# Fully connected layer 1 -- after 2 round of downsampling, our 28x28 image
# is down to 7x7x64 feature maps -- maps this to 1024 features.
with tf.name_scope('fc1'):
W_fc1 = weight_variable([7 * 7 * 64, 1024])
b_fc1 = bias_variable([1024])
h_pool2_flat = tf.reshape(h_pool2, [-1, 7 * 7 * 64])
h_fc1 = tf.nn.relu(tf.matmul(h_pool2_flat, W_fc1) + b_fc1)
# Dropout - controls the complexity of the model, prevents co-adaptation of
# features.
with tf.name_scope('dropout'):
keep_prob = tf.placeholder(tf.float32)
h_fc1_drop = tf.nn.dropout(h_fc1, keep_prob)
# Map the 1024 features to 10 classes, one for each digit
with tf.name_scope('fc2'):
W_fc2 = weight_variable([1024, 10])
b_fc2 = bias_variable([10])
y_conv = tf.matmul(h_fc1_drop, W_fc2) + b_fc2
return y_conv, keep_prob
def conv2d(x, W):
"""conv2d returns a 2d convolution layer with full stride."""
return tf.nn.conv2d(x, W, strides=[1, 1, 1, 1], padding='SAME')
def max_pool_2x2(x):
"""max_pool_2x2 downsamples a feature map by 2X."""
return tf.nn.max_pool(x, ksize=[1, 2, 2, 1],
strides=[1, 2, 2, 1], padding='SAME')
def weight_variable(shape):
"""weight_variable generates a weight variable of a given shape."""
initial = tf.truncated_normal(shape, stddev=0.1)
return tf.Variable(initial)
def bias_variable(shape):
"""bias_variable generates a bias variable of a given shape."""
initial = tf.constant(0.1, shape=shape)
return tf.Variable(initial)
def main(_):
# Import data
mnist = input_data.read_data_sets(FLAGS.data_dir)
# Create the model
x = tf.placeholder(tf.float32, [None, 784])
# Define loss and optimizer
y_ = tf.placeholder(tf.int64, [None])
# Build the graph for the deep net
y_conv, keep_prob = deepnn(x)
with tf.name_scope('loss'):
cross_entropy = tf.losses.sparse_softmax_cross_entropy(
labels=y_, logits=y_conv)
cross_entropy = tf.reduce_mean(cross_entropy)
with tf.name_scope('adam_optimizer'):
train_step = tf.train.AdamOptimizer(1e-4).minimize(cross_entropy)
with tf.name_scope('accuracy'):
correct_prediction = tf.equal(tf.argmax(y_conv, 1), y_)
correct_prediction = tf.cast(correct_prediction, tf.float32)
accuracy = tf.reduce_mean(correct_prediction)
# Enable Large Model Support
from tensorflow.contrib.lms import LMS
lms_model = LMS({'adam_optimizer'},
excl_scopes = {'loss', 'accuracy', 'dropout'},
lb=3)
lms_model.run(tf.get_default_graph())
graph_location = tempfile.mkdtemp()
print('Saving graph to: %s' % graph_location)
train_writer = tf.summary.FileWriter(graph_location)
train_writer.add_graph(tf.get_default_graph())
with tf.Session() as sess:
sess.run(tf.global_variables_initializer())
for i in range(20000):
batch = mnist.train.next_batch(50)
if i % 100 == 0:
train_accuracy = accuracy.eval(feed_dict={
x: batch[0], y_: batch[1], keep_prob: 1.0})
print('step %d, training accuracy %g' % (i, train_accuracy))
train_step.run(feed_dict={x: batch[0], y_: batch[1], keep_prob: 0.5})
print('test accuracy %g' % accuracy.eval(feed_dict={
x: mnist.test.images, y_: mnist.test.labels, keep_prob: 1.0}))
if __name__ == '__main__':
parser = argparse.ArgumentParser()
parser.add_argument('--data_dir', type=str,
default='/tmp/tensorflow/mnist/input_data',
help='Directory for storing input data')
FLAGS, unparsed = parser.parse_known_args()
tf.app.run(main=main, argv=[sys.argv[0]] + unparsed)
피드 구독하기:
글 (Atom)